e-ManualTopSite mapHelpGlossary

Category Top

What This Machine Can Do

Overview of This Function

Things You Must Do Before Using This Machine

Flow of Sending Operations

Canceling a Job

Specifying Destinations

Specifying Destinations Using the Address Book (Local)

Specifying Destinations Using the Address Book (Remote)

Specifying Destinations Using the Address Book (LDAP Server)

Specifying Destinations Using the One-Touch Buttons

Specifying a Destination by Entering an E-mail Address

Specifying Destinations by Entering an I-Fax Address

Specifying a Destination by Entering a File Server

Specifying a File Server Using the Keyboard

Specifying a File Server Using the Browse Key (Windows (SMB))

Specifying a File Server Using the Search Host Key (Windows (SMB))

Storing in a Mail Box

Storing in an Advanced Box

Setting Your Personal Folder as the Destination

Setting Your Own E-Mail Address as the Destination

Setting Cc and Bcc Addresses

Checking/Editing/Deleting the Information for a Destination

Favorite Settings

Recalling Previous Send Jobs

Storing New Addresses

Registering an E-Mail Address

Registering an I-Fax Address

Registering a File Server Address

Registering a Group Address

Registering an Address Obtained via an LDAP Server

Registering an Advanced Box Address

Storing/Editing/Deleting One-Touch Buttons

Checking/Editing/Deleting a Stored Address

Registering/Editing/Deleting Favorite Settings

Registering/Editing Favorite Settings

Checking Favorite Settings

Editing a Name/Comment

Deleting Favorite Settings

Assigning Shortcuts

Switching the Color Mode

Setting the Resolution

Specifying/Registering Scan Sizes

Setting the File Format

Trace and Smooth

Compact PDF or XPS

Searchable PDF/XPS/OOXML

Adding a Digital Signature to a PDF or XPS

Encrypting PDF Files

Reader Extensions

Applying a Policy

Selecting the Original Type

2-Sided Original

Book → 2 Pages

Different Size Originals

Adjusting Density Manually

Adjusting Background Density

Adjusting the Image Sharpness

Changing the Zoom Ratio

Erase Frame

Job Build

Delayed Send

Preview

Finished Stamp

Job Done Notice

File Name

Subject/Message

Reply-to

Setting E-Mail Priority

Receiving I-Fax Documents

Processing Received Documents

Receiving Documents

Setting the Memory Lock Mode

Forwarding Received Documents

Available Paper Sizes

When Problems Occur

Questions & Answers

Top » Scan and Send » Specifying Destinations » Storing in a Mail Box
Storing in a Mail Box
08KY-0YA
You can store a scanned document in a mail box. If you include a mail box as one of the destinations to which you are sending your document, the document is stored in the selected mail box for later use. Documents stored in a mail box can be printed and sent to other destinations.
IMPORTANT
Documents that are scanned using a specified scan size (Custom, Long Original, or Free Size), cannot be stored in a mail box.
With the current default setting, documents stored in a mail box are automatically deleted after three days. However, you can change this setting in [Set/Register Mail Boxes]. (See "Mail Box Settings.")

1.
Press [Scan and Send] → [New Destination].
2.
Press [Store in Mail Box].
3.
Select the desired mail box → press [OK].
[URL Send]:
If you want to send a link to a mail box via e-mail, press [URL Send].
A message <Mail box Incoming Notice> is inserted into the body of the e-mail message stating the link to the mail box.
NOTE
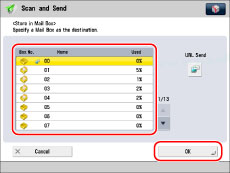
Only one mail box can be specified as the destination at a time.
To be able to send a link to a mail box via e-mail, it is necessary to first register an e-mail address for the mail box. (See "Mail Box Settings.")
If the URL Send mode is set, you send to a group address that includes a mail box as a destination.