e-ManualTopSite mapHelpGlossary

Category Top

What This Machine Can Do

Overview of This Function

Things You Must Do Before Using This Machine

Flow of Sending Operations

Canceling a Job

Specifying Destinations

Specifying Destinations Using the Address Book (Local)

Specifying Destinations Using the Address Book (Remote)

Specifying Destinations Using the Address Book (LDAP Server)

Specifying Destinations Using the One-Touch Buttons

Specifying a Destination by Entering an E-mail Address

Specifying Destinations by Entering an I-Fax Address

Specifying a Destination by Entering a File Server

Specifying a File Server Using the Keyboard

Specifying a File Server Using the Browse Key (Windows (SMB))

Specifying a File Server Using the Search Host Key (Windows (SMB))

Storing in a Mail Box

Storing in an Advanced Box

Setting Your Personal Folder as the Destination

Setting Your Own E-Mail Address as the Destination

Setting Cc and Bcc Addresses

Checking/Editing/Deleting the Information for a Destination

Favorite Settings

Recalling Previous Send Jobs

Storing New Addresses

Registering an E-Mail Address

Registering an I-Fax Address

Registering a File Server Address

Registering a Group Address

Registering an Address Obtained via an LDAP Server

Registering an Advanced Box Address

Storing/Editing/Deleting One-Touch Buttons

Checking/Editing/Deleting a Stored Address

Registering/Editing/Deleting Favorite Settings

Registering/Editing Favorite Settings

Checking Favorite Settings

Editing a Name/Comment

Deleting Favorite Settings

Assigning Shortcuts

Switching the Color Mode

Setting the Resolution

Specifying/Registering Scan Sizes

Setting the File Format

Trace and Smooth

Compact PDF or XPS

Searchable PDF/XPS/OOXML

Adding a Digital Signature to a PDF or XPS

Encrypting PDF Files

Reader Extensions

Applying a Policy

Selecting the Original Type

2-Sided Original

Book → 2 Pages

Different Size Originals

Adjusting Density Manually

Adjusting Background Density

Adjusting the Image Sharpness

Changing the Zoom Ratio

Erase Frame

Job Build

Delayed Send

Preview

Finished Stamp

Job Done Notice

File Name

Subject/Message

Reply-to

Setting E-Mail Priority

Receiving I-Fax Documents

Processing Received Documents

Receiving Documents

Setting the Memory Lock Mode

Forwarding Received Documents

Available Paper Sizes

When Problems Occur

Questions & Answers

Top » Scan and Send » Specifying Destinations » Specifying Destinations Using the One-Touch Buttons
Specifying Destinations Using the One-Touch Buttons
08KY-0Y3
IMPORTANT
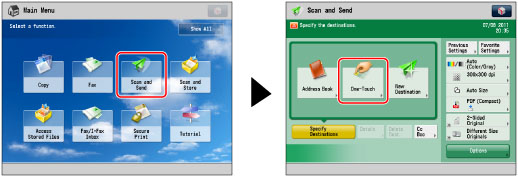
To use this feature, you must first register destinations in one-touch buttons. (See "Storing/Editing/Deleting One-Touch Buttons.")

Specifying Destinations from the One-Touch Buttons of a Client Machine
1.
Press [Scan and Send] → [One-Touch].
2.
Select the desired one-touch button → press [OK].
If you know the three digit number for the one-touch button, you can press → enter the three digit number of the desired one-touch button using - (numeric keys).
NOTE
You can select multiple one-touch buttons.
To cancel the selected one-touch button, press the one-touch button again.
Specifying Destinations from the One-Touch Buttons of a Server Machine
IMPORTANT
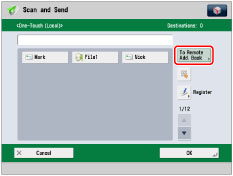
To use the one-touch buttons of a server machine, it is necessary to specify the settings for [Acquire Remote Address Book]. (See "Obtaining the Remote Address Book.")
NOTE
To use the one-touch buttons of a server machine, it is necessary to configure the server machine settings. Set to open the Remote Address Book externally on the server machine. (See "Making the Remote Address Book Open.")

1.
Press [Scan and Send] → [One-Touch].
2.
Press [To Remote Add. Book].
NOTE
To switch the display to the one-touch buttons of a client machine, press [To Local].
3.
Select the desired one-touch button → press [OK].
If you know the three digit number for the one-touch button, you can press → enter the three digit number of the desired one-touch button using - (numeric keys).
NOTE
You can select multiple one-touch buttons.
To deselect a one-touch button, press the one-touch button again.

IMPORTANT
If the server machine is performing the system manager information settings, authentication between the server machine and the client machine is performed while the client machine is browsing the one-touch buttons of the server machine. Authentication is performed by matching the System Manager ID and System PIN set by the server machine and client machine.
The availability of the one-touch buttons of the server machine depends on the status of the system manager information settings for the server machine and client machine, as shown below.
When the server machine is performing the system manager information settings
When the client machine is performing the system manager information settings
The System Manager ID and System PIN for the server machine and client machine match
Can use the one-touch buttons of the server machine
Performing
Performing
Matches
Yes
Does Not Match
No
Not Performing
-
No
Not Performing
Performing
-
Yes
Not Performing
-
Yes
For instructions on setting the System Manager ID and System PIN, see "Specifying the System Manager Settings."
The destinations registered in the one-touch buttons of the server machine are updated in the following times:
When a job has been sent on the client machine
When you press (Reset) on the client machine
When Auto Reset is activated on the client machine
Up to eight machines including this machine can be connected as client machines at the same time to the server machine with the one-touch buttons that are opened externally. However, if the server machine is performing other network communication during this time, the number of machines that can connect may be reduced. If the machine cannot connect, a network error notice is sent.
If an authentication error or a communication timeout due to network congestion occurs between the client and server, you cannot obtain the destinations registered in one-touch buttons of the server machine. You can set the communication timeout in [Communication Timeout] in [Acquire Remote Address Book]. (See "Obtaining the Remote Address Book.")
NOTE
If the display language set for the server machine and client machine is different, the Address Book may have garbled characters.