0KCF-015


|
NOTE
|
|
The operation panel shown above is for the imageRUNNER 1435iF. The available keys or functions vary depending on the model.
|
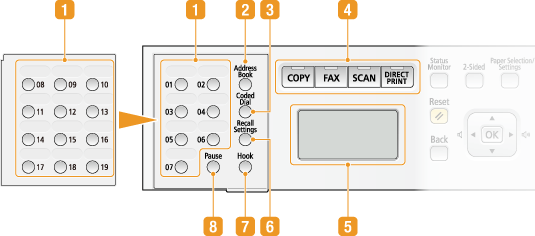
 One-touch keys (imageRUNNER 1435iF / 1435i only)
Press to quickly specify a destination for sending documents. From the keys numbered 01 to 19, select the one in which the desired destination is registered. Keys 08 to 19 are located under the key cover. Registering Destinations in the One-Touch Keys
 [Address Book] key (imageRUNNER 1435iF / 1435i only)
Press to display a list of destinations registered in the Address Book, or to register or edit destinations in the Address Book. Registering the Address Book (imageRUNNER 1435iF / 1435i Only)
 [Coded Dial] key (imageRUNNER 1435iF / 1435i only)
Press to use coded dial numbers. After pressing the key, enter a three-digit number to display the destination registered for that number.
 Function selection keys
Press to activate the copy, fax, scan, or USB Print functions. The fax function is only available on the imageRUNNER 1435iF. Display
 Display
Displays the operation and status screens for copying, scanning, and other functions, as well as the status of the machine and error information. Also, view the screen when specifying the settings of the machine. Display
 [Recall Settings] key (imageRUNNER 1435iF / 1435i only)
Press to recall previously used destinations with settings specified for sending documents. Specifying Previously Used Destinations (Fax) Specifying Previously Used Destinations (E-mail/File Server)
 [Hook] key (imageRUNNER 1435iF only)
Press to dial without lifting up the handset of the external telephone, such as when receiving fax information services. Receiving Fax Information Services
[Scan Size] key (imageRUNNER 1435i only)
Press to select the scanning size of the document to send or store in a USB memory device. Specifying a Scanning Size
 [Pause] key (imageRUNNER 1435iF only)
Press to insert pauses in the fax number. Sending Faxes
[File Format] key (imageRUNNER 1435i only)
Press to select the file format into which documents are converted when they are sent or stored in a USB memory device. Selecting a File Format
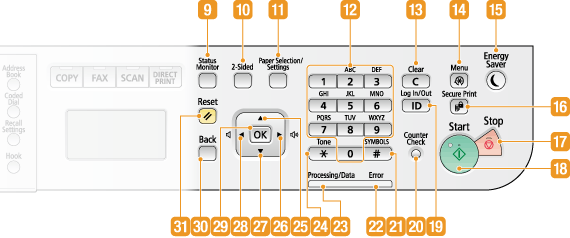
 [Status Monitor] key
Press to check the status of printing or faxing, to view the usage history, or to view the network settings such as the IP address of the machine. You can also check the status of the machine, such as the remaining amounts of paper and toner, or whether any errors occurred. Display
 [2-Sided] key
Press to specify the 2-sided settings such as when you are making copies or scanning documents.
 [Paper Selection/Settings] key
Press to select the paper you want to use, or to set the size and type of paper loaded in the paper source. Specifying Paper Size and Type
 Numeric keys ([0]-[9] keys)
Press to enter numbers and text. Entering Text
 [Clear] key
Press to delete the entered numbers and text.
 [Menu] key
Press to start specifying many of the settings for the machine, such as <Timer Settings> or <Preferences>. Setting Menu List
 [Energy Saver] key
Press to put the machine into sleep mode. The key lights up yellow green when the machine is in sleep mode. Press the key again to exit sleep mode. Entering Sleep Mode
 [Secure Print] key
Press when you start printing secured documents. To print a secured document, press the key, select the secured document to print and enter the PIN that has been set on the computer. Printing a Document Secured by a PIN (Secure Print)
 [Stop] key
Press to cancel copying or scanning documents, and other operations.
 [Start] key
Press to start copying or scanning documents, or printing files from a USB memory device.
 [ID] key
Press the key after entering your logon information such as an ID and PIN. After you finish using the machine, press the key again to log out. Logging on to the Machine
 [Counter Check] key
Press to view the counter values as well as the list of the equipment that is attached or enabled. Viewing the Counter Value Display
 [#] key
Press to enter symbols such as "@" or "/".
 [Error] indicator
Blinks or lights up when an error such as a paper jam occurs.
 [Processing/Data] indicator
Blinks while operations such as sending or printing are being performed. Lights up when there are documents waiting to be processed.
 [*] key
Press to switch the type of text that is entered.
Press to use tone dialing such as when receiving fax information services. Receiving Fax Information Services
 [
[ ] key
] keyWhen specifying settings, press to select the item above the currently selected item.
When changing setting values, press to increase a value.
 [
[ ] key
] keyWhen specifying settings, press to proceed to the next screen.
When entering text, press to move the cursor to the right.
Press to increase the sound volume for the fax communication or a setting value such as density for scanning, copying, etc.
 [
[ ] key
] keyWhen specifying settings, press to select the item below the currently selected item.
When changing setting values, press to decrease a value.
 [
[ ] key
] keyWhen specifying settings, press to return to the previous screen.
When entering text, press to move the cursor to the left.
Press to decrease the sound volume for fax communication or a setting value such as density for scanning, copying, etc.
 [OK] key
Press to apply settings or specified details.
 [Back] key
Press to return to the previous screen. If you press the key when specifying settings, for example, the settings are not applied and the display returns to the previous screen.
 [Reset] key
Press to cancel the settings and restore the previously specified settings.


