0KCF-062
|
NOTE
|
|
Available destinations for file servers are limited to the destinations registered in the Address Book. If no destinations are registered, register destinations in the Address Book before scanning to a file server.
|
1
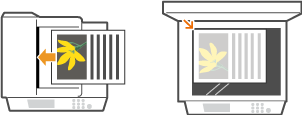
Place the document. Placing Documents

2
Press  .
.
 .
.If a logon screen appears, see Logging on to Authorized Send (imageRUNNER 1435iF / 1435i Only).
3
Use  /
/ to select <File>, and press
  .
.
 /
/ to select <File>, and press
  .
.
NOTE:
If <File> cannot be selected
If <File> cannot be selected
Sending files to file servers is restricted by Authorized Send. Specifying the Authorized Send Settings (imageRUNNER 1435iF / 1435i Only)
4
Select a destination from the Address Book, and press  .
.
 .
.For instructions on how to use the Address Book, see Specifying from Address Book (E-mail/File Server).

NOTE:
If the screen above is not displayed
If the screen above is not displayed
Specifying a destination is restricted and the destination is limited to the folder assigned to you. Proceed to step 5.
Sending a file to your folder
If <Send to Myself> is displayed, you can select this item to send a file to the folder assigned to you. For more information about the settings for sending files to specific folders, see Specifying the Authorized Send Settings (imageRUNNER 1435iF / 1435i Only).

5
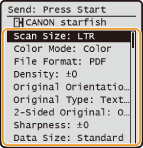
Specify the scan settings as necessary.

If you select JPEG in <File Format>, only one page can be scanned when the document is placed on the platen glass. To scan multiple documents at a time, place them in the feeder. These documents will be scanned and saved as separate files. If you select PDF or TIFF, multiple documents can be scanned and saved into one combined file, regardless of whether documents are placed on the platen glass or in the feeder.
NOTE:
The file name of a scanned document is automatically assigned based on the following format: communication management number (four digits)_sent date and time_document number (three digits).file extension name.
Example of file names: If a one-page document is converted into a PDF file and sent on October 17, 2015 at 07:00:05 P.M.
0045_151017190005_001.pdf
You cannot specify file names yourself.
6
Press  to start scanning.
 to start scanning.
Scanning starts.
If you want to cancel scanning, press 
 <Yes>
<Yes> 
 .
.

 <Yes>
<Yes> 
 .
.NOTE:
If the <File Authentication> screen is displayed
If the <File Authentication> screen is displayed
Enter the user name and password, select <Apply>, and press  . If you are not sure about them, ask your Network Administrator. For more information about this screen, see Specifying the Authorized Send Settings (imageRUNNER 1435iF / 1435i Only).
 . If you are not sure about them, ask your Network Administrator. For more information about this screen, see Specifying the Authorized Send Settings (imageRUNNER 1435iF / 1435i Only).
 When placing documents in the feeder in step 1
When scanning is complete, the documents are scanned to the file server.
 When placing documents on the platen glass in step 1
When scanning is complete, follow the procedure below (except if you selected JPEG as a file format in step 5).
|
1
|
If there are additional pages of documents to be scanned, place the next document on the platen glass, and press
 . .Repeat this step until you finish scanning all of the pages.
When there is only one page to be scanned, proceed to the next step.
|
|
2
|
Select <Start Sending> and press
 . .The documents are scanned to the file server.
|
|
TIPS
|
|
If you always want to scan with the same settings:
If you want to register frequently used setting combinations:
|


