1.
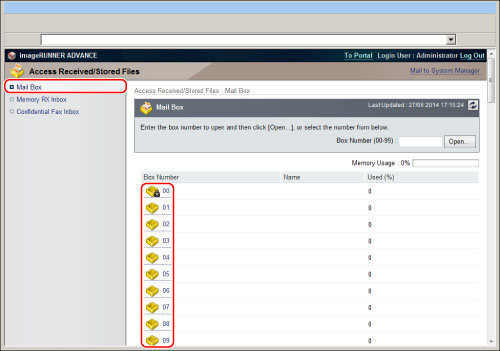
Click [Access Received/Stored Files] → select [Mail Box] → click the number of the desired mail box.
If the desired inbox is set with a PIN, enter the PIN → click [OK].
You can also select the desired mail box by entering its number next to Inbox Number (00-99) → click [Open...].
2.
Change the settings of the selected mail box, or select an operation to be performed for a document in the mail box.
You can change the order of documents displayed by clicking [File Name] or [Date/Time].
To change the settings of the selected mail box:
Click [Settings...] → specify the desired settings → click [OK].
Select the documents that you want to print → click [Print].
Change the print settings → click [Start Printing].
By selecting a document and clicking the buttons under Document Order, you can change the order in which the documents are printed.
[Move to Top]: Moves to the top
[Move Up]: Moves up one level
[Move Down]: Moves down one level
[Move to Bottom]: Moves to the bottom
If you want the documents to be automatically deleted after they are printed, select [Delete File After Printing].
Select the documents that you want to delete → click [Delete] → [OK].
|
IMPORTANT
|
|
Once a document is deleted, it cannot be retrieved.
|
To print a list of the documents:
Click [Print List] → [OK].
To display the details of a document:
Click the document name.
You can also click [

] (Type) to display the document details.
|
NOTE
|
A color icon (  ) is displayed for documents scanned in the Full Color mode. |
For more information on icons, see
"Types of Mail Box Icons" (Scan and Store) and
"Types of Mail Box Icons" (Access Stored Files).
To change the name of a document:
Select the document name → [Change File Name].
Enter the new document name → click [OK].