Top Site mapHelpGlossary Site mapHelpGlossary | |
 Category TopOverview of This FunctionSystem RequirementsBefore You Start the Remote UIOverview of Logging InThe Portal Page of the Remote UI
 Managing JobsManaging Copy/Print JobsManaging Send and Receive JobsManaging Store JobsDevice Status and Information DisplayShutting Down the Machine from the Remote UIRestarting the MachineReflecting SettingsRegistering/Editing Custom Paper TypesSpecifying a File Name for Transmission to a Destination in Favorite SettingsForwarding Settings
 LDAP Server SettingsImport/Export FunctionSaving All Settings Information to a Computer (Export All)Loading All Settings Information (Import All)Settings for Importing/Exporting from a Web ServiceAvailable Settings Information Table with the Import All FunctionSaving Settings Information to a Computer (Export Individually)Loading Settings Information (Import Individually)Installing a Certificate FileDisplaying/Clearing the Message BoardAudit Log ManagementBacking Up Stored DataManaging the Address ListsManaging InboxesManaging Mail BoxesManaging the Memory RX InboxManaging Confidential Fax InboxesPrinting Files Directly From the Remote UI
|
NOTE
|
|
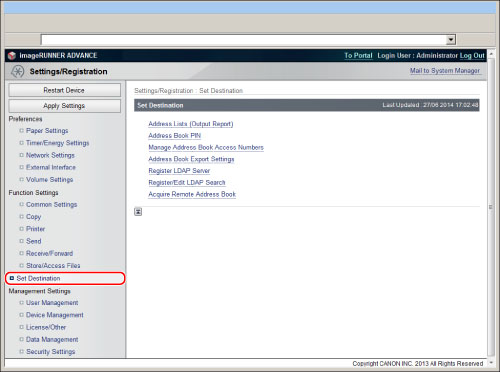
The LDAP server settings are the same as those that you can access from the control panel of the machine by pressing
 (Settings/Registration) → [Set Destination] → [Register LDAP Server]. For instructions on using the control panel to specify LDAP settings, see "LDAP Server Settings." (Settings/Registration) → [Set Destination] → [Register LDAP Server]. For instructions on using the control panel to specify LDAP settings, see "LDAP Server Settings."This operation can only be performed by a user with the required privileges. For more information, see "Setting Administrators."
|
|
Server Name:
|
Enter the name of the LDAP server.
|
|
Server Address:
|
Enter the address of the LDAP server.
|
|
Position to Start Search:
|
Enter the location (the directory in the LDAP server) from which to start searching.
|
|
Use SSL:
|
Set whether to use SSL or not. If you select this check box, SSL will be used.
|
|
Port Number:
|
Enter the port number that the LDAP server uses. The default value for <Port Number> varies depending on whether or not you select [Use SSL]. If necessary, change the default port number setting.
|
|
Max Number of Addresses to Search:
|
Enter the maximum number of addresses to search on the LDAP server.
|
|
Search Timeout:
|
Enter the maximum search time for addresses on the LDAP server before the session times out.
|
|
Login Information:
|
Set the login information. Select the type of login information from the <Login Information> drop-down list → specify the necessary fields. Some fields may be disabled, depending on the type of login information selected.
|
|
NOTE
|
|
For more information on these settings, see "LDAP Server Settings."
|
|
IMPORTANT
|
|
Once an LDAP server's settings are deleted, they cannot be retrieved.
|
| Copyright CANON INC. 2015 | Disclaimers CopyrightTrademarksThird Party SoftwareOffice LocationsUSRM2-5563-00 CopyrightTrademarksThird Party SoftwareOffice LocationsUSRM2-5563-00 |
|---|
 Expand all
 Collapse all
 Search options