Top Site mapHelpGlossary Site mapHelpGlossary | |
 Category TopWhat This Machine Can DoOverview of This FunctionThings You Must Do Before Using This MachineFlow of Sending OperationsCanceling a Job
 Specifying DestinationsSpecifying Destinations Using the Address Book (Local)Specifying Destinations Using the Address Book (Remote)Specifying Destinations Using the Address Book (LDAP Server)Specifying Destinations Using the One-Touch ButtonsSpecifying a Destination by Entering an E-mail AddressSpecifying Destinations by Entering an I-Fax AddressSpecifying a Destination by Entering a File Server
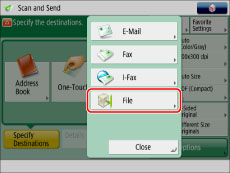
 Specifying a File Server Using the KeyboardSpecifying a File Server Using the Browse Key (Windows (SMB))Specifying a File Server Using the Search Host Key (Windows (SMB))Storing in an Advanced BoxSetting Your Personal Folder as the DestinationSetting Your Own E-Mail Address as the DestinationSetting Cc and Bcc AddressesChecking/Editing/Deleting the Information for a DestinationFavorite SettingsRecalling Previous Send Jobs
 Storing New AddressesRegistering an E-Mail AddressRegistering an I-Fax AddressRegistering a File Server AddressRegistering a Group AddressRegistering an Address Obtained via an LDAP ServerRegistering an Advanced Box AddressStoring/Editing/Deleting One-Touch ButtonsChecking/Editing/Deleting a Stored AddressRegistering/Editing/Deleting Favorite SettingsRegistering/Editing Favorite SettingsChecking Favorite SettingsEditing a Name/CommentDeleting Favorite SettingsAssigning ShortcutsSwitching the Color ModeSetting the ResolutionSpecifying/Registering Scan SizesSetting the File FormatTrace and SmoothCompact PDF or XPSSearchable PDF/OOXMLAdding a Digital Signature to a PDF or XPSEncrypting PDF FilesApplying a PolicySelecting the Original Type2-Sided OriginalBook → 2 PagesDifferent Size OriginalsAdjusting Density ManuallyAdjusting Background DensityAdjusting the Image SharpnessChanging the Zoom RatioErase FrameJob BuildDelayed SendPreviewFinished StampJob Done NoticeFile NameSubject/MessageReply-toSetting E-Mail PriorityPrinting the TX ReportReceiving I-Fax DocumentsProcessing Received DocumentsReceiving DocumentsSetting the Memory Lock ModeForwarding Received DocumentsAvailable Paper SizesWhen Problems OccurQuestions & Answers
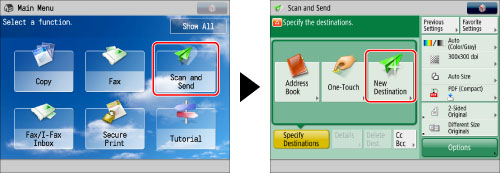
|
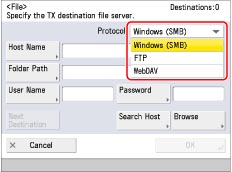
Protocol
|
System Requirements
|
Application
|
|
FTP
|
Solaris 10
Mac OS X 10.7/10.8/10.9
Red Hat Linux 9
|
-
|
|
Windows Server 2003 R2 SP2
|
Internet Information Services 6.0
|
|
|
Windows Vista SP2
Windows Server 2008 SP2
|
Internet Information Services 7.0
|
|
|
Windows Server 2008 R2 SP2
Windows 7
|
Internet Information Services 7.5
|
|
|
Windows 8
Windows Server 2012
|
Internet Information Services 8.0
|
|
|
Windows 8.1
Windows Server 2012 R2
|
Internet Information Services 8.5
|
|
|
Windows(SMB)
|
Windows Server 2003 R2 SP2
Windows Vista SP2
Windows Server 2008 SP2
Windows Server 2008 R2 SP2
Windows 7
Windows 8
Windows 8.1
Windows Server 2012
Windows Server 2012 R2
|
-
|
|
Red Hat Linux 9
Mac OS X 10.6
|
Samba 2.2/3.0
|
|
|
WebDAV
|
Solaris 10
Red Hat Linux 9
Mac OS X Server 10.7/10.8/10.9
|
Apache 2.0
|
|
Windows Server 2003 R2 SP2
|
Internet Information Services 6.0
|
|
|
Windows Vista SP2
Windows Server 2008 SP2
|
Internet Information Services 7.0
|
|
|
Windows Server 2008 R2 SP2
Windows 7 |
Internet Information Services 7.5
|
|
|
Windows 8
Windows Server 2012
|
Internet Information Services 8.0
|
|
|
Windows 8.1
Windows Server 2012 R2
|
Internet Information Services 8.5
|
|
IMPORTANT
|
|
If you are using WebDAV and connect to the Internet using a proxy server, the proxy server must support IPv6.
|
|
Item
|
Description
|
|
Host Name
|
A host name is a name assigned to a host computer that provides services on the network. In this entry box, enter the name of the file server on the network as the destination of the send job.
If you select [FTP] or [WebDAV] as the server protocol, you can also specify a port number after the host name address by entering a colon (:) followed by the port number.
Example: 192.168.100.50:21000
When sending to an IPv6 host, specify the following settings for [Host Name]:
[IPv6 Address]:<Port Number>
Example: [5aed:90a0:bc05:01d2:568a:2fc0:0001:12ee]:21000
Make sure to enter the same port number for the Host Name as the one specified for the FTP server or WebDAV server to which you are sending your documents.
|
|
Folder Path
|
A folder path is a series of characters that signify the location of the folder. Specify a folder in the file server as the destination of the send job.
|
|
User Name
|
The login user name for the file server.
To enter the user name only:
Example: user_name
To enter the user name and the domain name:
Example: domain_name\user_name
To enter a UPN (User Principal Name):
Example: user_name@domain_name.com
|
|
Password
|
The login password for the file server.
|
|
NOTE
|
|
If you select [WebDAV] as the server protocol in [Host Name], the HTTP protocol is used if you specify 'HTTP://' as the scheme at the start of the host name. The SSL + HTTP (HTTPS) protocol is used if you specify 'HTTPS://' as the scheme at the start of the host name. Specifying 'HTTPS://' as the scheme enables SSL communications between the server and the machine. You can confirm whether the SSL server certificate is valid when sending with WebDAV by setting [Confirm SSL Certificate for WebDAV TX] to 'On'.
You can only use UPN (User Principal Name) if you are sending to a computer belonging to a domain operated with Active Directory.
When sending to a file server on the Internet using WebDAV, proxy server settings may be required, depending on the environment of the destination. (See "Settings Common to TCP/IPv4 and TCP/IPv6.")
|
| Copyright CANON INC. 2015 | Disclaimers CopyrightTrademarksThird Party SoftwareOffice LocationsUSRM2-5563-00 CopyrightTrademarksThird Party SoftwareOffice LocationsUSRM2-5563-00 |
|---|
 Expand all
 Collapse all
 Search options