0KCF-037
 |
|
The Address Book enables you to specify a destination by selecting from a list of registered destinations or by searching by name for destinations with recipient names. You can also directly specify a destination by pressing a one-touch key or by entering a three-digit number (coded dial number) assigned to a destination.
|
|
NOTE
|
|
You need to register destinations in the Address Book beforehand.
|
1
Press  .
.
 .
.2
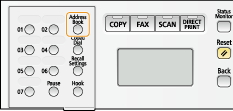
Press  (Address Book).
 (Address Book).
You can also use  /
/ to select <Specify from Address Book> on the screen, and press
  .
.
 /
/ to select <Specify from Address Book> on the screen, and press
  .
.3
Use  /
/ to select a tab.
 /
/ to select a tab.
 <All>
<All>Displays all the destinations registered in the Address Book. For the marks under the destinations, see the explanations below.
<A-Z>/<0-9>/<ABC> to <YZ>
Displays destinations with recipient names whose first characters correspond to the characters of the selected tab.
< >
>
 >
>Displays destinations for faxes.
< >
>
 >
>Displays destinations for e-mails. To specify destinations using this tab, see Specifying from Address Book (E-mail/File Server).
< >
>
 >
>Displays destinations for file servers. To specify destinations using this tab, see Specifying from Address Book (E-mail/File Server).
< >
>
 >
>Displays a list of group destinations.
< >
>
 >
>Displays a list of destinations registered in the one-touch keys.
4
Use  /
/ to select a destination, and press
  .
.
 /
/ to select a destination, and press
  .
.
NOTE:
If you want to specify multiple destinations
If you want to specify multiple destinations
Repeat steps 2 to 4. Up to 300 destinations can be specified.
To specify any additional destinations with the numeric keys, use  /
/ to select <Specify Next Destination (New)> on the screen, and press
  .
.
 /
/ to select <Specify Next Destination (New)> on the screen, and press
  .
.  To delete destinations
If you specified multiple destinations, you can delete destinations as necessary.
|
1
|
Select <Confirm/Edit Destination>, and press
 . . |
|
2
|
Select a destination you want to delete, and press
 . . |
|
3
|
Select <Delete Destination>, and press
 . .If you specified a group destination in step 2, <Number of Destinations> is displayed on the screen. Selecting this item and pressing
 displays the destinations in the group. displays the destinations in the group. |
|
4
|
Select <Yes>, and press
 . . |
|
NOTE
|
|
If you want to easily and quickly delete destinations without displaying a list of destinations
Before selecting <Confirm/Edit Destination> in step 1, you can press
 / / to toggle the destinations you specified. Display a destination you want to delete to toggle the destinations you specified. Display a destination you want to delete    <Yes> <Yes>   . . |
1
Press  .
.
 .
.2
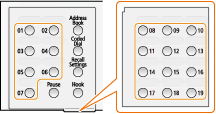
Press the one-touch key (01 to 19) in which the desired destination is registered.

NOTE:
If a confirmation screen appears
If a confirmation screen appears
When <One-Touch/Coded Dial TX Confirmation> is set to <On>, a screen is displayed that shows the destination and the name for the key. (For a group destination, the group name and the number of destinations are shown.) Check the contents and if everything is correct, select <OK>, and press  . To cancel the destination you have specified, select <Cancel>, press
  , and press a one-touch key again. Displaying Destinations in Address Book
 . To cancel the destination you have specified, select <Cancel>, press
  , and press a one-touch key again. Displaying Destinations in Address Book
If you want to specify multiple destinations
Repeat step 2. Up to 19 destinations can be specified by using the one-touch keys.
To specify any additional destinations with the numeric keys, use  /
/ to select <Specify Next Destination (New)> on the screen, and press
  .
.
 /
/ to select <Specify Next Destination (New)> on the screen, and press
  .
. To delete destinations
If you specified multiple destinations, you can delete destinations as necessary.
|
1
|
Select <Confirm/Edit Destination>, and press
 . . |
|
2
|
Select a destination you want to delete, and press
 . . |
|
3
|
Select <Delete Destination>, and press
 . .If you specified a group destination in step 2, <Number of Destinations> is displayed on the screen. Selecting this item and pressing
 displays the destinations in the group. displays the destinations in the group. |
|
4
|
Select <Yes>, and press
 . . |
|
NOTE
|
|
If you want to easily and quickly delete destinations without displaying a list of destinations
Before selecting <Confirm/Edit Destination> in step 1, you can press
 / / to toggle the destinations you specified. Display a destination you want to delete to toggle the destinations you specified. Display a destination you want to delete    <Yes> <Yes>   . . |
1
Press  .
.
 .
.2
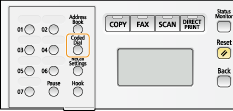
Press  (Coded Dial).
 (Coded Dial).
You can also use  /
/ to select <Specify from Coded Dial> on the screen, and press
  .
.
 /
/ to select <Specify from Coded Dial> on the screen, and press
  .
.3
Use the numeric keys to enter a three-digit number (001 to 281).
If you enter the wrong characters, press  . (Press to delete each character one by one. Press and hold to delete all the input characters at once.)
 . (Press to delete each character one by one. Press and hold to delete all the input characters at once.)
NOTE:
If a confirmation screen appears
If a confirmation screen appears
When <One-Touch/Coded Dial TX Confirmation> is set to <On>, a screen is displayed that shows the group and the name for the number. (For a group destination, the group name and the number of destinations are shown.) Check the contents and if everything is correct, select <OK>, and press  . To cancel the destination you have specified, select <Cancel>, press
  , and enter a three-digit number again. Displaying Destinations in Address Book
 . To cancel the destination you have specified, select <Cancel>, press
  , and enter a three-digit number again. Displaying Destinations in Address Book
If you want to specify multiple destinations
Repeat steps 2 and 3. Up to 281 destinations can be specified.
To specify any additional destinations with the numeric keys, use  /
/ to select <Specify Next Destination (New)> on the screen, and press
  .
.
 /
/ to select <Specify Next Destination (New)> on the screen, and press
  .
. To delete destinations
If you specified multiple destinations, you can delete destinations as necessary.
|
1
|
Select <Confirm/Edit Destination>, and press
 . . |
|
2
|
Select a destination you want to delete, and press
 . . |
|
3
|
Select <Delete Destination>, and press
 . .If you specified a group destination in step 2, <Number of Destinations> is displayed on the screen. Selecting this item and pressing
 displays the destinations in the group. displays the destinations in the group. |
|
4
|
Select <Yes>, and press
 . . |
|
NOTE
|
|
If you want to easily and quickly delete destinations without displaying a list of destinations
Before selecting <Confirm/Edit Destination> in step 1, you can press
 / / to toggle the destinations you specified. Display a destination you want to delete to toggle the destinations you specified. Display a destination you want to delete    <Yes> <Yes>   . . |


