This section describes the procedure for replacing the staple cartridge in the Inner Finisher-D1.
|
NOTE
|
|
The Inner Finisher-D1 is an optional product.
We recommend that you order staple cartridges from your local authorized Canon dealer before your stock runs out.
Use only staple cases intended for use with this machine.
|
1.
Pull out the staple case from the finisher.
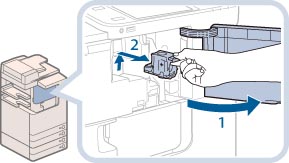 |
1. Open the front cover of the finisher.
|
|
2. Lift and pull out the staple case from the stapler unit, holding it by the green tab.
|
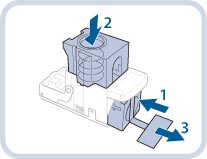
2.
Pull out the empty staple cartridge from the staple case.
 |
1. Press the areas indicated by PUSH on both sides of the staple case.
|
|
2. Once you have released the spring-loaded case, pull out the staple cartridge.
|
3.
Insert a new staple cartridge into the staple case.
 |
1. Insert a new staple cartridge.
|
|
2. Press the spring-loaded case down until it clicks into place.
|
|
|
3. Remove the seal holding the staples together, by pulling it straight out.
|
|
IMPORTANT
|
|
Do not remove the seal that holds the staples together before you place the staple cartridge into the staple case.
Only one staple cartridge can be inserted at a time.
Make sure that you pull the seal straight out. If you pull it out at an angle, it may tear.
|
4.
Attach the staple case.
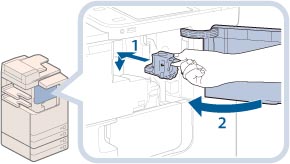 |
1. Gently push the staple case back into the finisher and push down firmly until it is securely in place.
|
|
2. Close the front cover of the finisher.
|
 CAUTION CAUTION |
|
When closing the front cover of the finisher, be careful not to get your fingers caught, as this may result in personal injury.
|
|
NOTE
|
|
After the cover is closed, the stapler unit may automatically perform a "dry" stapling operation to reposition the staples.
|