e-ManualTopSite mapHelpGlossary

Category Top

Preventing Unauthorized Access

Increasing Security

Restricting Access by Authentication

Administrator Settings

Specifying the System Manager Settings

Department ID Management

Specifying Department ID Management

Checking/Printing/Clearing Page Totals

Accepting Jobs with Unknown Department IDs

Accepting B&W Copy and Print Jobs without Entering a Department ID

User Setting Information Management (User Setting Information Management Service)

Logging In to the User Setting Information Management Service Page

Deleting the User Setting Information

User Access Control for Advanced Box

Logging In to the User Management Page

Registering/Editing the User Information of User Access Control for Advanced Box

Editing User Information by General Users

Authentication Log Management for the Advanced Box

Authentication Method Settings for Sending Operations

Specifying Personal Folders

Registering Personal Folders for Each User

Setting Up the Home Folder and Personal Folders

Registering Folders Designated by Login Service as Personal Folders

Specifying Authentication Method for LDAP Server

Specifying Authentication Method for Rights Management Server

Specifying Authentication Method for SMTP Server

Specifying Authentication Method for File Server

Specifying Authentication Method for Advanced Box

Simple Authentication Settings for Secure Print

Setting to Disable Integrated Authentication

Network Security

Key Pair and Server Certificate Settings for Encrypted SSL Communication

Generating a Key Pair and Server Certificate

Registering a Key Pair File and Server Certificate File Installed from a Computer

Editing Key Pairs and Server Certificates

Registering/Editing a CA Certificate File

Verifying Certificate Validity Using Certificate Revocation List

Using an Encryption Method That Complies with FIPS 140-2

Advanced Box Settings

Specifying the Advanced Box Settings

Setting the Network

MEAP Settings

Using the SSL

Printing Installed Application Information

Preventing Information Leakage

Digital Signatures

Setting/Confirming a Key Pair and Device Certificate

Confirming a Key Pair and User Certificate

Checking a Device Signature/User Signature Certificate

Setting a Rights Management Server

Forced Secure Watermark/Document Scan Lock

Secure Watermark (Forced Secure Watermark/Printer Driver Secure Watermark)

Adjusting the Secure Watermark Contrast

Selecting the Code for Document Scan Lock (TL Code/QR Code)

Document Scan Lock Settings (TL Code)

Specifying the Document Scan Lock Operational Settings
Setting the Document Scan Lock Mode (TL Code)
Adjusting the TL Code

Document Scan Lock Settings (QR Code)

Specifying the Document Scan Lock Operational Settings (QR Code)
Setting the Document Scan Lock Mode (QR Code)
Setting the Document Scan Lock Mode and Secure Watermark (QR Code)
Adjusting the QR Code Print Position

Copy Set Numbering Options

Accepting Only Encrypted Secure Printing

Restricting the Send Function

Setting the Address Book

Mail Box Settings

Specifying Settings for All Mail Boxes

Specifying the Mail Box Security Settings

Setting the Control Panel Display

Specifying Management Settings for the Hard Disk

Completely Erasing Unnecessary Data from the Hard Disk

Initializing All Data/Settings

TPM Settings

Device Management

Using the USB Port

Device Information Settings

Specifying Device Information Delivery Settings

Registering/Deleting/Printing Delivery Destinations

Setting Automatic Delivery

Setting Manual Delivery

Setting the Receiving Machine

Checking/Printing the Communication Log

Limiting Functions

Limiting Functions When the Security Key Is Turned OFF

Remote UI

Clearing the Message Board

ACCESS MANAGEMENT SYSTEM

Retrieving Audit Logs

Available Administrator Settings Table (Touch Panel Display)

IEEE 2600 Security Standard

Top » Security » Preventing Information Leakage » Forced Secure Watermark/Document Scan Lock » Document Scan Lock Settings (TL Code) » Setting the Document Scan Lock Mode (TL Code)
Setting the Document Scan Lock Mode (TL Code)
08JK-287
The Administrator can specify the TL code for the Forced Document Scan Lock mode and the Printer Driver Document Scan Lock mode.
Forced Document Scan Lock mode:
TL code is always embedded for copy and print jobs by general users.
Printer Driver Document Scan Lock mode:
You can select whether to embed TL Code for each print job which is operated by general users from the printer driver.
When using the TL code, you can embed tracking information that enables you to analyze by whom, when, and with which machine the document was output.
For information on the optional products required to use this function, see "Optional Products Required for Each Function (imageRUNNER ADVANCE C9280 PRO/C9270 PRO)" or "Optional Products Required for Each Function (imageRUNNER ADVANCE C7270/C7260)."
IMPORTANT
The Document Scan Lock mode does not guarantee restriction of unauthorized copying. You may not be able to restrict unauthorized copying or analyze tracking information, depending on the combination of settings and the output, such as a document with an image on the entire page.
Please note that Canon will not be held responsible for any damages caused by the use of the Document Scan Lock mode or the inability to use the Document Scan Lock mode.

1.
Press (Settings/Registration).
2.
Press [Function Settings] → [Common] → [Print Settings].
3.
Press [Document Scan Lock Settings].
If the Secure Watermark is activated, press [Secure Watermark/Document Scan Lock].
4.
Select the Document Scan Lock mode.
To select the Forced Document Scan Lock mode:
To select the Printer Driver Document Scan Lock mode:
To select the Forced Document Scan Lock mode:
Press [Forced Document Scan Lock].
If the Secure Watermark is activated, press [Forced Secure Watermark/Doc. Scan Lock].
Press [Set] for the function (<Copy>/<Access Stored Files>/<Printer>) to set the Forced Document Scan Lock mode.
If the Secure Watermark is activated, press [Forced Doc. Scan Lock] for the function (<Copy>/<Access Stored Files>/<Printer>) to set the Forced Document Scan Lock mode.
To select the Printer Driver Document Scan Lock mode:
Press [Printer Driver Document Scan Lock].
If the Secure Watermark is activated, press [Printer Driver Watermark/Doc. Scan Lock].
Press [Set].
If the Secure Watermark is activated, press [Driver Doc. Scan Lock].
5.
Press [Scan Lock Information] → select condition → press [OK].
[Allow All]:
You can embed TL code which enables documents to be copied.
[Prohibit All]:
You can embed TL code which restricts copying documents. You cannot copy documents when [Prohibit All] is detected.
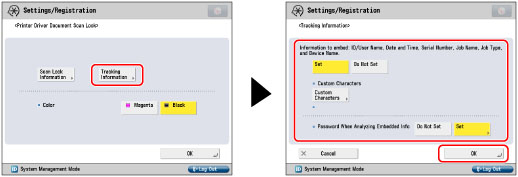
6.
Press [Tracking Information] → specify each setting → press [OK].
[Set]:
You can embed tracking information that enables you to analyze by whom, when, and with which machine the document was output.
[Custom Characters]: Set the text for tracking information.
[Set] for <Password When Analyzing Embedded Info>: Password authentication is requested when analyzing the tracking information.
[Do Not Set] for <Password When Analyzing Embedded Info>: Password authentication is not requested when analyzing the tracking information.
[Do Not Set]:
Tracking information is not embedded.
7.
Select [Magenta] or [Black] for <Color>.
8.
Press [OK].

IMPORTANT
[Set] is set for <Password When Analyzing Embedded Info> in <Tracking Information> by default. The default password is '7654321'. We recommend that you change the password. If <Password When Analyzing Embedded Info> is [Set], password authentication is requested when analyzing the tracking information using the Document Scan Code Analyzer for MEAP. To strengthen the confidentiality of the information, we recommend that password authentication be set for analyzing the tracking information.
If Printer Driver Document Scan Lock and Forced Document Scan Lock are set for a printer at the same time, Forced Document Scan Lock is given priority.
NOTE
If you want to use the Document Scan Lock function for each job from the printer driver, on the [Printing Preferences] dialog box, click the [Finishing] tab → [Advanced Settings] → select [On] for [Secure Printing Function of Devices]. For more information, see the on-line help for the printer driver.