Windows 7/Server 2008 R2 has had special folders (public folders) for file sharing available from the beginning. Set up unrestricted shared folders using the public folders.
Sharing Public Folders
1
From the [Start] menu, select [Control Panel], and click on [View network status and tasks].

2
Click [Change advanced sharing settings].

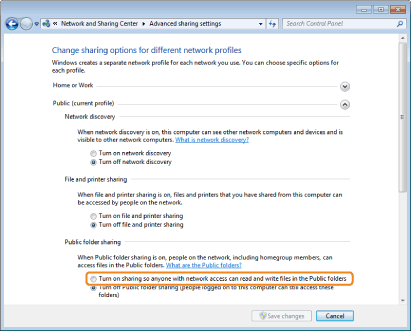
3
Select [Turn on sharing so anyone with network access can read and write files in the Public folders].
4
Select [Turn off password protected sharing], and click [Save changes].

 When [User Account Control] appears When [User Account Control] appearsClick [Yes].
|
Creating a Folder for Storing the Files
1
Display [Public] folder.
|
(1)
|
From the [Start] menu, select [All Programs] - [Accessories] - [Windows Explorer].
|
|
(2)
|
Open the hierarchy inside [Computer], and click on the [Public] folder.
|
2
Create a new folder inside the [Public] folder.
Example: share
 |
Use single-byte alphanumeric characters for the folder name.
|
|
|
The folder name created here is needed by "How to Save to a File Server (A Shared File Server)." We recommend that you make a note of it so that you do not forget.
|

1
Create a shared folder.
|
|
We recommend creating the shared folder in a location that would be easy to find later, such as directly under the C drive.
Example: C:\share |
|
|
Use single-byte alphanumeric characters for the folder name.
|
|
|
The folder name created here is needed by "How to Save to a File Server (A Shared File Server)." We recommend that you make a note of it so that you do not forget.
|
2
Right-click the file you created, and select [Shared with]-[Specific People].
3
Click [ ] to on the left of [Add], select the user with whom you wish to share, and click [Add].
] to on the left of [Add], select the user with whom you wish to share, and click [Add].
4
Set permissions for the added user.
|
(1)
|
Click on the [Permission Level] column for the added user.
|
|
(2)
|
Select [Read/Write].
|
|
(3)
|
Click [Share].
|

|
When [User Account Control] appears Click [Yes].
|
|
NOTE
|
|
[Permission Level]
[Read]: Can only view files.
[Read/Write]: Can create, change and delete files.
|
5
Click the [Done] button.
