e-ManualTopSite mapHelpGlossary

Category Top

Increasing Security

Restricting Access by Authentication

Administrator Settings

Specifying the System Manager Settings

Department ID Management

Specifying Department ID Management

Checking/Printing/Clearing Page Totals

Accepting Jobs with Unknown Department IDs

Accepting B&W Copy and Print Jobs without Entering a Department ID

User Setting Information Management (User Setting Information Management Service)

Logging In to the User Setting Information Management Service Page

Deleting the User Setting Information

User Access Control for Advanced Box

Authentication Method Settings for Sending Operations

Specifying Personal Folders

Registering Personal Folders for Each User

Setting Up the Home Folder and Personal Folders

Registering Folders Designated by Login Service as Personal Folders

Specifying Authentication Method for LDAP Server

Specifying Authentication Method for Rights Management Server

Specifying Authentication Method for SMTP Server

Specifying Authentication Method for File Server

Simple Authentication Settings for Secure Print

Setting to Disable Integrated Authentication

Network Security

Key Pair and Server Certificate Settings for Encrypted SSL Communication

Generating a Key Pair and Server Certificate

Registering a Key Pair File and Server Certificate File Installed from a Computer

Editing Key Pairs and Server Certificates

Registering/Editing a CA Certificate File

Verifying Certificate Validity Using Certificate Revocation List

Using an Encryption Method That Complies with FIPS 140-2

Network Settings/Management when Using an Advanced Box

MEAP Settings

Using the SSL

Printing Installed Application Information

Preventing Information Leakage

Digital Signatures

Setting/Confirming a Key Pair and Device Certificate

Confirming a Key Pair and User Certificate

Checking a Device Signature/User Signature Certificate

Setting a Rights Management Server

Forced Secure Watermark/Document Scan Lock

Secure Watermark (Forced Secure Watermark/Printer Driver Secure Watermark)

Adjusting the Secure Watermark Contrast

Document Scan Lock Settings

Specifying the Document Scan Lock Operational Settings

Setting the Document Scan Lock Mode

Adjusting the TL Code

Copy Set Numbering Options

Accepting Only Encrypted Secure Printing

Restricting the Send Function

Setting the Address Book

Setting the Box PIN to 7 Digits/Restricting Access

Setting the Control Panel Display

Specifying Management Settings for the Memory

Completely Erasing Unnecessary Data from the Memory

Initializing All Data/Settings

TPM Settings

Device Management

Using the USB Port

Device Information Settings

Specifying Device Information Delivery Settings

Registering/Deleting/Printing Delivery Destinations

Setting the Receiving Machine

Setting Automatic Delivery

Setting Manual Delivery

Checking/Printing the Communication Log

Setting SSO-H Authentication for Device Information Delivery Settings

Limiting Functions

Remote UI

Clearing the Message Board

Saving a Log of Key Operations

ACCESS MANAGEMENT SYSTEM

Retrieving Audit Logs

Available Administrator Settings Table (Touch Panel Display)

IEEE 2600 Security Standard

Top » Security » Key Pair and Server Certificate Settings for Encrypted SSL Communication » Verifying Certificate Validity Using Certificate Revocation List
Verifying Certificate Validity Using Certificate Revocation List
07SE-1YY
You can verify the validity of the certificate by using a Certificate Revocation List (CRL). You can also delete an unnecessary Certificate Revocation List.
1.
Press (Settings/Registration).
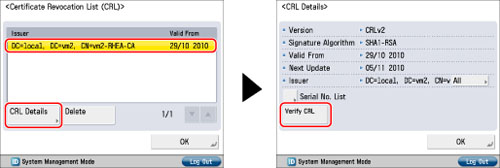
2.
Press [Management Settings] → [Device Management] → [Certificate Settings].
3.
Press [Certificate Revocation List (CRL)] → select the next step.
Verify the validity of the certificate:
Delete the certificate revocation list:
Verify the validity of the certificate:
Select the certificate revocation list for the certificate you want to verify → press [CRL Details] → [Verify CRL].
Confirm the validity of the certificate with the displayed result.
IMPORTANT
For more information on the check result, see "Network/Security."
Press [OK].
NOTE
To check the certificate authority, press [Serial No. List].
Delete the certificate revocation list:
Select the certificate revocation list you want to delete → press [Delete].
Press [Yes].
4.
Press [OK] → [OK].

IMPORTANT
For instructions on how to install a certificate revocation list, see "Installing a Certificate File."
NOTE
Up to 50 certificate revocation lists can be registered.