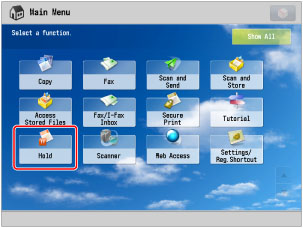
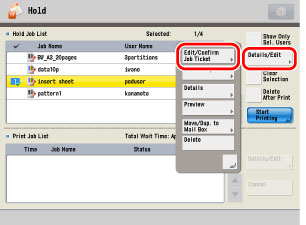
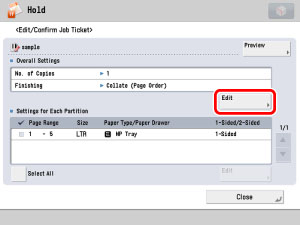
|
IMPORTANT
|
|
The Finishing modes cannot be used with jobs without a job ticket.
Be sure to correctly set the paper type. If the type of paper is not set correctly, it could adversely affect the quality of the image. Moreover, the fixing unit may become dirty, or the paper could jam, and a service repair may be needed.
The Finishing modes cannot be set if custom size, transparencies, tracing paper, or labels is selected.
|

|
IMPORTANT
|
|
When using Booklet Finisher-Q1 PRO, only 14 lb bond to 140 lb index (52 to 256 g/m2) paper can be used for the main document.
When using Booklet Finisher-N1, only 16 lb bond to 80 lb cover (60 to 220 g/m2) paper can be used for the main document.
The [Saddle Stitch] mode can be set only if 2-Sided Printing is set.
|
|
[Auto]:
|
If you are printing a single page original, the printed sheets are output face up. Otherwise, the printed sheets are output face down.
|
|
[Face Down (Normal Order)]:
|
Printed sheets are always output face down.
|
|
[Face Up (Reverse Order)]:
|
Printed sheets are always output face up.
|

|
IMPORTANT
|
|
You can set [Trim] only if you select [Saddle Stitch].
|
 : Available
|
Optional Unit
|
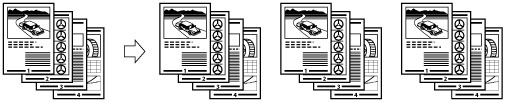
Collate
(Page order) |
Group
(Same Pages) |
Offset
|
Staple
|
Trim
|
Face Up/Face Down
|
||
|
Corner
|
Double
|
Saddle
Stitch |
||||||
|
none
|
|
|
-
|
-
|
-
|
-
|
-
|
|
|
Staple Finisher-Q1 PRO
|
|
|
|
|
|
-
|
-
|
|
|
Staple Finisher-Q1 PRO and Puncher Unit
|
|
|
|
|
|
-
|
-
|
|
|
Staple Finisher-Q1 PRO, Professional Puncher-C1 and Professional Puncher Integration Unit-B1
|
|
|
|
|
|
-
|
-
|
|
|
Staple Finisher-Q1 PRO and Paper Folding Unit-H1
|
|
|
|
|
|
-
|
-
|
|
|
Booklet Finisher-Q1 PRO
|
|
|
|
|
|
|
-
|
|
|
Booklet Finisher-Q1 PRO and Puncher Unit
|
|
|
|
|
|
|
-
|
|
|
Booklet Finisher-Q1 PRO, Professional Puncher-C1 and Professional Puncher Integration Unit-B1
|
|
|
|
|
|
|
-
|
|
|
Booklet Finisher-Q1 PRO and Paper Folding Unit-H1
|
|
|
|
|
|
|
-
|
|
|
Booklet Finisher-Q1 PRO and Booklet Trimmer-D1
|
|
|
|
|
|
|
|
|
|
Optional Unit
|
Collate
(Page order) |
Group
(Same Pages) |
Offset
|
Staple
|
Trim
|
Face Up/Face Down
|
||
|
Corner
|
Double
|
Saddle
Stitch |
||||||
|
none
|
|
|
-
|
-
|
-
|
-
|
-
|
|
|
Staple Finisher-N1
|
|
|
|
|
|
-
|
-
|
|
|
Staple Finisher-N1 and Puncher
|
|
|
|
|
|
-
|
-
|
|
|
Staple Finisher-N1 and Professional Puncher Integration Unit-B1
|
|
|
|
|
|
-
|
-
|
|
|
Staple Finisher-N1 / Paper Folding Unit-H1
|
|
|
|
|
|
|
-
|
|
|
Booklet Finisher-N1
|
|
|
|
|
|
|
-
|
|
|
Booklet Finisher-N1 and Puncher
|
|
|
|
|
|
|
-
|
|
|
Booklet Finisher-N1 and Professional Puncher Integration Unit-B1
|
|
|
|
|
|
|
-
|
|
|
Booklet Finisher-N1 / Paper Folding Unit-H1
|
|
|
|
|
|
|
-
|
|
|
Booklet Finisher-N1 / Inner Booklet Trimmer-A1
|
|
|
|
|
|
|
|
|
|
Paper Size
|
Corner
|
Double
|
Saddle Stitch*
|
|
13" x 19"
|
-
|
-
|
25 sheets
|
|
12 5/8" x 17 11/16"
|
-
|
-
|
25 sheets
|
|
12" x 18"
|
-
|
-
|
25 sheets
|
|
11" x 17"
|
50 sheets
|
50 sheets
|
25 sheets
|
|
LGL
|
50 sheets
|
50 sheets
|
25 sheets
|
|
LTRR
|
50 sheets
|
50 sheets
|
25 sheets
|
|
LTR
|
100 sheets
|
100 sheets
|
-
|
|
EXEC
|
100 sheets
|
100 sheets
|
-
|
|
STMTR
|
-
|
-
|
-
|
|
STMT
|
-
|
-
|
-
|
|
Paper Size
|
Corner
|
Double
|
Saddle Stitch*
|
|
12" x 18"
|
-
|
-
|
16 sheets
|
|
12 5/8" x 17 11/16"
|
-
|
-
|
-
|
|
11" x 17"
|
30 sheets
|
30 sheets
|
16 sheets
|
|
LGL
|
30 sheets
|
30 sheets
|
16 sheets
|
|
LTRR
|
30 sheets
|
30 sheets
|
16 sheets
|
|
LTR
|
50 sheets
|
50 sheets
|
-
|
|
EXEC
|
50 sheets
|
50 sheets
|
-
|
|
STMTR
|
-
|
-
|
-
|
|
STMT
|
-
|
-
|
-
|
|
NOTE
|
|
For information on the original orientation and paper orientation when performing stapling, see "Relationship Between the Original Orientation and Paper Orientation."
For information on the custom size paper can be stapled, see "Staple Finisher-Q1 PRO/Booklet Finisher-Q1 PRO/Puncher Unit-BS1."
|
|
IMPORTANT
|
|
For information on the modes which cannot be set in combination with this mode, see "Unavailable Combination of Functions."
If you set Staple, prints are always output with the printed face down.
|
|
NOTE
|
|
For information on optional products, see the following:
If [Finishing] is not set, the settings are the same as when [Group (Same Pages)] is set.
You can display the detailed information of the selected paper by pressing
 . . |
