Adjusting Gradation
0YRY-0HL 1100-0HU 10XJ-0HU 1106-0HU 10YY-0HU 10H3-0HR 10H4-0HR 108A-0HS 1116-0HS
If the printing result is significantly different from the original document when you copy an image, you can perform auto adjustment to correct the gradation. There are two types of adjustments: Full Adjustment and Quick Adjustment.

 |
|
Adjustments may not be performed effectively if there is not sufficient toner.
|
Full Adjustment
Correct the gradation of an image accurately and optimize reproducibility during printing. Optimized information will be retained until the next accurate correction.
1
Press 
 <Adjustment/Maintenance>
  <Adjust Image Quality>
  <Auto Adjust Gradation>.

 <Adjustment/Maintenance>
  <Adjust Image Quality>
  <Auto Adjust Gradation>.
2
Select the paper to adjust, and press <Full Adjust>.
 |
|
If you selected <Simple> in <Adjustment Level>, it is not necessary to select the paper. Adjustment is applied to all paper types.
|
3
Select the paper source in which the paper you selected in step 2 is loaded, and press <OK>.
4
Press <Start Printing>.
A test page is printed.
 |
|
Use this test page, which has colorful stripes for adjustment.
|
5
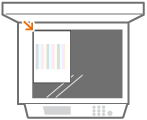
Place the test page on the platen glass.

Place the test page with the print side facing down, making sure that the black stripe is facing the left edge of the machine. However, if you place additional pages, make sure that the black stripe is facing the upper edge of the machine.
6
Close the feeder and press <Start Scanning>.
The machine starts scanning the test page.
7
Open the feeder, and remove the test page.
8
Repeat steps 4 to 7.
To complete the adjustment, print the test page four times, and scan it each time it is printed.
Quick Adjustment
This adjustment maintains the optimized status that was acquired by <Full Adjust>. If the result of this adjustment is not satisfactory, perform <Full Adjust>.
1
Press 
 <Adjustment/Maintenance>
  <Adjust Image Quality>
  <Auto Adjust Gradation>.

 <Adjustment/Maintenance>
  <Adjust Image Quality>
  <Auto Adjust Gradation>.
2
Select the paper to adjust, and press <Quick Adjust>.
 |
|
If you selected <Simple> in <Adjustment Level>, it is not necessary to select the paper. Adjustment is applied to all paper types.
|
3
Press <Start>.
Changing the Settings for Adjustment
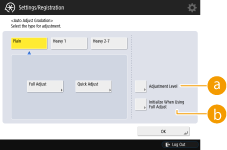
You can change the paper and adjustment level to use when performing adjustment.

 <Adjustment/Maintenance>
  <Adjust Image Quality>
  <Auto Adjust Gradation>
 <Adjustment Level>
Enables you to set the level for gradation adjustment.
 <Initialize When Using Full Adjust>
Enables you to set whether to use default settings for gradation adjustment.
 |
|
If the room environment dramatically changes after registering the adjustment paper, the gradation, density, and color may not be able to be correctly adjusted by performing auto gradation adjustment using the registered adjustment paper. In this case, register the adjustment paper again.
Since this may cause poor color balance, make sure to perform auto gradation adjustment (full adjustment) after changing the settings.
|