
Replacing the Toner Cartridge
0YRY-0H4 1100-0H7 10XJ-0H7 1106-0H7 10YY-0H7 10H3-0H5 10H4-0H5 108A-0H6 1116-0H6
When toner starts running low or has run out, a message prompting you to change the toner cartridge is displayed. Replace or prepare to replace the toner cartridge, according to the displayed message.
|
|
|
For information on the product numbers for toner cartridges, see Consumables.
You can check the current amount of toner remaining.
|
When the Message Is Displayed
When the toner in the toner cartridge has run out, the message <Replace the toner cartridge. (XXXX)> is displayed. Press the icon on the bottom right of the screen, and follow the instructions on the screen to replace the toner cartridge.

|
|
|
The "XXXX" in the message indicates the toner color.
|
When the Instruction Screen Is Displayed
The toner in the toner cartridge and the machine has run out, and printing cannot be performed. Follow the instructions on the screen to replace the toner cartridge.
|
|
|
The "XXXX" in the message indicates the toner color.
|
Procedure for Replacing the Toner Cartridge
When replacing the toner cartridge, the procedure is also displayed on the screen. Check the information displayed on the screen in addition to the following procedure.
 |
|
When replacing multiple toner cartridges at the same time, replace them in the order black, yellow, magenta, cyan.
|
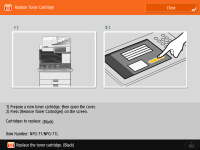
1
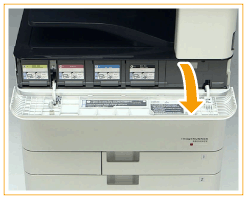
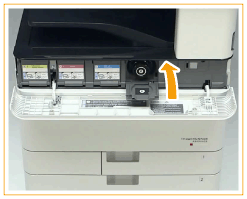
Open the toner replacement cover.
Hold the left and right edges of the cover when opening it.
2
Select the toner to replace and press <Remove Toner Cartridges>.
The toner that needs replacement is automatically selected.
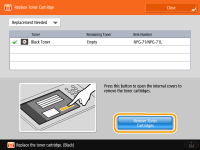
If you press <Remove Toner Cartridges>, the replacement cover (small cover) opens automatically.
|
|
|
An error message is displayed if the small cover does not open automatically due to the toner replacement cover being closed, etc. Press the icon on the bottom right of the screen, and follow the instructions on the screen to perform the operation again from step 1.
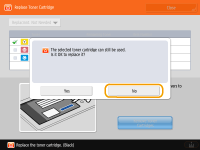
If you select a color with toner remaining, a confirmation message is displayed. To cancel replacing the toner, press <No> to deselect that color.
 |
3
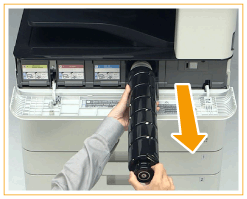
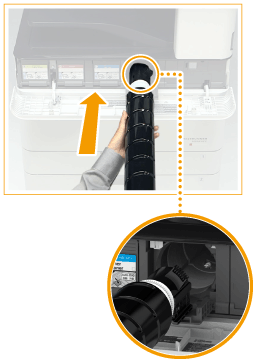
Pull out the toner cartridge.
|
|
|
Make sure to avoid applying shocks to the toner cartridge by hitting it against something, etc. Doing so may cause the toner to leak.
|
4
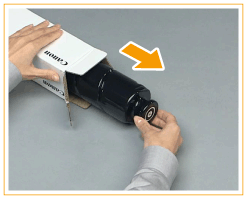
Remove the new toner cartridge from its box.
5
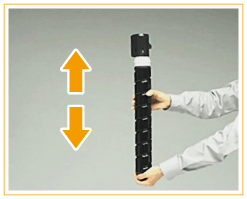
With the white part of the new toner cartridge facing up, shake the toner cartridge up and down approximately 10 times.
Shaking the toner cartridge evens out the toner inside.
|
|
|
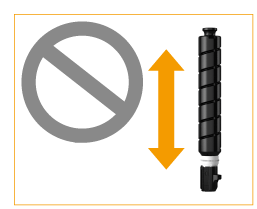
Do not have the white part of the toner cartridge face down. Doing so may prevent the toner from being supplied properly.
 |
6
Install the new toner cartridge.
Before installing the toner cartridge, confirm that the color of the toner cartridge and the color indicated on the small cover are the same.
With the flat surface of the toner cartridge facing down, slide the toner cartridge into the small cover as far as it will go.
7
Close the small cover.
The small cover cannot be closed unless the toner cartridge has been pushed in as far as it will go. Do not try to force the cover closed, as doing so may cause it to break.
8
Close the toner replacement cover.
The message <Checking the toner...> is displayed. The procedure is complete when this message disappears.
|
|
|
If printing was interrupted because toner ran out, it will automatically resume when you replace the toner cartridge.
Even if cyan, magenta, or yellow toner runs out, you can continue to print in black-and-white as long as black toner remains, but the printing quality will drop. If you want to continue printing in black-and-white, do not replace the toner cartridge until printing is complete.
If the color and density of printing differ after replacing the toner cartridge, perform adjustment.
|