|
IMPORTANT
|
|
Only LTR tab paper can be used.
|
|
NOTE
|
|
When you load tab paper into the paper drawer or Multi-drawer Paper Deck-A1, make sure to register the paper type. (See "Registering the Paper Size and Type for a Paper Source.")
|
 |
 |
|
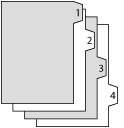
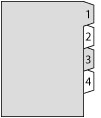
Right Order Tab Paper
|
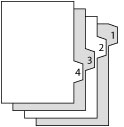
Reverse Order Tab Paper
|
|
IMPORTANT
|
|
You cannot make copies or prints on tab paper that is loaded in the Document Insertion Unit-H1/Document Insertion/Folding Unit-G1/Document Insertion Unit-J1.
|
|
NOTE
|
|
You can use tab paper set in Document Insertion Unit-H1/Document Insertion/Folding Unit-G1/Document Insertion Unit-J1 for Add Cover, Insert Sheets or Job Separator.
If you want to insert printed tab paper as a chapter pages, insert a blank paper where the tab paper will be inserted.
|
|
Paper Source
|
How to Load Tab Paper
|
|
|
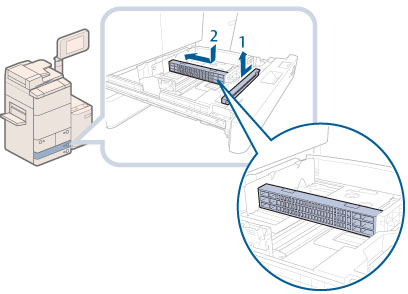
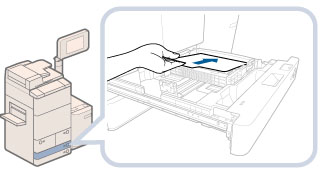
Paper Drawer
|
 |
Load reverse order tab paper face down with the tabs to the left side.
|
|
Multi-drawer Paper Deck-A1
|
 |
Load right order tab paper face up with the tabs to the right side.
|
|
Document Insertion Unit-H1
|
|
Load reverse order tab paper face down with the tabs to the left side.
|
|
Document Insertion/Folding Unit-G1/
Document Insertion Unit-J1 |
|
Load reverse order tab paper face down with the tabs to the left side.
|
|
NOTE
|
|
For more information on aligning the size change plate for the Multi-drawer Paper Deck-A1, "Changing the Paper Size for the Multi-drawer Paper Deck-A1."
For more information on selecting the paper size or type of the Document Insertion Unit-H1, see "Loading Paper into the Document Insertion Unit-H1 (Optional)."
For more information on selecting the paper size or type of the Document Insertion/Folding Unit-G1/Document Insertion Unit-J1, see "Loading Paper into the Document Insertion/Folding Unit-G1/Document Insertion Unit-J1 (Optional)."
|
 |
|
|
|

|
IMPORTANT
|
|
Slide the front guide until it clicks into place. If the front guide is not adjusted properly for the paper size loaded in the paper drawer, the correct paper size may not appear on the touch panel display.
Adjust the front guide correctly to avoid causing a paper jam, dirty prints, or make the inside of the machine dirty. |
 CAUTION CAUTION |
|
When returning the paper drawer to its original position, be careful not to get your fingers caught, as this may result in personal injury.
|
|
IMPORTANT
|
|
Paper which has been rolled or curled must be straightened out prior to use.
You will not be able to make copies or print if you load paper that exceeds the loading limit mark (
 ) or if the paper drawer is not completely pushed into the machine. ) or if the paper drawer is not completely pushed into the machine.Make sure that the height of the paper stack does not exceed the limit mark (
) at the back of the paper drawer.Always check that the paper drawers are in place.
Never place paper or any other items in the empty part of the drawer next to the paper stack. Doing so may cause paper jams.
When you are not loading tab paper, make sure to return the tab paper guide to its holder. Using the tab paper guide for storing paper other than tab paper may cause a paper jam.
|