|
IMPORTANT
|
|
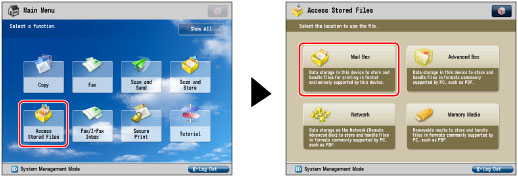
This mode can be used only for printing a file stored in a mail box.
|
|
NOTE
|
|
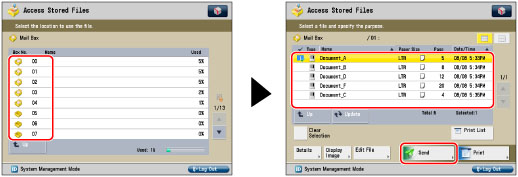
A maximum of 32 files stored in the same mail box can be selected and sent at the same time.
A maximum of 999 pages can be sent simultaneously.
|
|
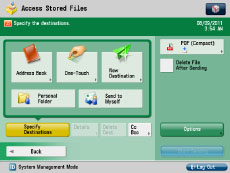
If the destination is stored in the Address Book:
|
Refer to the following, depending on the type of address book.
Scan and Send:
Fax:
|
|
If the destination is stored in a One-Touch button:
|
E-Mail, I-Fax, File Server, Advanced Box:
Fax:
|
|
If the destination is not stored in the Address Book:
|
Refer to the following detailed procedures, according to the address or server to specify.
|
|
If the destination is stored in Favorite Settings:
|
|
|
If you want to specify your personal folder as the destination:
|
|
|
If you want to specify your own e-mail address as the destination:
|
|
|
If you want to specify Cc and/or Bcc addresses:
|
|
IMPORTANT
|
|
If you set an address type to 'On' in [Limit New Destination], you cannot enter new destinations of that type. Select a stored destination by using the Local Address Book, Remote Address Book, LDAP Server in [Address Book], or pressing a one touch button in [One-Touch]. (See "Restricting the Send Function.")
|
|
NOTE
|
|
You can specify and send to up to 256 destinations at the one time. However, if a group address is specified for the destination, each address stored in that group is counted as one destination.
If you try to send to a file server in which [Confirm Before Sending] is set to 'On', a screen appears prompting you to enter the file server password. In this case, enter the file server password. If you want to register a file server in a group address, set [Confirm Before Sending] to 'Off'. You cannot send to a group address including a file server in which [Confirm Before Sending] is set to 'On'. (See "Registering a File Server Address.")
If you want to automatically delete the selected document after it is sent, press [Delete File After Sending].
You cannot print or store the document in another inbox while it is being sent.
If the selected destination is a group address which contains a mail box, the file you are sending will not be sent to (and stored in) that mail box.
The destinations registered in the one-touch buttons on the Quick Menu of the client machine are not updated even if those registered in the one-touch buttons of a server machine are updated. Confirm that the destination is not old if you cannot send to it.
|
|
NOTE
|
|
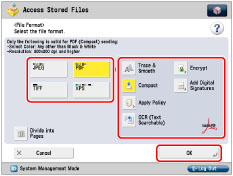
For more information on file formats, see "Setting the File Format."
|
|
NOTE
|
|
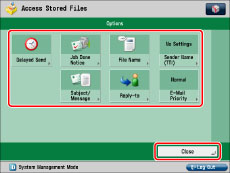
For more information on option modes, see "Scan and Send" or "Sending/Receiving a Fax."
|
|
IMPORTANT
|
|
For information on the modes which cannot be set in combination with this mode, see "Optional Products Required for Each Function."
|
|
NOTE
|
|
Files with a resolution other than 600 x 600 dpi cannot be sent if there is a fax destination included in the destination.
|
