Restricting the Send Function
You can set various send functions such as restricting new destination or send domain.
|
IMPORTANT
|
|
If a destination type in [Limit New Destination] is set to 'On', all settings stored in the settings history are erased, regardless of the destination type.
|
Restricting Sending to New Addresses
By restricting sending of faxes, e-mails, I-faxes, and files to new destinations using the procedure below, data can only be sent to previously registered destinations. As you can no longer enter or send to new destinations, setting this mode with an Address Book PIN increases security when sending. Sending is only allowed in the following cases when this mode is set:
If you specify a destination stored in the Address Book
If you specify a destination obtained via an LDAP server
If you specify a destination by pressing a one-touch button
If you recall stored [Favorite Settings] including destinations
If you select [Send to Myself]
1.
Press

(Settings/Registration).
2.
Press [Function Settings] → [Send] → [Common Settings].
3.
Press [Limit New Destination] → select the type of destination to restrict.
4.
Press [On] → [OK].
If you do not want to restrict new destinations, press [Off].
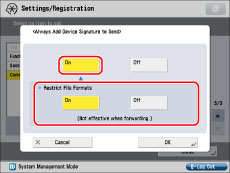
Adding a Device Signature to Sent PDF or XPS Documents
This mode enables you to always add a device signature to sent PDF or XPS documents.
This setting can be specified when the Device Signature PDF/XPS function is available for use. For information on the optional products required to use the Device Signature PDF/XPS function, see
"Optional Products Required for Each Function."1.
Press
(Settings/Registration).
2.
Press [Function Settings] → [Send] → [Common Settings].
3.
Press [Always Add Device Signature to Send] → [On] for <Always Add Device Signature to Send> → specify the setting for <Restrict File Formats>.
If you do not want to add a device signature, press [Off] for <Always Add Device Signature to Send>.
If you set <Restrict File Formats> to 'On', only PDF or XPS files can be sent.
|
NOTE
|
|
If you set <Restrict File Formats> to 'On', and sending a file in a format other than PDF or XPS is registered in [Favorite Settings], the file cannot be sent.
|
4.
Press [OK].
Setting Limited Destination for Sending E-Mail
When sending e-mail from this machine, you can set the destination address only to the login user's own address. This setting enables you to prevent information leakage which occurs during sending such as entering a wrong destination.
|
IMPORTANT
|
|
This setting is enabled if you log in as General Users using a login service, such as SSO-H. If you log in as Administrators, this setting is invalid.
|
1.
Press
(Settings/Registration).
2.
Press [Function Settings] → [Send] → [Common Settings].
3.
Press [Limit E-Mail to Send to Myself].
4.
Press [On] → [OK].
Press [Off] if you want to allow sending E-mail to all destinations.
Restricting Destination for File Transmission
When transmitting files, you can set the destination to the personal folder of the login user. This setting enables you to prevent information leakage which occurs during transmitting such as to a wrong destination.
|
IMPORTANT
|
|
This setting is enabled if you log in as General Users using a login service, such as SSO-H. If you log in as Administrators, this setting is invalid.
|
1.
Press
(Settings/Registration).
2.
Press [Function Settings] → [Send] → [Common Settings].
3.
Press [Restrict File TX to Personal Folder].
4.
Press [On] → [OK].
Press [Off] if you want to allow transmitting files to all destinations.
Redialing from the fax transmission history can be restricted by setting [Restrict Resending from Log] to 'On'. This enables you to help prevent redialing to an incorrect number.
This mode can be set when the Fax function is available for use. For information on the optional products required to use the Fax function, see
"Optional Products Required for Each Function."1.
Press
(Settings/Registration).
2.
Press [Function Settings] → [Send] → [Common Settings].
3.
Press [Restrict Resending from Log] → [On] → [OK].
If you want to allow redialing from the fax transmission history, press [Off].
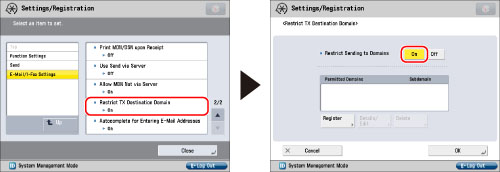
Restricting the Domains to Which E-mail/I-Fax Documents Can Be Sent
You can restrict the domains to which documents can be sent via e-mail or I-fax. If you restrict the domains for sending, you can send documents only to destinations that belong to the specified domains.
1.
Press
(Settings/Registration).
2.
Press [Function Settings] → [Send] → [E-Mail/I-Fax Settings].
3.
Press [Restrict TX Destination Domain] → [On] for <Restrict Sending to Domains>.
Press [Off] to not restrict the domains.
4.
Specify the domains to which you want to allow e-mail or I-fax documents to be sent.
If you want to register a domain:
Press [Register].
Press [Domain Name].
Enter the domain name → press [OK].
Press [OK].
Select [Allow] for <Send to Subdomain> to allow sending to subdomains.
|
NOTE
|
|
You can register up to three domains.
|
If you want to edit a domain:
Select the desired registered domain → press [Details/Edit].
Press [Domain Name].
Enter the domain name → press [OK].
Press [OK].
Select [Allow] for <Send to Subdomain> to allow sending to subdomains.
If you want to delete a domain:
Select the domain to delete → press [Delete].
Press [Yes].
5.
Press [OK].
Setting to Confirm Entered Fax Numbers
If [Confirm Entered Fax Number] is set to 'On', a confirmation screen is displayed when a user enters a fax number, to prevent misdialing.
This setting can be specified when the Fax function is available for use. For information on the optional products required to use the Fax function, see
"Optional Products Required for Each Function."1.
Press
(Settings/Registration).
2.
Press [Function Settings] → [Send] → [Fax Settings].
3.
Press [Confirm Entered Fax Number] → [On] → [OK].
If you do not want to confirm entered fax numbers, press [Off].
Allowing Sending from the Fax Driver
You can allow sending from the fax driver.
This setting can be specified when the Fax function is available for use. For information on the optional products required to use the Fax function, see
"Optional Products Required for Each Function."1.
Press
(Settings/Registration).
2.
Press [Function Settings] → [Send] → [Fax Settings].
3.
Press [Allow Fax Driver TX] → [On] → [OK].
If you do not want to restrict sending, press [Off].
Displaying a Confirmation Screen when a Fax Destination is Set
You can set the machine to display a confirmation screen for checking the destinations when sending a fax by setting [Confirm Before Sending when Fax Dest. Incl.] to 'On'. This enables you to help prevent sending a fax to an incorrect number.
This mode can be set when the Fax function is available for use. For information on the optional products required to use the Fax function, see
"Optional Products Required for Each Function."
|
IMPORTANT
|
|
A confirmation screen is displayed only if a fax destination was set. A confirmation screen is not displayed if the fax number contains a group address.
|
1.
Press
(Settings/Registration).
2.
Press [Function Settings]→ [Send] → [Fax Settings].
3.
Press [Confirm Before Sending when Fax Dest. Incl.] → [On] → [OK].
Select [Off] if you do not want to display the confirmation screen.
Restricting Sequential Broadcast Transmission
Sequential broadcast transmission can be restricted by setting [Restrict Seq. Broadcast When Fax Dest. Incl.] to 'On'. This enables you to help prevent sending a fax to an incorrect number by restricting the sending of faxes to multiple destinations.
This mode can be set when the Fax function is available for use. For information on the optional products required to use the Fax function, see
"Optional Products Required for Each Function."
|
IMPORTANT
|
|
In the following cases, sending is restricted:
If the fax address contains multiple destinations
If both fax and non-fax addresses are selected.
|
|
NOTE
|
|
If [Restrict Seq. Broadcast When Fax Dest. Incl.] is set to 'Off', a confirmation message for checking the destinations appears when you send a fax.
|
1.
Press
(Settings/Registration).
2.
Press [Function Settings] → [Send] → [Fax Settings].
3.
Press [Restrict Seq. Broadcast When Fax Dest. Incl.] → [On] → [OK].
Press [Off] if you do not want to restrict sequential broadcast transmission.
|
IMPORTANT
|
|
If you use the following destination types (Fax, E-Mail, I-Fax, File) for which [Limit New Destination] is set to 'On', you cannot edit the destination:
Destinations obtained via LDAP servers
Destinations registered in [Favorite Settings]
E-mail addresses obtained by pressing [Send to Myself]
Destinations of a job that is canceled because of transmission errors, or a job that is waiting to be sent with the Delayed Send mode on the Status Monitor/Cancel screen.
|