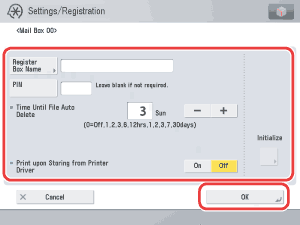
- Specify each setting → press [OK].

[Register Box Name]:
Press [Register Box Name] → enter the new name → press [OK].
[PIN]:
If you want to set a PIN for this Mail Box, enter the PIN using  - -  (numeric keys). You can leave the PIN blank. You cannot store a PIN with only zeros as the number, such as <0000000>. (numeric keys). You can leave the PIN blank. You cannot store a PIN with only zeros as the number, such as <0000000>.
<Time Until File Auto Delete>:
Press [-] or [+] to set the time that has to elapse before files in the selected Mail Box are automatically deleted.
[URL Send Settings]:
If you set the machine to send a link via e-mail to the Mail Box in which the file is stored, you can check or perform operations on the file in the Mail Box, using the Remote UI (User Interface) of the machine. To send a link to a Mail Box via e-mail, press [URL Send Settings] → specify the destination → press [OK].
<Print upon Storing from Printer Driver>
You can select whether to print a file when it is sent from a computer and stored in a mail box. To print the file when it is stored in a mail box, select [On].
[Initialize]:
To initialize settings, select the Mail Box that you want to initialize → press [Initialize] → press [Yes].
- Since there is no way to check a stored PIN, make sure that you write down the PIN that you enter, and keep it in a safe place.
- If a password is already set for each Mail Box, you can specify [Time Until File Auto Erase] and [Print Upon Storing From the Printer Driver] settings of all the Mail Box using [Settings for All Mail Boxes] in [Function Settings] (Settings/Registration). However, if you update the settings for a Mail Box separately after using [Setting for All Mail Box], the updated settings take preference over the settings set with [Setting for All Mail Boxes]. (See "Settings for All Mail Boxes.")
|
 (Settings/Registration) → [Function Settings] → [Store/Access Files] → [Mail Box Settings] → [Set/Register Mail Boxes].
 -
-  (numeric keys), make sure to enter a two digit number → press [OK].