Converting Scanned Documents into Encrypted Searchable PDF
By using the Searchable PDF mode, you can convert paper documents into text searchable PDF files. For example, you can save space by digitizing paper documents such as curriculum vitae. Encrypting PDF files enables you to restrict unauthorized users from opening files and searching information. If you set a password when you send scanned documents, you can prevent information leakage that occurs when the documents are sent to the wrong destination.
Benefits of the Searchable PDF mode
The searchable PDF mode enables you to perform OCR (optical character recognition) to extract data that can be recognized as text from the scanned image, and add it as a transparent layer of text to create a PDF file that is searchable. This mode enables you to search necessary information quickly from PDF files.
Benefits of the Encrypted PDF mode
You can encrypt PDF files by setting a password. Only users who enter the correct password can open, print, or change the PDF. To use this function, the Universal Send Advanced Feature Set is required.
|
Required Condition
|
|
The Send function is available for use.
The Universal Send Security Feature Set is activated.
|
This section describes the procedure for creating a searchable PDF with restricted viewing access, and sending the PDF to the specified destination.
The appearance of the screens may differ from the ones you actually see, depending on the model of the machine you are using and the optional products available for use.
Follow the procedures below.
Specifying the OCR (Text Searchable) Settings
Encrypting and Sending the PDF
Specifying the OCR (Text Searchable) Settings
|
IMPORTANT
|
|
Text may not be detected correctly, depending on the background color, style and size of the characters in the image.
|
1.
Place your originals → press [Scan and Send] on the Main Menu screen.
|
NOTE
|
|
If the Main Menu screen is not displayed, press [Main Menu].
|
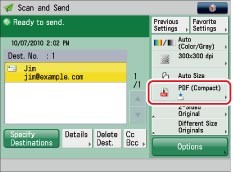
2.
Specify the destination → press the File Format button.
3.
Select [PDF] → press [Set Details].
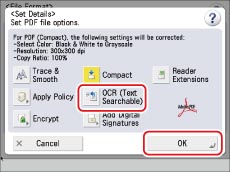
4.
Press [OCR(Text Searchable)] → [OK].
5.
Press [OK].
Encrypting and Sending the PDF
1.
Press the File Format button on the [Scan and Send] screen.
2.
Select [PDF] → press [Set Details].
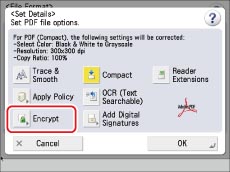
3.
Press [Encrypt].
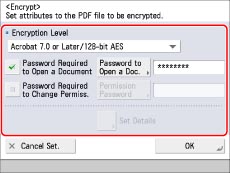
4.
Specify each setting.
Set [Password Required to Open a Document] to 'On' → enter a password for the file in [Password to Open a Doc.].
5.
Press [OK] → [OK] → [OK].
6.
Press

(Start) to send the PDF.
A text searchable PDF file is sent to the specified destination. To open this PDF file, the password set in step 4 is required.