e-ManualTopSite mapHelp

Category Top

Flow of Operations on the Settings/Registration Screen

Flow of Operations for Administrators

Flow of Operations for General Users

Settings/Registration Table

Preferences

Adjustment/Maintenance

Function Settings

Function Settings: Copy

Function Settings: Printer

Function Settings: Send

Function Settings: Receive/Forward

Function Settings: Store/Access Files

Function Settings: Web Access

Set Destination

Management Settings

Preferences

Paper Settings

Registering the Paper Size and Type for a Paper Source

Registering Long Sheet Tray Defaults

Registering/Editing/Deleting Custom Paper Sizes

Display Settings

Default Screen after Startup/Restoration

Default Screen (Status Monitor/Cancel)

Switching the Copy Basic Features Screen

Store Location Display Settings

Enabling the Language/Keyboard Switch

Changing the Display Language/Keyboard on the Touch Panel Display

Changing the Keyboard Shift Lock Feature Settings

Displaying the Remaining Paper Message

Number of Copies/Wait Time Status Display

Clean the Original Scanning Area Screen Prompt

Changing the Default Display of Select Paper List Screen

Setting the Default Display of the Paper Type Selection Screen

Changing Default Display for Paper Type List

mm/Inch Entry Switch

Displaying the Current Department ID

Displaying the Remaining Toner Error Message

Deleting the Remaining Toner Error Message

Changing the Puncher Die Name

Changing the Primary Fixing Assembly Name

Changing the Secondary Fixing Assembly Name

Timer/Energy Settings

Current Time Adjustment

Current Date and Time

Time Format

Auto Reset Time

Default Display after Auto Reset

Auto Sleep Time

Time Settings for Auto Adjust Gradation

Energy Consumption in the Sleep Mode

Auto Sleep Weekly Timer Settings

Setting the Energy Saver/Sleep Mode Exit Time

Switching Modes Activated After Pressing Energy Saver Key

Changing the Energy Saver Mode

Low Power Mode Time

Perfect Binder Energy Saver Mode Time

Setting When to Deactivate the Perfect Binder Energy Saver Mode

Accessibility

Key Repetition Settings

Inverting the Screen Colors

Function Settings

Common

Paper Feed Settings

Enabling Paper Drawer Auto Selection
Specifying Paper Drawer Auto Selection Based on Color
Setting Job Suspension for Detection of Multi-Sheet Feeding
Enabling Timeout for Suspended Jobs

Paper Output Settings

Output Tray Designation
Setting the Stacker Output Tray
Specifying the Maximum Number of Sheets to Load in the Stacker
Auto Eject Paper on Stacker Tray
High Volume Stack Mode
Alternating the Print Output (Offset Jobs)
Inserting a Job Separation Sheet between Print Jobs
Inserting a Job Separation Sheet between Copy Sets
Inserting a Job Separation Sheet after Clearing a Paper Jam in the Stacker
Outputting Different Sized Papers to the Same Output Tray
Aligning Output Paper of Different Width
Forcing to Output Excess Tab Paper
Normal/Reverse Order Output with External Finisher
Face UP/Face Down Output with External Finisher
Image Orientation When Output with External Finisher

Print Settings

Setting the Printing Priority
Outputting Reports with Two-Sided Printing
Registering Forms for the Superimpose Image Mode
Setting the Image Priority
Registering/Editing/Deleting User-Defined Text for Page Numbers and Watermarks

Scan Settings

Timing to Raise Feeder Tray
Feeder Jam Recovery Method
Scanner Noise Settings
Streak Prevention
Black Scan Speed/Image Quality Priority
Distinguishing LTRR and STMT Originals
Setting the Gamma Value for Remote Scans
Automatically Enabling the Remote Scanner Function
Auto Offline

Generate File

High Compression/Limited Color Image Quality Level
Setting the Resolution for Limited Color PDF
Settings for Creating Searchable PDF/XPS/OOXML
Trace & Smooth Settings
OOXML Settings
Deleting Background Images When Generating Word Files
Specifying the Minimum Version When Generating a PDF
Formatting PDF Files to PDF/A
Optimizing PDF for Web
Changing the PDF Encryption Level from Acrobat 10.0 or Equivalent to Acrobat 9.0 or Equivalent

Register Finishing Size

Perfect Binding Finishing Size
Registering/Editing/Deleting Finishing Size for Finishing/Booklet (Trim).

Copy

Registering/Editing/Deleting Favorite Settings Buttons

Changing/Initializing the Default Settings for the Copy Function

Registering Shortcut Keys

Registering Express Copy Shortcut Buttons

Enabling Auto Collating

Giving Priority to Image Orientation

Enabling Auto Orientation

Color Mode Settings for Copy

Printer

Print Quality

Layout

Copy Set Numbering

Face Up/Face Down

Compressed Image Output

Initialize

Send

Outputting Reports

Common Settings

Registering/Editing/Deleting Favorite Settings Buttons
Displaying a Confirmation Screen When Recalling Favorite Settings
Changing the Default Screen for Send
Changing the Default Settings for Send
Registering Shortcut Keys
Send TX Report
Communication Management Report
Printing the TX Terminal ID
Automatically Deleting Failed Jobs
Number of Retry Attempts
Data Compression Ratio
Gamma Value for YCbCr Send Jobs
Dividing Data Into Chunks When Sending with WebDAV
Confirming the SSL Server Certificate When Sending with WebDAV

E-Mail/I-Fax Settings

Registering the Unit's Name for E-Mail/I-Fax
Common Communication Settings for E-Mail/I-Fax
Confirming the SSL Server Certificate When Sending with SMTP
Confirming the SSL Server Certificate When Receiving with POP
Maximum Data Size for Send
Default Subject
Full Mode TX Timeout
Printing MDN/DSN upon Receipt
Sending Via a Server
Allowing MDN Not Via Server
Setting Auto Complete for E-mail Address Entry

Receive/Forward

Outputting Reports

Common Settings

2-Sided Printing
Paper Drawer Selection
Reducing a Received File
Printing Received Images with the 2 On 1 Layout
Printing Footer Information on a Received Document
Gamma Value for YCbCr Receive Jobs
Interrupt Printing of Received Jobs
Handling Files That Fail to Be Forwarded
Forwarding Settings
Storing Forwarding Settings
When Forwarding Destinations Do Not Match the Forwarding Conditions
Editing Forwarding Settings
Printing Forwarding Settings
Specifying the I-Fax Inbox Settings
Always Send Notice for RX Errors

Store/Access Files

Common Settings

Specifying the Scan and Store Settings
Specifying the Stored File Settings
Forcing Seven Digit Mail Box PINs

Mail Box Settings

Set Destination

Printing the Address Lists

Register Destinations

Registering an E-Mail Address

Registering an I-Fax Address

Registering a File Server Address

Registering a Group Address

Addresses Obtained via a Server

Editing Address Details

Deleting Addresses

Naming an Address Book

Registering One-Touch Buttons

Registering/Editing One-Touch Buttons

Deleting One-Touch Buttons

Changing the Default Display of the Address Book

LDAP Server Settings

Registering an LDAP Server

Editing LDAP Server Settings

Printing LDAP Server Settings

LDAP Server Auto Search

Registering/Editing LDAP Search Attributes

Registering/Editing/Deleting Default Search Conditions for Each LDAP Server

Obtaining the Remote Address Book

Remote Address Book

Remote Address Book Server Address

Communication Timeout

Top » Settings/Registration » Function Settings » Printer » Copy Set Numbering
Copy Set Numbering
0S9Y-1RS
Copy Set Numbering

[On], [Off]*

This setting enables you to print documents with a five digit serial number in the background on each copy.
Copy numbers are printed in the following methods:
When printing three copies of a five page document:
Print Position

[5 Locations]*, [Top Left], [Bottom Left], [Top Right], [Bottom Right], [Full Surface]

This setting enables you to specify the position of the copy numbers to be printed. You can select to print numbers in all five positions, in each corner, or over the entire page.
Starting Number

1 to 9999; 1*

The Starting Number mode enables you to specify the copy number to start numbering. The default is '1' (printed as 00001), but you can specify up to '9999' (printed as 09999).
Number Size

[Small(12 point)], [Medium(24 point)], [Large(36 point)]*

The Number Size mode enables you to select the size of copy number from [Small(12 point)], [Medium(24 point)], and [Large(36 point)] ('12.0 pt.', '24.0 pt.', and '36.0 pt.').
Density

1 to 5; 3*

This setting enables you to adjust the number density and has 5 levels you can adjust, with level '3' (middle level) being the default setting. Selecting '1' makes the number lighter, and selecting '5' makes it darker.
Color

[Yellow], [Magenta], [Cyan], [Black]*, [Red], [Green], [Blue]

This setting enables you to specify the color of the copy number.
Number Position Vertical/Number Position Horizontal

-5/16 inches to +5/16 inches; 0* inches

The position of the copy numbers specified with the Print Position mode can be finely adjusted by offsetting them in the horizontal or vertical directions. The adjustment can be made in increments of 1/16" from -5/16" through +5/16".
You can increase or decrease the setting value to adjust the print position of the copy numbers, as described below.
[Number Position Vertical]
Increasing the setting value moves the print position in the downward direction of the paper. Decreasing the setting value moves the print position in the upward direction of the paper.
[Number Position Horizontal]
Increasing the setting value moves the print position to the right. Decreasing the setting value moves the print position to the left.

IMPORTANT
Please note that if the print position is adjusted to place the digits of the copy numbers outside the printable area, the portion outside the printable area is not printed.
NOTE
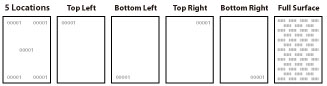
If the copy number has fewer than five digits, the machine prints it as follows:
Example: If the copy number is 10
10→00010
Copy numbers are not printed on blank pages (pages with no data).
If the Copy Set Numbering mode is used in combination with the Gutter mode or Offset Short Edge/Offset Long Edge mode, part of the copy number may be cut off.
The Copy Set Numbering mode is not available if the Transparency Interleaving mode is enabled.
If the number of printed copies exceeds '99999', it returns to '00001'.
The Number Position Vertical/Number Position Horizontal mode is only effective for the print position of copy numbers. When adjusting print position (other than the copy numbers), perform the setting with the Offset Short Edge/Offset Long Edge mode. (See "Offset Short Edge/Offset Long Edge (Front)" and "Offset Short Edge/Offset Long Edge (Back).")
The Print Position mode is only available if you set [Copy Set Numbering] to [On].
The Starting Number mode is available only if you set [Copy Set Numbering] to [On].
The Number Size mode is only available if you set [Copy Set Numbering] to [On].
The Density mode is only available if you set [Copy Set Numbering] to [On].
The Color mode is only available if you [Copy Set Numbering] to [On].
The Number Position Vertical/Number Position Horizontal mode is only available if you set [Copy Set Numbering] to [On].