|
NOTE
|
|
The stored job management function can only be used on Canon devices with a touch panel display.
To use the stored job management function, you must log in to the device from the touch panel display of a Canon device. For instructions on logging in, see "Logging In"
The screen that is displayed may differ depending on the model of the machine.
|

|
NOTE
|
|
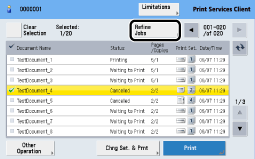
The list of stored jobs retrieved from Canon Business Imaging Online when logging in to the device is displayed.
The maximum number of jobs displayed on one page is 100. If the number of jobs to retrieve from Canon Business Imaging Online exceeds 100 jobs, the stored jobs are retrieved by page and displayed in the Stored Jobs list.
If you move to the previous page or next page using [
 ] or [ ] or [ ] while jobs are selected in the displayed Stored Jobs list, the selections are canceled. ] while jobs are selected in the displayed Stored Jobs list, the selections are canceled.If you press [
If you are using an imageRUNNER model or LBP model, select [Print Services Client] from the MEAP application selection button.
If you update the list when a job is selected, the selection is retained, except in the following cases:
When the job is deleted
When the job no longer matches the conditions for refining and is no longer displayed in the list
|
|
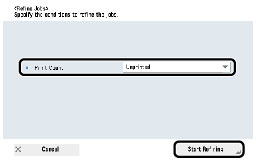
Condition
|
Options
|
Description
|
|
Print Count
|
Unprinted
|
Displays jobs for which the print count is zero.
|
|
No Specification
|
Displays jobs for which the print count has not reached the limit count.
|


|
NOTE
|
|
In the details, [Document Name], [Date/Time Received], [Date/Time of Last Print], [Pages], [Size (byte)], [Number of Copies], [Select Color], [Print Style], [N on 1], [Print Count], [Limit Count], [Status], [Owner Name], [Retention Expiration], [Print Expiration], and [Document ID] are displayed.
|
|
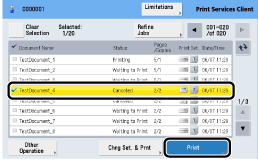
Status
|
Description
|
|
Receiving
|
Receiving stored job with Canon Business Imaging Online
|
|
Waiting
|
Successfully received stored job with Canon Business Imaging Online
|
|
Printing
|
Completed receipt of stored job with Canon Business Imaging Online and printing in process
|
|
Printed
|
Completed printing
|
|
Deleting
|
Processing deletion
|
|
RX Error
|
Could not complete receipt of stored job with Canon Business Imaging Online
|
|
Ended in Err.
|
Printing failed
|
|
Waiting to Print
|
Canon Business Imaging Online received print request but printing not yet in process
|
|
Canceled
|
Canceled printing before completion
|
|
Processing
|
Canon Business Imaging Online is exporting a stored job for an output option
|
|
Deleted
|
Completed deletion
|
|
Prnt. Sched.
|
A saved Auto Batch Printing job before printing is performed
|
|
NOTE
|
|
If Deleting, RX Error, Ended in Err., Canceled, or Deleted is displayed for the status, the print result for that job is error.
|
|
NOTE
|
|
When printing stored jobs, you can select multiple jobs and print them at one time.
When selecting multiple stored jobs, you cannot select more than the maximum number of selectable jobs.
Printing cannot be performed if a job that cannot be printed due to AMS access restrictions is selected.
For information on AMS, see "AMS Limitations" |
|
NOTE
|
|
A list of jobs for which errors occur is displayed in the error list dialog when you select and print multiple stored jobs.
If errors occur for all the jobs you select and you close the error list dialog, the Stored Jobs list is updated and you are returned to the Print Services screen.
If errors occur for some of the jobs you select and you close the error list dialog, the jobs without errors are printed, and the jobs for which errors occurred are displayed in the error list dialog again after printing is complete. If you close the error list dialog, the Stored Jobs list is updated and you are returned to the Print Services screen.
The dialog may not be displayed depending on the settings file setting value.
|
|
NOTE
|
|
If printing starts after the Waiting to Print dialog is displayed, an update dialog is displayed, and the stored job is updated.
When the Stored Jobs list is updated after printing, all stored job selections are canceled.
If the device cannot perform color printing, printing is performed in black-and-white, regardless of the print attributes of a job.
|
|
NOTE
|
|
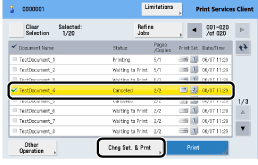
This button can be used when only one job is selected.
The button is disabled if no job is selected or if more than one job is selected. |

|
Print Attribute
|
Options
|
Description
|
|
Number of Copies
|
-
|
Enter the number of copies to print. Set within the range 1 to 255.
|
|
Select Color
|
|
Automatically selects Black & White or Color, and prints.
|
|
|
Performs color printing.
|
|
|
|
Performs black-and-white printing.
|
|
|
No Change
|
Prints without changing the print settings.
|
|
|
-----
|
Prints without changing the print settings.
This option is displayed when Select Color is not set and Select Color cannot be changed. |
|
|
Print Style
|
|
Performs 1-sided printing.
|
|
|
Performs 2-sided printing.
|
|
|
-----
|
Prints without changing the print settings.
This option is displayed when Print Style is not set and Print Style cannot be changed. |
|
|
N on 1
|
|
Prints one page on one side of the paper.
|
|
|
Prints two pages on one side of the paper.
|
|
|
|
Prints four pages on one side of the paper.
|
|
|
No Change
|
Prints without changing the print settings.
|
|
|
-----
|
Prints without changing the print settings.
This option is displayed when N on 1 is not set and N on 1 cannot be changed. |
|
Print Attribute
|
Condition
|
Limitations
|
|
Print Style
|
When Deny is set for the AMS limitation, Simplex
|
Only 2-Sided can be selected.
|
|
N on 1
|
When 2 is set for the AMS limitation, Nup
|
Only 2 on 1 or 4 on 1 can be selected.
|
|
When 4 is set for the AMS limitation, Nup
|
Only 4 on 1 can be selected.
|
|
|
Select Color
|
When Bw is set for the AMS limitation, ColorPrint
|
Only Black & White can be selected.
|
|
NOTE
|
|
If the device is operating in AMS mode, Print Services Client applies limitations according to the access limitations for the login user.
If the device is operating in Regular mode, limitations are not applied. AMS mode is available only for iR-ADV models.
By pressing the Limitations button on the Print Services screen, you can display the Limitations dialog and confirm the AMS limitations set for the login user.
The Limitations button is displayed only when the device is operating in AMS mode. |


|
NOTE
|
|
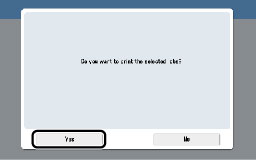
You can select multiple jobs and cancel them at one time.
When selecting multiple stored jobs, you cannot select more than the maximum number of selectable jobs.
When the Stored Jobs list is updated after canceling, all stored job selections are canceled.
If errors occur for some or all of the stored jobs when canceling printing, the jobs for which errors occurred are displayed in the error list dialog. Close the error dialog to update the Stored Jobs list.
|

|
NOTE
|
|
When deleting stored jobs, you can select multiple jobs and delete them at one time.
When selecting multiple stored jobs, you cannot select more than the maximum number of selectable jobs.
The dialog may not be displayed depending on the settings file setting value.
|

|
NOTE
|
|
If errors occur during deleting, a list of the jobs for which the errors occurred is displayed in the error list dialog. If you close the error list dialog, the Stored Jobs list is updated and you are returned to the Print Services screen.
|
|
NOTE
|
|
When the Stored Jobs list is updated after deletion, all stored job selections are canceled.
|
