Adding/Changing an ID Provider
This section describes the procedure for adding an ID provider to link with Canon Business Imaging Online and changing the ID provider to log in to.
|
Required Privileges
|
|
Administrator privileges for the Tenant
|
|
Information Required in Advance
|
The following file downloaded from the ID provider is required to add a provider. (For information on the procedure for Salesforce or Salesforce Sandbox, see steps 4 to 9 of "Salesforce Settings".) Metadata (.xml)
Certificate (.cer)
The following information is required to perform batch registration of settings for linking with other services for another user in the tenant.
Canon Business Imaging Online user ID
User ID of the other service
|
Authentication linking is set for the ID provider added here, and can be selected as the other party for Single Sign-On.
1.
Log in to Canon Business Imaging Online.
For more information, see
"Logging In".
2.
On the [Home] screen, click [Register and Manage ID Providers] in [Authentication Federation with Other Services Settings].
3.
Click [Add IDP].
4.
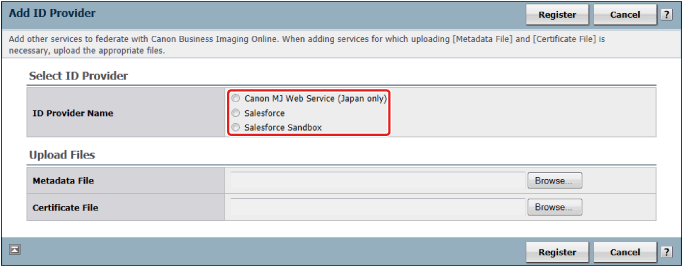
Select the ID provider to add.
5.
Click [Browse] → specify the upload file → click [Register].
Specify the file downloaded from the ID provider.
|
File extension
|
File content
|
|
.xml
|
Certificate
|
|
.cer
|
Metadata
|
|
NOTE
|
|
File uploading is not required for SOLTAGE.
|
6.
Confirm that registration is complete → close your Web browser.
It takes approximately four hours to complete the registration. Notification of registration completion is sent via e-mail.
The name of the registered ID provider is added to the list.
Authentication Information Mapping
Batch registration of ID provider linking settings for other users in the tenant can be performed by editing a mapping file. For information on the procedure in Salesforce and Salesforce Sandbox, see steps 6 to 14 in
"Canon Business Imaging Online Settings".
Changing the ID Provider for Logging In
You can change the Single Sign-On ID provider.
1.
Log in to Canon Business Imaging Online.
For more information, see
"Logging In".
2.
On the [Home] screen, click [Register and Manage ID Providers] in [Authentication Federation with Other Services Settings].
3.
Click [Select Login Destination IDP].
4.
Select the Single Sign-On ID provider → click [Update].
You can select an ID provider that has been registered.
5.
Click [Yes].
6.
Click [To the Register and Manage ID Providers Page].
7.
Confirm that the ID provider selected as the login destination is selected.


