User Management (Batch Settings)
This section describes the procedure for the batch setting of multiple users and the roles for each service.
After the scheduled batch settings (registering multiple users, editing/deleting detailed information, or setting roles) are complete, e-mail notification is sent to the user that set the schedule from Canon Business Imaging Online.
NOTE
Registration of the settings is completed the following day.
Required Privileges
Administrator privileges for the Tenant
Information Required in Advance
Creating a settings file to use for the batch operation
For more information on creating the file, see "Downloading a Sample Settings File" and "Details of Batch Operation Settings Files".
Scheduling Batch Registration, Detailed Information Changes, or Deletion for Multiple Users
NOTE
You can set up to three schedules for batch registration, detailed information changes, or deletion for multiple users.
If there are already three schedules set, it is necessary to cancel a schedule or delete a schedule that is already complete (a schedule with [Succeeded] or [Failed]).
1.
Log in to Canon Business Imaging Online.
For more information, see "Logging In".
2.
On the [Home] screen, click [User Operations] in [Manage Users (Batch Settings)].
3.
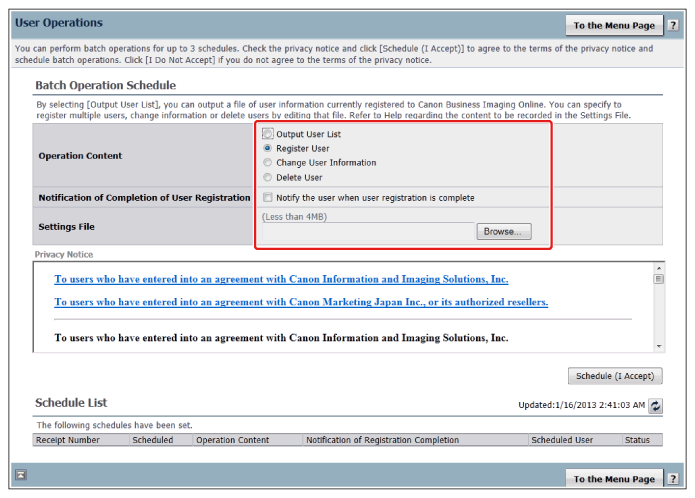
Select [Operation Content] → click [Browse] → select a file created in advance.
When [Operation Content] is [Register User]:
For information on the content of the file, see "User Batch Registration Settings Files".
If you select [Notification of Completion of User Registration], an e-mail indicating the user ID and the URL for setting the password is sent to the registered user from Canon Business Imaging Online.
When [Operation Content] is [Change User Information]:
For information on the content of the file, see "User Batch Change Settings Files".
When [Operation Content] is [Delete User]:
For information on the content of the file, see "User Batch Deletion Settings Files".
NOTE
If [Output User List] is selected for [Operation Content], a list of all the users registered in the Tenant is output to a CSV file. (See "User Batch Output Files".) That CSV file can be edited to change the detailed information for multiple users.
[Notification of Completion of User Registration] can be selected only when [Register User] is selected for [Operation Content].
4.
Read the content of [Privacy Notice] → click [Schedule (I Accept)].
NOTE
When [Delete] is selected, the deleted user information cannot be restored.
In the following cases, an error is displayed and the settings are not specified.
When the format of the settings file does not match that in "Details of Batch Operation Settings Files"
When the size of the settings file exceeds 4 MB
5.
Click [To the User Operations Page].
A list of the batch operation information is displayed in [Schedule List].
Canceling/Deleting a Schedule
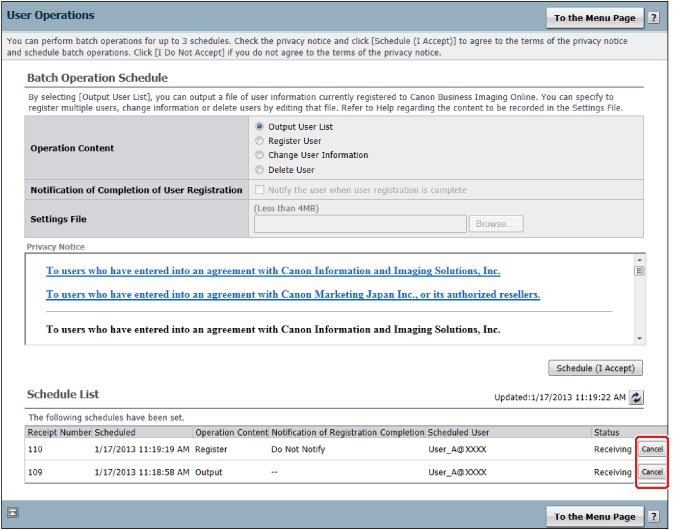
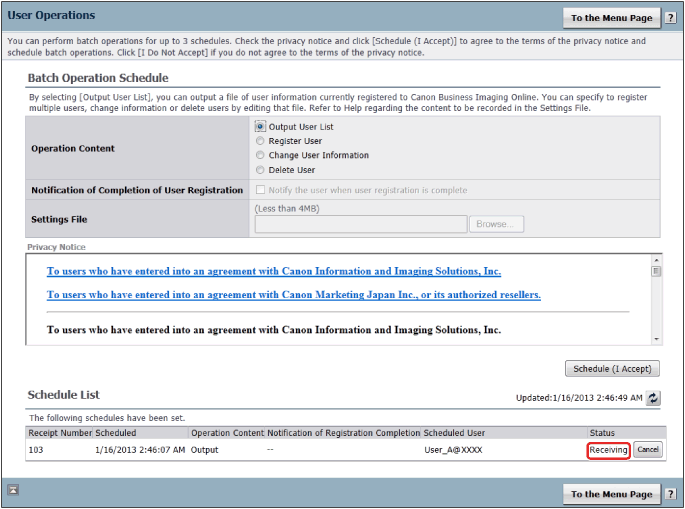
In the [Schedule List], schedules whose [Status] is [Receiving] can be canceled, and schedules that are already complete (those with [Succeeded] or [Failed] displayed) can be deleted.
1.
Display [User Operations].
The procedure is the same as steps 1 and 2 in "Scheduling Batch Registration, Detailed Information Changes, or Deletion for Multiple Users".
2.
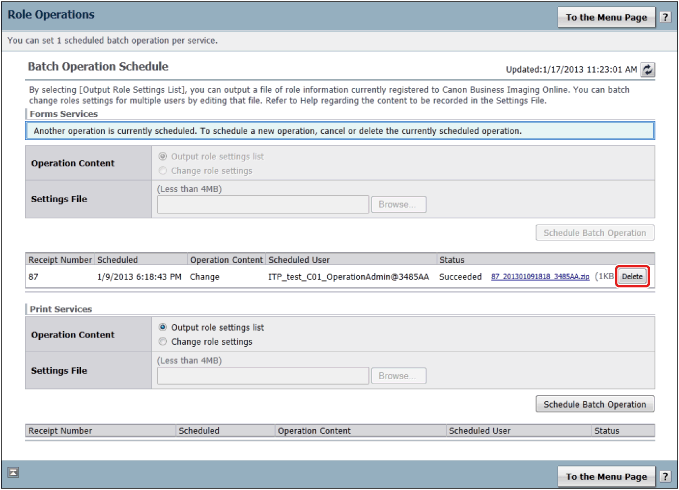
In [Schedule List], click [Cancel] or [Delete] for the schedule to cancel.
3.
Check the confirmation screen → click [Yes].
4.
Click [To the User Operations Page].
Downloading a Results File
In the [Schedule List], items whose [Status] is [Succeeded] or [Failed] display the file name of the results file (.zip format). You can click the file name to download the file and check the settings that succeeded/failed for each user.
1.
Display [User Operations].
The procedure is the same as steps 1 and 2 in "Scheduling Batch Registration, Detailed Information Changes, or Deletion for Multiple Users".
2.
Click the file name (*.zip) in the [Schedule List].
3.
Follow the file download procedure to save the file.
Scheduling Batch Device Role Settings for Multiple Users
You can set roles for multiple users at the same time.
NOTE
You can set a single batch role setting schedule for multiple users for each service.
If there is already a schedule set, it is necessary to cancel the current schedule or delete the schedule that is already complete (a schedule with [Succeeded] or [Failed]).
1.
Log in to Canon Business Imaging Online.
For more information, see "Logging In".
2.
On the [Home] screen, click [Role Operations] in [Manage Users (Batch Settings)].
3.
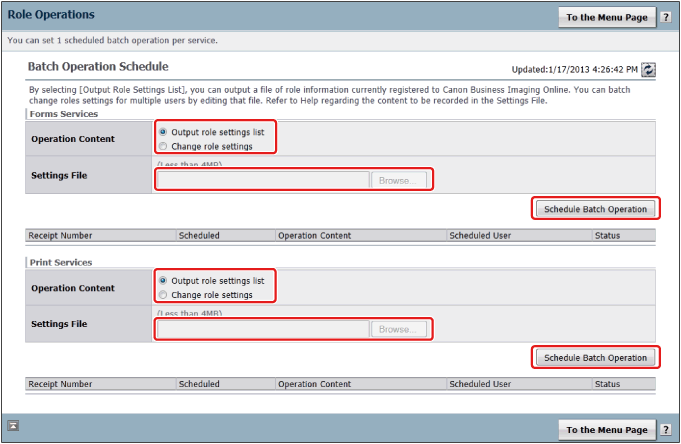
Specify the following settings → click [Schedule Batch Operation].
When setting a [Forms Services] schedule
Select [Operation Content] → click [Browse] → select a file created in advance.
For information on the content of the file, see "Role Batch Setting Settings Files".
Click [Schedule Batch Operation] for [Forms Services].
When setting a [Print Services] schedule
Select [Operation Content] → click [Browse] → select a file created in advance.
For information on the content of the file, see "Role Batch Setting Settings Files".
Click [Schedule Batch Operation] for [Print Services].
NOTE
In the following cases, an error is displayed and the settings are not specified.
When the format of the settings file does not match that in "Role Batch Setting Settings Files"
When the size of the settings file exceeds 4 MB
4.
Click [To the Role Operations Page].
Canceling/Deleting a Schedule
In the [Schedule List], schedules whose [Status] is [Receiving] can be canceled, and schedules that are already complete (those with [Succeeded] or [Failed] displayed) can be deleted.
1.
Display [Role Operations].
The procedure is the same as steps 1 and 2 in "Scheduling Batch Registration, Detailed Information Changes, or Deletion for Multiple Users".
2.
In [Schedule List], click [Cancel] or [Delete] for the schedule to cancel.
3.
Check the confirmation screen → click [Yes].
4.
Click [To the User Operations Page].
Downloading a Results File
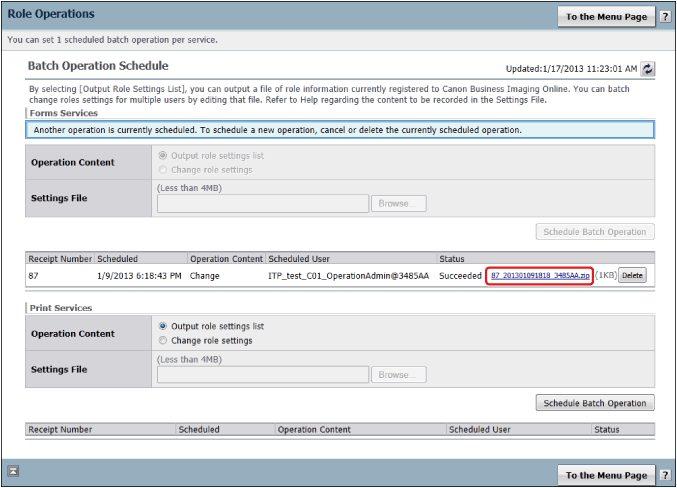
In the [Schedule List], items whose [Status] is [Succeeded] or [Failed] display the file name of the results file (.zip format). You can click the file name to download the file and check the settings that succeeded/failed for each user.
1.
Display [User Operations].
The procedure is the same as steps 1 and 2 in "Scheduling Batch Registration, Detailed Information Changes, or Deletion for Multiple Users".
2.
Click the results file name (*.zip) in the [Schedule List].
3.
Follow the file download procedure to save the file.
Downloading a Sample Settings File
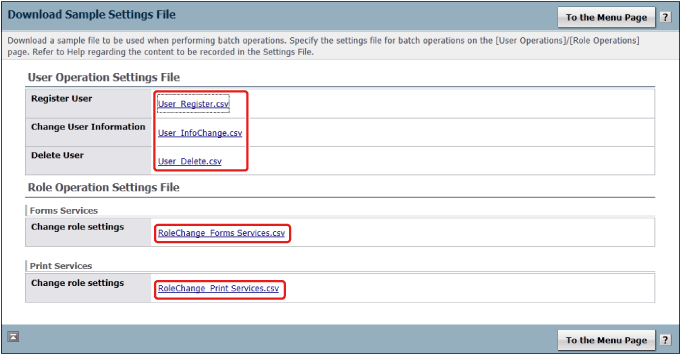
You can download a sample of the settings file used for a batch operation. That sample can be edited and specified as the settings file for a batch operation on the [User Operations]/[Role Operations] page.
1.
Log in to Canon Business Imaging Online.
For more information, see "Logging In".
2.
On the [Home] screen, click [Download Sample Settings File] in [Manage Users (Batch Settings)].
3.
Click the file name (*.csv) to use for the batch setting operation.
4.
Follow the file download procedure to save the file.
Details of Batch Operation Settings Files
IMPORTANT
Save the file to register in the Unicode Text (UTF-16) format.
Precautions When Customizing a Settings File
When a value is "blank", a blank character is set.
The exception is the password item. If a blank character is specified for the password item, the password is automatically generated and output.
The order to enter item IDs in the settings file is optional.
The only quotation marks that can be used are double quotation marks.
Single-byte spaces added before and after the items in the settings file are ignored.
Up to 3,000 lines of user information can be recorded in one settings file.
Line breaks (CRLF, LF, or CR codes) inside quotation marks are ignored.
In the following cases, an error occurs and the setting is not specified:
When an item is defined twice
When a unique new item is defined
Information Included in the Settings File
Type of Information
Description
Required
If not included, an error occurs and the setting is not specified.
Optional
Set if included.
Ignore
Not set even if included. (Items included in output files and result files.)
User Batch Registration Settings Files
NOTE
For details on the information entered from the second row, see "User Registration".
Content of the header row (row 1)
Type
Content to enter in the data rows (row 2 and later)
USER_ID
Required
Target user ID*
LAST_NM
Required
Last name of user*
FIRST_NM
Required
First name of user*
LOCALE_CD
Required
Region that the user resides (select one of the following)
Japanese (Japan): ja_JP
English (United States): en_US
English (Singapore): en_SG
TIME_ZONE_CD
Required
Time zone of the user
(Enter the string in the "Code" column in "List of Time Zones".)
UI_LOCALE_CD
Required
Screen display language of the user (select one of the following)
Japanese: ja
English: en
PASSWORD
Optional
Password of the user
MAIL_ADDRESS
Optional
E-mail address of the user*
COMMENT
Optional
Enter a string of your choice*
LOCAL_ACCOUNT_NM
Optional
Local account name (item used in Print Services)
LOCAL_DOMAIN_NM
Optional
Local domain name (item used in Print Services)
TENANT_ID
Ignore
ID of the tenant the user belongs to
MASTER_FLG
Ignore
Flag indicating the master administrator
Master administrator: 1
User other than the master administrator: 0
RESULT
Ignore
Result of processing the operation for the target user
* For information on the the number and type of characters that can be used, see "User Registration".
User Batch Change Settings Files
Content of the header row (row 1)
Type
Content to enter in the data rows (row 2 and later)
USER_ID
Required
Target user ID*
LAST_NM
Optional
Last name of user*
FIRST_NM
Optional
First name of user*
LOCALE_CD
Optional
Region that the user resides (select one of the following)
Japanese (Japan): ja_JP
English (United States): en_US
English (Singapore): en_SG
TIME_ZONE_CD
Optional
Time zone of the user
(Enter the string in the "Code" column in "List of Time Zones".)
UI_LOCALE_CD
Optional
Screen display language of the user (select one of the following)
Japanese: ja
English: en
MAIL_ADDRESS
Optional
E-mail address of the user*
COMMENT
Optional
Enter a string of your choice*
LOCAL_ACCOUNT_NM
Optional
Local account name (item used in Print Services)
LOCAL_DOMAIN_NM
Optional
Local domain name (item used in Print Services)
PASSWORD
Ignore
Password of the user
TENANT_ID
Ignore
ID of the tenant the user belongs to
MASTER_FLG
Ignore
Flag indicating the master administrator
Master administrator: 1
User other than the master administrator: 0
RESULT
Ignore
Result of processing the operation for the target user
* For information on the the number and type of characters that can be used, see "User Registration".
User Batch Deletion Settings Files
Content of the header row (row 1)
Type
Content to enter in the data rows (row 2 and later)
DELETE_USER_ID
Required
User ID to be Deleted
User Batch Output Files
The details of this file are the same as "User Batch Change Settings Files".
However, [PASSWORD] and [RESULT] are not included.
The data rows are output in ascending user ID order.
Role Batch Setting Settings Files
Role Batch Registration Settings for Print Services
Content of the header row (row 1)
Type
Content to enter in the data rows (row 2 and later)
USER_ID
Required
The target user ID
PRINT_ROLE_FLG
Required
Flag indicating the user of Print Services
User of Print Services: 1
User that is not a user of Print Services: 0
RESULT
Ignore
Result of processing the operation for the target user
Role Batch Registration Settings for Forms Services
Content of the header row (row 1)
Type
Content to enter in the data rows (row 2 and later)
USER_ID
Required
The target user ID
FORM_ROLE_FLG
Required
Flag indicating the user of Forms Services
User of Forms Services: 1
User that is not a user of Forms Services: 0
RESULT
Ignore
Result of processing the operation for the target user
Role Batch Output Files
Role Batch Registration Settings for Print Services
Details are the same as "Role Batch Registration Settings for Print Services" in "Role Batch Setting Settings Files". However, [RESULT] is not included.
Role Batch Registration Settings for Forms Services
Details are the same as "Role Batch Registration Settings for Forms Services" in "Role Batch Setting Settings Files". However, [RESULT] is not included.
NOTE
The data rows for each service are output in ascending user ID order.
» How to Use Forms Services/Print Services » Tenant Settings » User Management (Batch Settings)