Editing User Information
Administrator users of the Tenant can change the user information in their own tenant. They can also reset passwords and change the roles for each service.
Required Privileges
Administrator privileges for the Tenant
Changing Detailed Information
1.
Log in to Canon Business Imaging Online.
For more information, see "Logging In".
2.
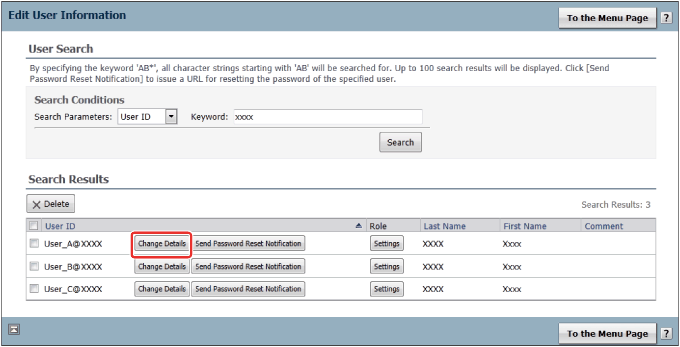
Click [Settings] for the user you want to set a role for.
3.
On the [Home] screen, click [Edit User Information] in [Manage Users].
4.
Search for the user.
Select [Search Parameters].
[User ID]
Searches by user ID.
[Last Name]
Searches by last name.
[First Name]
Searches by first name.
[Comment]
Searches by comment string.
Enter [Keyword].
You can specify wildcards (*).
Search condition
Example keyword
Description
[User ID]
sato_ichirou@example_sales.co.jp
sato_*
Searches by user ID, and displays the corresponding user.
[Last Name]
Sato
Suzuki
Searches by user's last name, and displays the corresponding users.
Click [Search].
The corresponding users are displayed in a list.
5.
Click [Change Details] for the user you want to change the registered information for.
6.
Check the registered information.
Check [User ID].
This cannot be changed.
Check [E-mail Address for Notification].
Canon Business Imaging Online sends notification to this e-mail address when the password is changed, etc.
To change the address, select [Change the e-mail address for notification] → enter the new e-mail address.
Enter only e-mail addresses and separator characters. You cannot enclose addresses with "<" and ">" or add a display name.
Number of characters
Type of characters
Example
Left side of @
64 characters or less
Single-byte alphanumeric characters
! # $ % & ' * + - / = ? ^ _ ` { | } ~ .
(The address cannot start with "." or "=" or end with "." or include consecutive ".".)
suzuki@example.co.jp
Right side of @
228 characters or less
Single-byte alphanumeric characters
- .
(Start the address with an alphanumeric character. The address cannot end with "." or include consecutive ".".)
All
255 characters or less
Check [Name].
This can be changed.
Number of characters
Type of characters
Last Name
16 characters or less
Multiple-byte/single-byte
First Name
Check [Administrator Privileges].
To register the new user as an administrator user for the Tenant, select [Set this user as administrator]. Otherwise, the user is registered as a general user.
NOTE
Administrator privileges cannot be canceled for the user performing the operation or the operational administrator.
For information on the differences between administrator users and general users for a Tenant, see "Terms Used in This Manual".
Check [Time Zone].
This can be changed.
Check [Display Language].
This can be changed.
Check [Comment].
This can be changed.
Number of characters
Type of characters
63 characters or less
Multiple-byte/single-byte
7.
Confirm the terms of use.
Select [Update (I Accept)] or [I Do Not Accept].
8.
Confirm the displayed information → click [To Home Page].
Resetting a Password
1.
Display the users in a list.
The procedure up until here is the same as "Changing Detailed Information".
2.
Click [Send Password Reset Notification] for the user you want to reset the password for.
A URL for resetting the password is sent to the user's e-mail address for notification.
IMPORTANT
The URL for resetting the password is valid for 24 hours.
If the e-mail address for notification is not registered, a URL for resetting the password is displayed on the screen operated by an administrator user instead of sending it to the e-mail address for notification.
Setting the Roles for Each Service
1.
Display the users in a list.
The procedure up until here is the same as "Changing Detailed Information".
2.
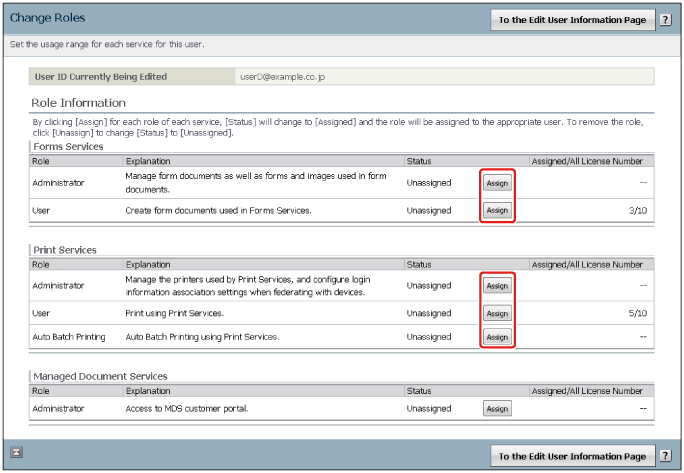
Set the roles for each service.
Set whether each service will be used by the [Administrator] role or [User] role.
NOTE
For information on the difference between the [Administrator] role and the [User] role, see "Terms Used in This Manual".
If there are no licenses available for use, roles cannot be assigned to users.
» How to Use Forms Services/Print Services » Tenant Settings » Editing User Information