Setting Screen and Operations for Scanning to Save
When you press <Scan and Store> on the Main Menu, and then press <Mail Box>, <Advanced Box>, <Network>, or <Memory Media> to scan originals, the following setting screen is displayed.
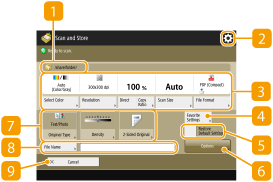
 Save location
For Mail Box, the box number and name is displayed next to the icon.
For Advanced Box/Network/Memory Media, the directory path is displayed next to the icon.


Press this icon to register the current settings in <Favorite Settings> of  or in the Quick Menu. Using the Quick Menu
or in the Quick Menu. Using the Quick Menu Current setting status and setting buttons
Displays setting status such as resolution, magnification, and scanning size. Make sure to confirm the settings in order to scan properly. To change the settings, press the button under the display section.
<Favorite Settings>
Register frequently used scan settings here in advance to easily recall them when necessary.
 <Restore Default Settings>
Changes scan setting into setting values registered in <Change Default Settings>. <Scan and Store Settings> <Change Default Settings>
 <Options>
Enables you to specify the settings of functions that are not displayed in / . For details about each setting item, see Scanning and Copying.
/. For details about each setting item, see Scanning and Copying.Function setting buttons
Displays the most frequently used buttons. The setting status is displayed on the buttons. To change the settings, press the desired button.
 <File Name>
Press to assign a file name for a file when saving.
You cannot use the following characters in a file name: \ / : , * ? " < > |. Also, you cannot use a . (period) or space for the first or last character of a file name.
If you do not specify anything, the saved date and time is automatically assigned as a file name. For example, if a file is saved as a JPEG at 1:05:12 p.m. on October 30, 2015, its name will be "20151030130512.jpg."

If a file name is too long, the string (path) indicating the file location may exceed the maximum of 256 characters, causing the file to not be specified.
If you enter a file name that already exists in the save location, (1) to (9) is added to the file name, for example, "a(1).pdf" (except for the files in the Mail Box).
If <Divide into Pages> is selected when specifying the file format, a three-digit page number is added to the end of a file name. For a file with the name "a.pdf," for example, the file is divided into "a_001.pdf," "a_002.pdf," and "a_003.pdf" when saved.
 <Cancel>
Cancels scan settings and returns to the file selection screen.