Selecting the IEEE802.1X Authentication Method
This section describes how to select the IEEE802.1X authentication method.
1.
Press

(Settings/Registration).
2.
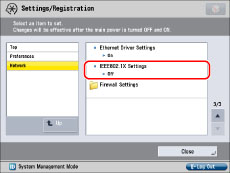
Press [Preferences] → [Network] → [IEEE802.1X Settings].
3.
Press [On] for <Use IEEE802.1X>.
Press [Off] if you do not want to use IEEE802.1X authentication.
|
IMPORTANT
|
|
If you set <Use IEEE802.1X> to 'On', the machine will not completely enter the Sleep mode.
|
4.
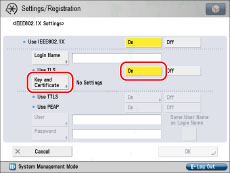
Select the IEEE802.1X authentication method → press [OK].
Register the CA certificate in advance.
(See "Registering/Editing a CA Certificate File.") If setting the EAP-TLS method, also install the key pair file and the client certificate file.
(See "Installing a Key Pair File and Server Certificate.")Press [On] for <Use TLS> → [Key and Certificate].
|
NOTE
|
|
If you set <Use TLS> to 'On', you cannot set <Use TTLS> or <Use PEAP>.
|
Select the key pair and client certificate you want to use for EAP-TLS → press [Set as the Default Key].
|
IMPORTANT
|
|
You cannot specify 'Device Signature Key' (used for key pairs for adding digital signatures to PDFs or XPSs) or 'AMS' (used for key pairs for access restrictions) as the name for the key pair.
You can check the content of a certificate by selecting a key pair on the Key and Certificate screen, and pressing [Certificate Details]. On the Certificate Details screen, you can press [Verify Cert.] to verify the certificate.
You can check what a key pair is being used for by selecting a key pair with 'Used' displayed for <Status> on the Key and Certificate screen, and pressing [Display Use Location].
|
Press [Yes] → [OK].
Press [Login Name].
Enter the name of the user to receive IEEE802.1X authentication → press [OK].
Press [OK].
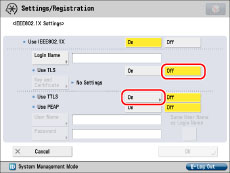
Press [Off] for <Use TLS> → [On] for <Use TTLS>.
Select the internal authentication protocol to use → press [OK].
|
IMPORTANT
|
|
You cannot set both MS-CHAPv2 and PAP simultaneously.
|
Set the login name/user name and password.
To apply IEEE802.1X authentication to login users: Press [Same User Name as Login Name]. Enter the login user name in [Login Name] and the specified login user password in [Password]. On the Confirm screen, enter the same password to confirm the password → press [OK].
To apply IEEE802.1X authentication to users other than login users: Enter the user name in [User Name] and the specified user password in [Password]. On the Confirm screen, enter the same password to confirm the password → press [OK].
Press [OK].
Press [Off] for <Use TLS> → [On] for <Use PEAP>.
Set the login name/user name and password.
To apply IEEE802.1X authentication to login users: Press [Same User Name as Login Name]. Enter the login user name in [Login Name] and the specified login user password in [Password]. On the Confirm screen, enter the same password to confirm the password → press [OK].
To apply IEEE802.1X authentication to users other than login users: Enter the user name in [User Name] and the specified user password in [Password]. On the Confirm screen, enter the same password to confirm the password → press [OK].
Press [OK].