|
NOTE
|
|
You can select a job type from the drop-down list to display only jobs of a specific type in the list.
|
 (Status Monitor/Cancel).
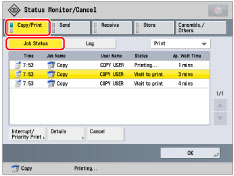
|
[Interrupt/Priority Print]:
|
Interrupts the print job in progress, or changes the printing priority of the selected job. [Interrupt and Print] suspends the current job and prints the selected job. [Priority Print] prints the selected job after the current job is complete.
|
|
[Details]:
|
Displays detailed information for the selected job. Check the detailed information → press [OK] to return to the Copy/Print screen.
|
|
[Cancel]:
|
Cancels the selected job. Press [Cancel] → [Yes] to cancel the job.
|
|
IMPORTANT
|
|
You cannot select multiple jobs and cancel them all at once. Select and cancel one job at a time.
|
|
NOTE
|
|
If interrupt printing is performed for a multiple page copy/print job, printing of the remaining pages is suspended while the interrupt print job is performed. However, if you are using one of the finishing modes below, the interrupt print job is only performed after the current print set is complete.
Staple
Booklet
Saddle Fold
You cannot interrupt an interrupt print job with another job. If you try to interrupt an interrupt print job, the job is started after the current interrupt job is complete.
You cannot perform Interrupt/Priority printing by selecting an interrupt print job that is waiting to be processed.
You cannot interrupt a job that has resumed copying/printing after being suspended due to an interruption by another job, lack of paper or toner, or other causes. Even if an interrupt print job is performed, that operation is ignored.
You cannot perform interrupt printing for a document received via fax/I-fax with another received print job.
[Pause] changes to [Resume] when you pause a print job. Press [Resume] to resume printing.
For information on the errors that can be temporarily disabled by pressing [Skip Error] after you select a job, see "List of Error Messages."
The canceled job appears as <NG> (No Good) on the Log screen.
|
(Status Monitor/Cancel).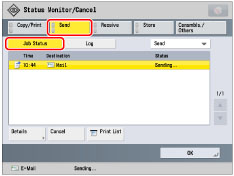
|
[Details]:
|
Displays detailed information for the selected job. Check the detailed information → press [OK] to return to the Send screen.
|
|
[Cancel]:
|
Cancels the selected job. Press [Cancel] → [Yes] to cancel the job.
|
|
[Print List]:
|
Prints the job status list. [Print List] is displayed when a job is selected. Press [Print List] → [Yes] to print the list.
|
|
IMPORTANT
|
|
You cannot select multiple jobs and cancel them all at once. Select and cancel one job at a time.
|
|
NOTE
|
|
The destination can be changed for a job that is canceled because of transmission errors, or a job that is waiting to be sent with the Delayed Send mode.
To change the destination of a job for which a transmission error has occurred, set [Delete Failed TX Jobs] to 'Off'. (See "Automatically Deleting Failed Jobs.")
You cannot change multiple destinations at one time. Also, you cannot change the destinations in a group at one time.
You cannot change the destination with [Change Destination] in the following cases:
- If even one of the jobs with the same job number as the destination you want to change is being sent or waiting to be sent (excluding Delayed Send) - If you are sending a fax with Direct Send - If you are using manual sending - If you are sending using a fax driver - If entry of the type of destination specified is restricted in [Limit New Destination] (See "Restricting the Send Function.") You cannot change the type of destination or the storage location in the mail box.
The canceled job appears as <NG> (No Good) on the Log screen.
The list can be printed only if 11"×17", LGL, LTR, or LTRR (plain, recycled, thin, or color) is loaded in one of the paper sources that is set to 'On' in [Other] in [Paper Drawer Auto Selection On/Off]. (See "Enabling Paper Drawer Auto Selection.")
However, if [Consider Paper Type] for [Copy] is set to 'On' in [Paper Drawer Auto Selection On/Off], you cannot print from a paper source with color paper specified.
|
(Status Monitor/Cancel).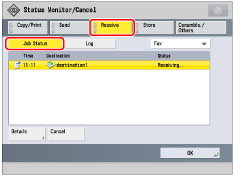
|
[Details]:
|
Displays detailed information for the selected job. Check the detailed information → press [OK] to return to the Receive screen.
|
|
[Cancel]:
|
Cancels the selected job. [Cancel] is displayed when a job is selected. Press [Cancel] → [Yes] to cancel the job.
|
|
[Check I-Fax RX]:
|
Reception starts if an I-fax has been received by the POP server. [Check I-Fax RX] is displayed when a forwarded job is selected.
|
|
NOTE
|
|
You cannot select multiple jobs and cancel them all at once. Select and cancel one job at a time.
The canceled job appears as <NG> (No Good) on the Log screen.
To use [Check I-Fax RX], set <POP> to 'On' in [Communication Settings] to enable the machine to receive via POP. (See "Common Communication Settings for E-Mail/I-Fax.")
You can automatically receive I-faxes without pressing the Check I-Fax RX key in the following cases (See "Common Communication Settings for E-Mail/I-Fax."):
<POP Interval> in [Communication Settings] is set to a value other than '0'.
I-faxes are received with SMTP without going via a server.
|
(Status Monitor/Cancel).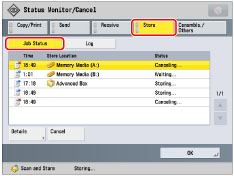
|
[Details]:
|
Displays detailed information for the selected job. Check the detailed information → press [OK] to return to the Store screen.
|
|
[Cancel]:
|
Cancels the selected job. Press [Cancel] → [Yes] to cancel the job.
|
|
IMPORTANT
|
|
You cannot select multiple jobs and cancel them all at once. Select and cancel one job at a time.
|
|
NOTE
|
|
The canceled job appears as <NG> (No Good) on the Log screen.
|
|
NOTE
|
|
If the paper specified at the time the job was issued is not available, a message asking you to load the appropriate paper appears. Load the paper, and resume the job. If [Suspended Job Timeout] in [Function Settings] (Settings/Registration) is set to 'On', the job which is suspended because paper was not available for printing is displayed as a suspended job after a specified period of time elapses. To resume printing of the suspended job, load the paper → select the job → press [Details] → [Resume].
|
