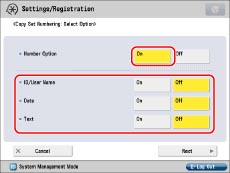
You can specify the detailed settings of the Copy Set Numbering mode for the Copy/Mail Box functions. For more information on the Copy Set Numbering mode, see "Copy Set Numbering" (Copy) and "Copy Set Numbering" (Access Stored Files).
1.
Press  (Settings/Registration).
 (Settings/Registration).
 2.
Press [Function Settings] → [Common] → [Print Settings].
3.
Press [Copy Set Numbering Option Settings] → [On] for <Number Option> → specify each setting.
If you do not want to specify copy set numbering option settings, press [Off].
<Number Option>
|
[On]:
|
[Full Surface] and [Numbers in 5 Locations] are grayed out, and cannot be selected.
You can select [10.5 pt], [12.0 pt], or [14.0 pt] for the size of the text.
|
|
[Off]:
|
You can select [Full Surface] or [Numbers in 5 Locations].
You can select [12.0 pt], [24.0 pt], or [36.0 pt] for the size of the text.
|

Press [On] for <ID/User Name> → [Next].
Select the way you would like to align the selected or entered characters on the page → press [OK].
Press [On] for <Date> → [Next].
Select the date format → press [Next].
Select the way you would like to align the selected or entered characters on the page → press [OK].
Press [On] for <Text> → [Next] → [Enter].
Enter the text to print → press [OK] → [Next].
If you have registered characters in [Register Characters for Page No./Watermark] in [Function Settings] (Settings/Registration), you can select the characters from the list.
Select the way you would like to align the selected or entered characters on the page → press [OK].