
 CAUTION CAUTION |
|
The lifter inside the paper decks rises and descends automatically. When loading paper, be careful not to get your fingers caught, as this may result in personal injury.
When handling paper, take care not to cut your hands on the edges of the paper.
|
|
IMPORTANT
|
|
Do not lift up the lifter inside the paper decks while the main power is ON, as this may result in a malfunction or damage to the machine. If you need to lift up the lifter, for example, if you drop objects, turn OFF the main power with the paper decks open. For instructions on shutting down the machine, see "Shutting Down the Machine."
 A screen prompting you to load paper also appears if the selected paper deck is not fully inserted into the machine. Make sure that the paper deck is properly in place.
Do not load the following types of paper into the paper deck. Doing so may cause a paper jam.
Severely curled or wrinkled paper
Thin straw paper
Heavy paper (more than 129 lb cover (350 g/m2))
Thin paper (less than 16 lb bond (60 g/m2))
Paper which has been printed on using a thermal transfer printer
The reverse side of paper which has been printed on using a thermal transfer printer
When paper stock is not enough in the paper source, using coated paper whose weight is 22 lb bond (85 g/m2) or less, may cause the paper to get wrinkled or corners to fold. Avoid using the paper when
 is displayed for the remaining amount of paper. If paper gets wrinkled with the paper being fed in a vertical (portrait) orientation, feed the paper in a horizontal (landscape) orientation. is displayed for the remaining amount of paper. If paper gets wrinkled with the paper being fed in a vertical (portrait) orientation, feed the paper in a horizontal (landscape) orientation.Make sure that you fan the sheets of paper well before placing them. Thin paper, recycled paper, pre-punched paper, heavy paper, transparencies, clear film, translucent film, and tab papers should be fanned particularly well before loading it.
Never place paper or any other items in the empty part of the deck next to the paper stack. Doing so may cause paper jams.
When you are printing in the Staple mode, do not remove the output sheets that are waiting to be stapled. (Printing and stapling resume after you clear the paper jam.)
|
|
NOTE
|
|
The procedure for loading paper into the POD Deck-D1/Secondary POD Deck-D1 is the same as the one for loading paper into the paper decks of the main unit. As an example, the procedure for the paper decks of the main unit is explained in this section.
The POD Deck-D1/Secondary POD Deck-D1 are optional products.
Register the size and type of the loaded paper in [Paper Settings] in [Preferences] (Settings/Registration).
You can use custom paper sizes. (See "Registering/Editing/Deleting Custom Paper Sizes.")
You can name, register, and edit custom paper types. (See "Registering Custom Paper Types.")
For information on paper that can be loaded, see "Available Paper Stock."
If a message prompting you to load paper appears during printing, the remaining prints are automatically made after you load the correct paper. If you select a different paper source, the remaining prints are made after you press [OK].
Press [Cancel] to cancel printing.
To use another available function, press [Another Function] → select the desired function → press [Done].
When changing the paper to load into the paper deck from plain paper to coated paper, you may have to wait a moment because temperature control of the warm air which fans a paper is required.
|

|
IMPORTANT
|
|
If the machine is in the Sleep mode (the touch panel is not displayed, and only
 (Energy Saver) is lit), you may be unable to open the paper deck. In this case, press (Energy Saver) to reactivate the machine, and then press the open button on the paper deck. (Energy Saver) is lit), you may be unable to open the paper deck. In this case, press (Energy Saver) to reactivate the machine, and then press the open button on the paper deck. |

|
NOTE
|
|
For high-quality printouts, use paper recommended by Canon.
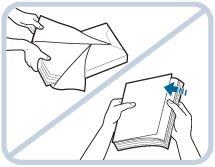
Before loading paper, always fan the sheets several times, and align the edges to facilitate feeding.
|

|
IMPORTANT
|
|
In the following situations, adjust the size change plates to match the paper size being loaded.(See "Adjusting a Paper Deck to Hold a Different Paper Size (Main Unit, POD Deck-D1 (Optional)) .")
When you load paper into the paper deck for the first time.
When you load paper and the edges of the paper stack may become curled in the paper deck or there are gaps between the edge of paper and the size change plates, because the size of paper being loaded does not match the paper size that the size change plates currently set for.
Do not give a strong shock to the rear edge retainer when loading paper into the paper deck, as this may result in a malfunction or damage to the machine.
 Do not load paper into the paper deck that has been previously printed onto, as this may result in a malfunction or damage to the copier.
Paper which is curled must be straightened out before loading it into the paper deck unit.
Make sure that the height of the paper stack does not exceed the loading limit mark (
 ) at the back of the paper deck the copier. ) at the back of the paper deck the copier. |
|
NOTE
|
|
Each paper deck of the main unit holds approximately 1,000 sheets of paper (20 lb bond (80 g/m2)).
For the upper and middle decks of POD Deck-D1/Secondary POD Deck-D1, each paper deck holds approximately 1,000 sheets of paper (20 lb bond (80 g/m2)), and each lower deck holds approximately 2,000 sheets of paper (20 lb bond (80 g/m2)).
If there are instructions on the package of paper about which side of the paper to load, follow those instructions.
When the paper is loaded into the paper deck, the side facing down is the one printed on.
If problems occur, such as poor print quality or paper jams, try turning the paper stack over, and reload it. However, you cannot turn the texture paper and 1-Sided Coated paper over. Change to the new paper.
For more information on the print direction of preprinted paper (paper which has logos or patterns already printed on it), see "Relationship Between the Original Orientation and Paper Orientation."
|

 CAUTION CAUTION |
|
When returning the paper deck to its original position, be careful not to get your fingers caught, as this may result in personal injury.
|
|
IMPORTANT
|
|
You will not be able to make copies or print if you load paper that exceeds the loading limit, or if the paper deck is not completely pushed into the machine. Always check that the paper decks are in place, and that the paper does not exceed the loading limit mark (
). |
|
NOTE
|
|
Rewrap any remaining paper in its original package, and store it in a dry place, away from direct sunlight.
If paper runs out and printing is stopped, load a new paper stack. Printing restarts after the new paper stack is loaded.
 If you print on the paper which has absorbed moisture, steam may come out from the output area of the machine. This is because the moist on the paper evaporates when the high temperature is applied when a toner is fixed to the paper. It is not a malfunction. (This especially happens in low room temperature.)
|
