
 CAUTION CAUTION |
|
The lifter inside the paper decks rises and descends automatically. When loading paper, be careful not to get your fingers caught, as this may result in personal injury.
When handling paper, take care not to cut your hands on the edges of the paper.
|
|
NOTE
|
|
Paper size for the paper deck of the machine and POD Deck-D1/Secondary POD Deck-D1 can be changed using the same procedure.
POD Deck-D1/Secondary POD Deck-D1 is available as an option.
|
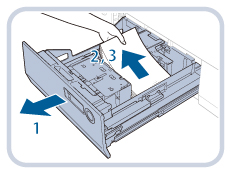 |
1. Press the button on the paper deck that you want to change the paper size and then pull out the paper deck.
|
|
2. Check that the inside lifter descends to the paper loading position.
|
|
|
3. Remove all set paper.
|
|
IMPORTANT
|
|
If the machine is in the Sleep mode (the touch panel is not displayed, and only
 (Energy Saver) is lit), you may be unable to open the paper deck. In this case, press (Energy Saver) to reactivate the machine, and then press the open button on the paper deck. (Energy Saver) is lit), you may be unable to open the paper deck. In this case, press (Energy Saver) to reactivate the machine, and then press the open button on the paper deck. |
 |
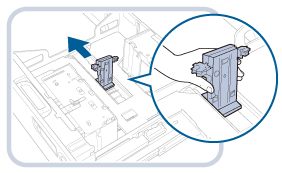
1. Remove the size change plates lock.
|
|
2. Slide the size change plates to a position where it does not catch on the set paper.
|
 |
1. Set the paper of the target size to approximately 3/8" (10 mm) high.
|
|
2. Slide the size change plates (front) and size change plates (back) to match the paper size.
|
|
IMPORTANT
|
|
Do not subject the paper holder plate to shock when loading paper into the paper deck, as this may result in a malfunction or damage to the machine.
 Adjust the guides correctly to avoid causing a paper jam, dirty prints, or making the inside of the machine dirty.
|


|
IMPORTANT
|
|
Do not load paper into the paper deck that has been previously printed onto, as this may result in a malfunction or damage to the copier.
Paper which has been rolled or curled must be straightened out before loading it into the paper deck.
Make sure that the height of the paper stack does not exceed the loading limit mark (
 ) on the inside of the paper deck. ) on the inside of the paper deck.Never place paper or any other items in the empty part of the paper deck next to the paper stack. Doing so may cause paper jams.
|
|
NOTE
|
|
Each paper deck of the main unit holds approximately 1,000 sheets of paper (20 lb bond (80 g/m2))
For the upper and middle decks of POD Deck-D1/Secondary POD Deck-D1, each paper deck holds approximately 1,000 sheets of paper (20 lb bond (80 g/m2)), and each lower deck holds approximately 2,000 sheets of paper (20 lb bond (80 g/m2)).
If there are instructions on the package of paper about which side of the paper to load, follow those instructions.
When the paper is loaded into the paper deck, the side facing down is the one printed on.
If problems occur, such as poor print quality or paper jams, try turning the paper stack over, and reload it. However, you cannot turn the texture paper and 1-Sided Coated paper over. Change to the new paper.
For more information on the print direction of preprinted paper (paper which has logos or patterns already printed on it), see "Relationship Between the Original Orientation and Paper Orientation."
When loading paper, make sure that the height of the paper stack does not exceed 3/4" (20 mm). If the height of the paper stack exceeds 3/4" (20 mm), the edges of the paper stack may become curled or creased, and poor print quality may result.
|

|
CAUTION |
|
When returning the paper deck to its original position, be careful not to get your fingers caught, as this may result in personal injury.
|
|
IMPORTANT
|
|
When you change the paper size, make sure to store paper type in [Paper Settings] in [Preferences] (Setting/Registration).
|
