Monitoring and Controlling via SNMP
SNMP is a protocol for monitoring and controlling communication devices on a network on the basis of a management information database called MIB. You can check the machine's error information and the number of prints through a computer. The machine supports SNMPv1 and SNMPv3 in which security functions are enhanced. You can use either of the two or both. Set each function according to your environment and purposes.
SNMPv1
SNMPv1 determines the communication range on the basis of information called community name. However, as community names are sent to networks as plain text, they may be vulnerable to security issues. To ensure safety, invalidate SNMPv1 and use SNMPv3.
SNMPv3
SNMPv3 enables you to implement network device management with strong security functions.
|
NOTE
|
|
When SNMP management software is usable, you can set, monitor, and control the machine through a computer. For details, see your software's instruction manuals.
|
Setting SNMPv1/SNMPv3
1
Press  .
.
 .
.2
Press <Preferences>  <Network>
  <SNMP Settings>.
 <Network>
  <SNMP Settings>.
3
Set SNMPv1.
|
1
|
Press <On> in <Use SNMPv1>.
If you don't use SNMPv1, press <Off>.
|
|
2
|
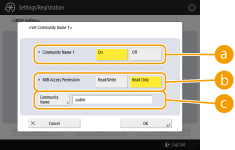
Press <Set Dedicated Community>, <Set Community Name 1> or <Set Community Name 2>.
The exclusive community is a community (group) prepared for managers using Canon software such as imageWARE Enterprise Management Console. To use the exclusive community, press <Set Dedicated Community>. To specify a general community, press <Set Community Name 1> or <Set Community Name 2>.
|
|
3
|
Set the community.
  <Dedicated Community>/<Community Name 1>/<Community Name 2> <Dedicated Community>/<Community Name 1>/<Community Name 2>To use the selected community, press <On>. When you don't want to use the community, press <Off>.
 <MIB Access Permission> <MIB Access Permission>For each community, select MIB access privileges from <Read/Write> or <Read Only>.
 <Community Name> <Community Name>Enter a community name that you belong to using alphanumeric characters. If you select <Set Dedicated Community>, you cannot set an exclusive community name.
|
|
4
|
Press <OK>.
|
4
Set SNMPv3.
|
1
|
Press <On> in <Use SNMPv3>.
If you don't use SNMPv3, press <Off>.
|
|
2
|
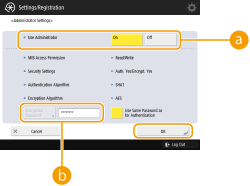
Press <Administrator Settings>.
|
|
3
|
Specify the necessary settings, and press <OK>.
  <Use Administrator> <Use Administrator>If you use Administrator, set to <On>.
 <Encryption Password> <Encryption Password>If you use a password which is different from the authentication, deselect <Use Same Password as for Authentication>, press <Encryption Password>, and enter the password.
|
|
4
|
Press <User Settings>
 <Register>. <Register>. |
|
5
|
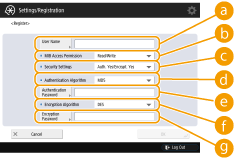
Enter the necessary information.
  <User Name> <User Name>Enter a user name using alphanumeric characters.
 <MIB Access Permission> <MIB Access Permission>Select MIB access privileges from <Read/Write> or <Read Only>.
 <Security Settings> <Security Settings>Set a combination of authentication and encoding. Select <Auth. Yes/Encrypt. Yes>, <Auth. Yes/Encrypt. No>, or <Auth. No/Encrypt. No>.
 <Authentication Algorithm> <Authentication Algorithm>Select <MD5> or <SHA1> according to your environment.
 <Authentication Password> <Authentication Password>Enter a password to use for authentication. When the password is entered, <Confirm> is displayed for confirmation. Enter the password again.
 <Encryption Algorithm> <Encryption Algorithm>Select <DES> or <AES> according to your environment.
 <Encryption Password> <Encryption Password>Enter a password to use for encoding. When the password is entered, <Confirm> is displayed for confirmation. Enter the password again.
|
|
6
|
Press <OK>
 <OK>. <OK>. |
|
7
|
Press <Context Settings>
 <Register>. <Register>. |
|
8
|
Enter a context name and press <OK>.
|
|
9
|
Press <OK>.
|
5
Configure settings in <Retrieve Printer Mngt. Information from Host>.
If you set to <On>, you can periodically acquire printer management information such as printing protocol from a computer on the network by using SNMP.
6
Press <Next>.
7
Configure settings in <Reject SNMP Packets While in Sleep Mode>.
SNMP data cannot be received while in sleep mode.
NOTE:
If you set to <On>, you may not be able to access the machine from Canon Software (imageWARE series) or applications using the SNMP protocol.
8
Press <OK>.
9
Press 


 <Apply Setting Changes>
  <Yes>.


 <Apply Setting Changes>
  <Yes>.
|
NOTE
|
|
When using SNMPv1 and SNMPv3 in combination, it is recommended to set MIB access privileges for SNMPv1 to <Read Only>. If you set <Read/Write>, almost all of the machine's operations become practicable and the strong security functions of SNMPv3 will not be effective. Access privileges to MIB can be set in either SNMPv1 or SNMPv3. In SNMPv3, you can set them for each user.
If Administrator is disabled, you cannot specify settings in <SNMP Settings>
 <Use SNMPv3> <Use SNMPv3>  <Administrator Settings>. In addition, <Use Same Password as for Authentication> for <Encryption Password> is fixed to off. "Administrator" cannot be used as a user name in <SNMP Settings> <Administrator Settings>. In addition, <Use Same Password as for Authentication> for <Encryption Password> is fixed to off. "Administrator" cannot be used as a user name in <SNMP Settings>  <Use SNMPv3> <Use SNMPv3>  <User Settings>. <User Settings>. |