
<Receive/Forward>
This section describes how to specify receive settings.
<TX/RX User Data List>
You can print a list of the send/receive settings registered in the machine. TX/RX User Data List
<Fax User Data List>
You can print a list of the fax settings registered in the machine. Fax User Data List
<Print on Both Sides>
You can select whether to print received documents on both sides of paper.
<Select Drawer>
You can set how the machine prints documents when there is no paper matching the size of the received document. There are four printing methods.
<Switch A>
The image is printed over two sheets of paper that have the same combined size as the received document.
<Switch B>
The image is printed with blank space on paper that has the same width as the received document.
<Switch C>
The image is reduced and printed on paper that differs in width from the received document.
<Switch D>
The image is printed on paper that is larger in size than the received document.
<Reduce Fax RX Size>
You can select whether to automatically reduce received documents so that the whole document is printed within the printable area of the paper.
 |
|
If the area of the image which exceeds the printable area is smaller than 1/2" (12 mm), the image on that area will not be printed, regardless of the settings specified here.
|
<2 on 1 Log>
You can select whether to print received documents of the same paper size onto a single sheet of paper. This setting is only available under the following conditions:
You must select the same paper drawer for printing two consecutive pages of a received document.
The paper in the selected paper drawer must be large enough for two consecutive pages to be printed out.
For example, if the LTR paper drawer is empty, but the 11" x 17" drawer is loaded, you can print two LTR originals onto a single sheet of 11" x 17" paper. On the other hand, if the 11" x 17" paper drawer is empty but the LTR drawer is loaded, you can print a reduced 11" x 17" original on LTR paper.
 |
|
If you set this to <On>, documents are printed with a dotted line in the middle. If you print the document with sender information, the dotted line is not printed in the area where the sender information is located.
|
<Print RX Page Footer>
You can select whether to print information, such as reception time and page number, at the bottom of received documents.
<Interrupt and Print RX Jobs>
You can set to suspend other jobs to print faxes/I-faxes when the machine receives them.
<Use Forwarding Settings>
You can select whether to forward received documents to other destinations such as the Confidential Fax Inbox of the machine and an external file server. If you select <On>, specify the forwarding conditions in <Forwarding Settings>.
<Handle Files with Forwarding Errors>
You can set how the machine handles documents that fail to be forwarded.
|
|
|
If you press <Common Settings>
|
<Forwarding Settings>
You can specify the conditions for forwarding received documents. You can also set to forward all incoming documents to a specified destination without specifying any conditions.
 Configuring Forwarding Settings
|
1
|
Press
. |
||||
|
2
|
Press <Function Settings>
|
||||
|
3
|
Press <Forwarding Settings>, and specify the required settings.
To register forwarding settings, press
 <Change> and proceed to step 4. <Change> and proceed to step 4.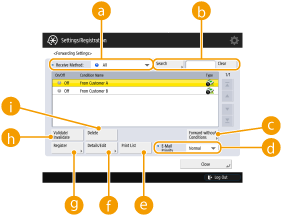  <Receive Method:> drop-down list <Receive Method:> drop-down listSelect the reception method for the forwarding settings to display in the list.
 <Search> <Search>You can search for forwarding settings using a keyword. To reset the results, press <Clear>.
 <Forward without Conditions> <Forward without Conditions>You can specify the forwarding destination when forwarding settings are not registered or none of the set forwarding conditions are met.
 <E-Mail Priority> <E-Mail Priority>If the forwarding destination is an e-mail address, you can set the e-mail priority for the e-mail.
 <Print List> <Print List>You can print the forwarding settings.
 <Details/Edit> <Details/Edit>You can display the details of the forwarding settings. You can also edit the settings.
<Register>You can register forwarding settings.
 <Validate/Invalidate> <Validate/Invalidate>You can enable/disable registered forwarding settings.
 <Delete> <Delete>You can delete the registered forwarding settings.
|
||||
|
4
|
Configure the forwarding conditions.
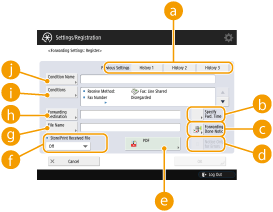 <Previous Settings> <Previous Settings>To use forwarding settings set previously, select <History 1>, <History 2>, or <History 3>.
The three settings that are stored are retained even when the power is turned OFF.
<Specify Fwd. Time>Set the start time, end time, and day of the week, etc. for the forwarding.
<Forwarding Done Notice>Notifies the specified e-mail address when forwarding is complete.
<Notice Only for Errors>You can specify this setting only when <Forwarding Done Notice> is set. If you set this to <On>, the specified e-mail address is only notified when forwarding fails.
File Format You can specify the file format for forwarded images.
<Store/Print Received File>If you set this to <On> and the Memory Reception function to <On>, received files are stored in the Memory RX Inbox. If you set the Memory Reception function to <Off>, received files are printed.
<File Name>Enter a name to assign to forwarded documents.
If the filename is not set, the first 24 characters of the forwarding condition name are entered as the filename. You can also change the filename.
<Forwarding Destination>Set the forwarding destination for received documents.
Select <Address Book> to forward to other devices or an Advanced Space available to the outside as an SMB or WebDAV server. Select <Confidential Fax Inbox> to receive using the Confidential Fax Inbox.
<Conditions>Displays the screen for setting forwarding conditions, enabling you to set the conditions for the reception method and recipient.
Select a conditional expression from the drop-down list, and enter a condition using the <Set> button, as necessary.
 <Condition Name> <Condition Name>You can assign a name for the forwarding condition.
|
||||
|
5
|
Press <OK>.
Forwarding settings are stored when you press <OK> on the registration or details/edit screen to complete registration.
You cannot store settings that are the same as existing settings.
|
||||
|
6
|
Enable the forwarding conditions.
On the screen in step 3, select the forwarding condition, and press <Validate/Invalidate> to enable it.
|


<Set/Register Confidential Fax Inboxes>
You can assign a name for each Confidential Fax Inbox as well as set a PIN.
Setting/Registering Confidential Fax Inboxes
|
1
|
Press
. |
||
|
2
|
Press <Function Settings>
|
||
|
3
|
Press <Set Fax/I-Fax Inbox>.
|
||
|
4
|
Press <Set/Register Confidential Fax Inboxes>.
|
||
|
5
|
Select the box number
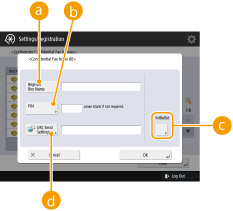 <Register Box Name> <Register Box Name>Register a name for the box.
<PIN>Enter the PIN for the box.
<Initialize>Initializes the box.
<URL Send Settings>Enables the URL for a box with documents saved can be sent via e-mail or checked on the Remote UI screen.
|
<Memory RX Inbox PIN>
You can set a PIN for the Memory RX Inbox.
|
|
|
Since there is no way to check a registered PIN, make sure that you write down the PIN that you enter, and keep it in a safe place.
|
<Use Fax Memory Lock>
You can select whether to save incoming faxes in the Memory RX Inbox of the machine without printing (Memory Reception). This function enables you to check saved documents before printing or deleting them from the Memory RX Inbox. Saving Received Documents in the Machine (Memory Reception)
<Use I-Fax Memory Lock>
You can select whether to save incoming I-faxes in the Memory RX Inbox of the machine without printing (Memory Reception). This function enables you to check saved documents before printing or deleting them from the Memory RX Inbox. Saving Received Documents in the Machine (Memory Reception)
<Memory Lock Start Time>
You can specify the time to activate the Memory Reception function. The machine will automatically switch to the Memory Reception mode at the specified time.
Setting the Start Time for Memory Reception
|
1
|
Press
. |
||
|
2
|
Press <Function Settings>
|
||
|
3
|
Press <Set Fax/I-Fax Inbox>.
|
||
|
4
|
Press <Memory Lock Start Time>, and specify the required settings.
 <Everyday> <Everyday>Set the time that memory reception starts.
<Specify Days>Set the day of the week and time that memory reception starts.
<Off>Select this when you do not want to set a memory reception start time.
|
<Memory Lock End Time>
You can specify the time to deactivate the Memory Reception function. The machine will automatically cancel the Memory Reception mode at the specified time.
Setting the End Time for Memory Reception
|
1
|
Press
. |
||
|
2
|
Press <Function Settings>
|
||
|
3
|
Press <Set Fax/I-Fax Inbox>.
|
||
|
4
|
Press <Memory Lock End Time>, and specify the required settings.
 <Everyday> <Everyday>Set the time that memory reception ends.
<Specify Days>Set the day of the week and time that memory reception ends.
<Off>Select this when you do not want to set a memory reception end time.
|
<Divided Data RX Timeout>
If a received I-fax is divided, the data finished being received is printed when the time specified here passes after the start of the reception, and the subsequent data is deleted.
|
|
|
If you delete divided data, it cannot be combined to form a complete document, even if the remaining divided data is received later.
Divided data cannot be printed as a regular image unless it has been combined.
|
<Forward Temporarily Stored File to Memory RX Inbox>
You can set the machine so that unprinted documents due to paper jams or lack of paper can be forwarded to the Memory RX Inbox of the machine. Forwarded documents can be printed later. Saving Received Documents in the Machine (Memory Reception)
<Always Send Notice for RX Errors>
You can select whether to notify the sender that an I-fax was not received successfully.
<ECM RX>
You can receive faxes using the Error Correction Mode (ECM). ECM checks for fax data errors and corrects them.
|
|
|
To perform a communication using ECM, ECM needs to be set in both the sending machine and this machine.
Even when you set ECM, errors can sometimes occur due to a poor telephone line connection.
|
<Fax RX Report>
A Fax RX Report is a report that enables you to check whether faxes were received correctly. The machine can be set to print this report automatically after documents are received or only when a reception error occurs. Fax RX Report
<Confidential Fax Inbox RX Report>
A Confidential Fax Inbox RX Report is a report that enables you to check whether documents were received in the Confidential Fax Inbox correctly. The machine can be set to print this report automatically after documents are received. Confidential Fax Inbox RX Report
<RX Start Speed>
You can change the receive start speed. This setting is useful when there is difficulty initiating the receiving of a document due to a poor line condition.
<RX Password>
You can set an ITU-T standard password. If a subaddress is not set in a document that was received from another party using the ITU-T standard, a reception password check takes place. If the password found does not match the password set with this setting, or if a password is not attached to the document, the document is not received.
|
|
|
Priority is given to the subaddress password if the received document is set with a subaddress, even if an RX password is set.
|
|
|
|
ITU-T stands for International Telecommunication Union-Telecommunication Standardization Sector, which is the group that makes recommendations toward the standardization of worldwide telecommunications.
|