e-ManualTopSite mapHelpGlossary

Category Top

Overview of This Function

Advanced Box/Network Settings

Mail Box

Advanced Box

Network

Memory Media

Flow of Operations for Accessing Stored Files

Printing Files Stored in a Mail Box

Printing Files Stored in the Advanced Box

Printing Files Stored on the Network

Printing Files Stored in Memory Media

Canceling a Job While Printing

Reserving Jobs

Arranging Files Stored in a Mail Box

Checking File Information

Previewing a File

Operations for Files Stored in a Mail Box

Printing Lists

Arranging Files and Folders Stored in the Advanced Box

Checking Detailed Information of the Advanced Box

Personal Space Operations

Folder Operations

Checking File Information

Previewing a File

Operations for Files Stored in a Folder

Arranging Files and Folders Stored on the Network

Checking Storage Information

Folder Operations

Checking File Information

Previewing a File

File Operations

Arranging Files and Folders Stored in Memory Media

Checking the Detailed Information for Memory Media

Folder Operations

Checking File Information

Previewing a File

File Operations

Printing a Sample

Storing Print Settings

Adjusting Density During Printing

Merging Files When Printing

Favorite Settings

Storing Favorite Settings

Recalling/Deleting Favorite Settings

Changing Color Modes

Paper Selection

Collating Prints

Two-Sided Printing

Convenient Modes for Printing

Adding a Cover

Inserting Sheets

Booklet Mode

Job Separator

Shifting the Original Image Using the Numeric Keys

Adding a Secure Watermark

Document Scan Lock

Document Scan Lock (TL Code)

Document Scan Lock (QR Code)

Superimpose Image

Gutter

Page Numbering

Copy Set Numbering

Watermark Printing

Date Printing

Adjusting the Color

Adjust One-Touch Color

Print on Tab

Adjusting the Print Resolution

Printing with Halftones

Adjusting Printing to Fit the Paper Size

Enlarging the Print Area

Printing Files with Multiple Pages on One Page (N On 1)

Printing Comments

Printing Password Protected PDF Files

Enlarging and Reducing Prints

Setting the Print Orientation

Setting the Print Position

Sending a File

Unavailable Combination of Functions

Top » Access Stored Files » Booklet Mode
Booklet Mode
08JK-18K
This mode enables you to print documents in such a way that the prints are made into a booklet.
For information on the optional products required to use this function, see "Optional Products Required for Each Function (imageRUNNER ADVANCE C9280 PRO/C9270 PRO)" or "Optional Products Required for Each Function (imageRUNNER ADVANCE C7270/C7260)."
For information on the Booklet Scan mode, see "Booklet Scanning."
Saddle Stitch Booklet
This mode enables you to print one-sided or two-sided files in such a way that the prints are made into a booklet.
When the Booklet Finisher-K1/Booklet Finisher-L1 is attached
Divided Booklet
This mode enables you to make a large document with many pages into a divided booklet.
Creep (Displacement) Correction
This mode enables you to adjust the position of the images in a booklet by calculating the width of the displacement between the outermost page and center page of the booklet
*1 Trimmed
*2 After the pages are trimmed, the outer margins of all pages are equal.
*3 The inner margins are set so that the inner margins of the outermost pages are wider than the inner margins of the center pages. The placement of the images on each page is adjusted by calculating the amount of displacement between the outermost page and innermost page of the booklet.
As an example, the procedure for printing files that are stored in a Mail Box is explained in this section.
IMPORTANT
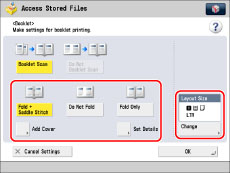
This mode can be used only for printing a file stored in a mail box or a PDF or XPS file.
The Saddle Stitch and Divided Booklet modes can be set only if the Booklet Finisher-K1/Booklet Finisher-L1 is attached.
Be sure to correctly set the paper type. When printing on special types of paper, such as heavy paper, be sure to correctly set the paper type, especially if you are using heavy paper. If the type of paper is not set correctly, it could adversely affect the quality of the image. Moreover, the fixing unit may become dirty and require a service repair, or the paper could jam.
[Booklet Scan] can only be specified for the following paper sizes: LTR, LTRR, STMT, or STMTR.
The Booklet mode cannot be set if multiple files are selected, and their record sizes are different.

1.
Press [Access Stored Files] → [Mail Box].
2.
Select the desired Mail Box → select the desired file → press [Print].
3.
Press [Change Print Settings].
4.
Press [Options] → [Booklet].
5.
Specify the booklet print settings.
Mail Box
Advanced Box/Network/Memory Media
Folding and Saddle Stitching:
Adding Covers:
Changing the Layout Size of a Booklet:
Folding and Saddle Stitching:
Press [Fold + Saddle Stitch].
If you do not want to saddle stitch, select [Fold Only].
If you do not want to set the Fold and Saddle Stitch modes, select [Do Not Fold].
NOTE
Fold can be used only for printing a file stored in a mail box.
If the Booklet Finisher-K1 is attached, the maximum number of sheets, including cover sheets, that can be saddle stitched is 20. If the number of sheets is 21 or more, the booklet is not saddle stitched.
If the Booklet Finisher-L1 is attached, the maximum number of sheets, including cover sheets, that can be saddle stitched is 16. If the number of sheets is 17 or more, the booklet is not saddle stitched.
The following shows the maximum number of sheets that can be folded at one time when [Fold Only] is selected:
If the Booklet Finisher-K1 is attached:
16 lb bond to 28 lb bond (60 to 105 g/m2): five sheets
29 lb bond to 80 lb cover (106 to 220 g/m2): three sheets
If the Booklet Finisher-L1 is attached: one sheet
Adding Covers:
Press [Add Cover] → [Print].
Press [Leave Blank] if you do not want to print on the cover.
If you are feeding cover paper from the Document Insertion Unit-H1, Document Insertion Unit-J1, or Document Insertion/Folding Unit-G1, select [Leave Blank].
If you selected [Booklet Scan], you can set <Front Cover>, <Front Inside Cover>, <Back Inside Cover>, and <Back Cover> individually.
To set the paper for the cover, press [Change] → select the paper source → press [OK].
If you want to select the multi-purpose tray when a paper size/type is already selected for the current or reserved job, press [Change MP Tray Paper].
IMPORTANT
You must select the same paper size for the cover page as that used for the main document.
If you are loading preprinted paper to use as the cover page into the document insertion unit, you must load the paper face up.
If you are using Heavy paper, you can only print on <Front Inside Cover> or <Back Inside Cover>.
When using Booklet Finisher-K1, use the paper shown below.
Main document: 16 lb bond to 80 lb cover (60 to 220 g/m2)
Cover paper: Up to 110 lb cover (300 g/m2)
When using Booklet Finisher-L1, use the paper shown below.
Main document: 16 lb bond to 80 lb cover (60 to 220 g/m2)
Cover paper: Up to 140 lb index (256 g/m2)
NOTE
[Add Cover] can be used only for printing a file stored in a mail box.
Changing the Layout Size of a Booklet:
Press [Change] for <Layout Size>.
Select the desired booklet size → press [OK].
If you want to select the multi-purpose tray when a paper size/type is already selected for the current or reserved job, press [Change MP Tray Paper].
6.
Press [Set Details] → specify the detailed Booklet settings.
If you do not want to specify the detailed settings, proceed to step 7.
Making a divided booklet:
Setting the creep correction:
Trimming the edges of the booklet:
Adjusting the trim width:
Adjusting the saddle stitch position:
Adjusting the fold position:
NOTE
[Set Details] can be used only for printing a file stored in a mail box.
Making a divided booklet:
Press [Divided Booklet]  → set the number of sheets to divide → press [OK].
IMPORTANT
If the Booklet Finisher-K1 is attached, the maximum number of sheets that can be saddle stitched at a time depends on the paper type and paper weight.
Paper Type and Paper Weight
Number of Sheets That Can Be Saddle Stitched
Thin/Plain (16 lb bond to 21 lb bond (60 to 81 g/m2))
20 sheets
Plain (22 lb bond to 28 lb bond (82 to 105 g/m2))
10 sheets
Heavy (29 lb bond to 80 lb cover (106 to 220 g/m2))
5 sheets
Coated (29 lb bond to 110 lb index (106 to 209 g/m2))
5 sheets
Coated (80 lb cover (210 to 220 g/m2))
3 sheets
If the Booklet Finisher-L1 is attached, the maximum number of sheets that can be saddle stitched at a time depends on the paper weight.
Paper Weight
Number of Sheets That Can Be Saddle Stitched
16 lb bond to 21 lb bond (60 to 81 g/m2)
16 sheets
22 lb bond to 28 lb bond (82 to 105 g/m2)
10 sheets
29 lb bond to 110 lb cover (106 to 150 g/m2)
5 sheets
56 lb cover to 110 lb index (151 to 209 g/m2)
4 sheets
80 lb cover (210 to 220 g/m2)
2 sheets
NOTE
If the Booklet Finisher-K1 is attached, the number of saddle stitched booklets that the auxiliary booklet tray can hold depends on the paper weight and number of sheets each booklet contains.
Paper Weight
Number of Sheets to Use
Number of Prints the Auxiliary Booklet Tray Can Hold
16 lb bond to 21 lb bond (60 to 81.4 g/m2)
2 to 5 sheets:
25 sets
6 to 10 sheets:
15 sets
11 to 15 sheets:
10 sets
16 to 20 sheets:
5 sets
22 lb bond to 28 lb bond (82 to 105 g/m2)
2 to 5 sheets:
25 sets
6 to 10 sheets:
15 sets
If the Booklet Finisher-L1 is attached, the number of saddle stitched booklets that the auxiliary booklet tray can hold depends on the paper type, paper weight, and number of sheets each booklet contains.
Paper Type and Paper Weight
Number of Sheets to Use
Number of Prints the Auxiliary Booklet Tray Can Hold
Thin/Plain (16 lb bond to 21 lb bond (60 to 81.4 g/m2))
1 to 5 sheets:
25 sets
6 to 10 sheets:
15 sets
11 to 16 sheets:
10 sets
Plain/Heavy (22 lb bond to 28 lb bond (81.5 to 105 g/m2))
1 to 5 sheets:
25 sets
6 to 10 sheets:
15 sets
Heavy/Coated (29 lb bond to 40 lb bond (106 to 150 g/m2))
1 to 5 sheets:
10 sets
Heavy/Coated (40 lb bond to 110 lb index (151 to 209 g/m2))
1 to 4 sheets:
10 sets
Heavy/Coated (80 lb cover (210 to 220 g/m2))
1 to 3 sheets:
10 sets
Setting the creep correction:
Press [Creep Correction] → select the correction method → press [OK] → [OK].
If you select [Manual], press or to adjust the correction width.
Trimming the edges of the booklet:
Press [Trim].
NOTE
You can set [Trim] only if you select [Fold + Saddle Stitch].
Adjusting the trim width:
Press [Adjust Trim Width] → adjust the trim width → press [OK].
Adjusting the saddle stitch position:
Press [Change Fold/Stitch Pos.] → select the paper size for finishing.
Adjust the saddle stitch position using [-] or [+]→ press [OK] → [OK].
NOTE
You can set [Change Fold/Stitch Pos.] only if you select [Fold + Saddle Stitch].
Adjusting the fold position:
If you want to adjust the folding position, press [Adjust Fold Position] → adjust the folding position → press [OK].
NOTE
You can set [Adjust Fold Position] only if you select [Fold Only].
7.
Press [OK] → [Close].
8.
Set the Booklet Tray guide to match the paper size.
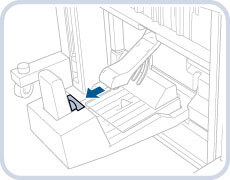
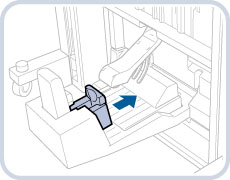
12" x 18"/11" x 17"/LGL
LTRR
IMPORTANT
Make sure to set the Booklet Tray guide to match the paper size. Setting the Booklet Tray guide incorrectly may result in a paper jam.

IMPORTANT
For information on the modes which cannot be set in combination with this mode, see "Unavailable Combination of Functions."
Saddle stitching is not performed if there is only one output sheet.
The accuracy of folds may vary, depending on the type and quantity of paper.