|
1
|
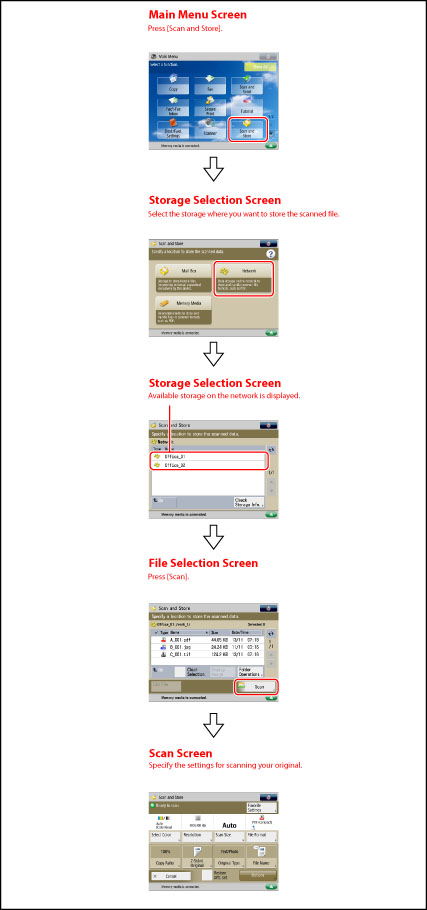
[Up]
Press to return to the upper level.
|
|
2
|
[Check Storage Info.]
Press to check the details of the storage location.
|
|
1
|
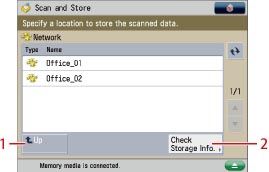
[Clear Selection]
Press to cancel the selection of a file.
|
|
2
|
 You can specify the following settings:
Register to Quick Menu (See "Quick Menu.")
|
|
3
|
[Name]
Press to sort the files by name, in ascending or descending order.
[Date/Time] Press to sort the files by date/time, in ascending or descending order. |
|
4
|
 Press to update the contents of the storage location.
|
|
5
|
[Display Image]
Press to view the contents of the selected file.
|
|
6
|
[Folder Operations]
Press to display the menu for editing the folders in the storage.
|
|
7
|
[Scan]
Your original is scanned and stored.
|
|
8
|
[Edit File]
Press to display the menu for displaying the details for, deleting, or renaming the selected file.
|
|
9
|
[Up]
Press to return to the upper level.
|
|
1
|
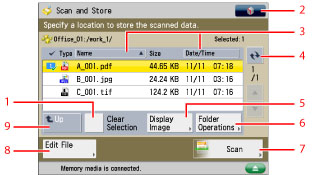
[Details]
Press to check the details of the selected file.
|
|
2
|
[Delete]
Press to delete a file stored in the folder. You can select and delete up to 32 files at a time.
|
|
3
|
[Change File Name]
Press to change a file name.
|
|
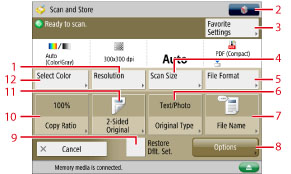
1
|
[Resolution]
Press to select the resolution for scanning.
|
|
2
|
You can specify the following settings:
Register/Edit Favorite Settings
Register to Quick Menu (See "Quick Menu.")
Change Default Settings
|
|
3
|
[Favorite Settings]
Press to recall scan settings or register frequently used settings in the Favorite Settings.
|
|
4
|
[Scan Size]
Press to set the size of the original that you are going to scan.
|
|
5
|
[File Format]
Press to select the file format for the files to store.
|
|
6
|
[Original Type]
Press to select the type of original (text only, photo only, or both text and photo) you are going to scan. |
|
7
|
[File Name]
Press to assign the file a name. |
|
8
|
[Options]
Press to specify other settings. You can set useful scanning modes such as Sharpness and Erase Frame.
|
|
9
|
[Restore Dflt. Set.]
Press to cancel all settings. (The machine restores the default settings for Scan and Store.) |
|
10
|
[Copy Ratio]
Press to reduce or enlarge the scanning size of the original. |
|
11
|
[2-Sided Original]
Press if you are scanning a two-sided original.
|
|
12
|
[Select Color]
Press to select the color mode for scanning.
|
|
IMPORTANT
|
|
In the following cases, you cannot store files in the Advanced Box of another imageRUNNER ADVANCE series machine on the network. (The numbers below may vary depending on the remaining capacity of the memory.)
When the Advanced Box of the other imageRUNNER ADVANCE series machine on the network lacks any free space.
When more than 32 computers or other machines simultaneously access the Advanced Box of another imageRUNNER ADVANCE series machine that has been made accessible on the network using SMB.
When the path length for the file, including the path to the folder, exceeds 256 characters.
When more than 100,000 files or folders are stored in the Advanced Box of the other imageRUNNER ADVANCE series machine on the network.
When more than 1,000 files or folders are stored in the selected folder.
When the size of a single file exceeds 2 GB.
If Authentication Management is set for users of the Advanced Box of another imageRUNNER ADVANCE series machine on the network, after you finish using the Advanced Box network, ensure that you press
 (Log In/Out) to log out. (Log In/Out) to log out. |
|
NOTE
|
|
We recommend that you delete unwanted files or image data from your storage location to make space for storing new files.
For instructions on checking detailed information for the storage location, see "Checking Storage Information."
For more information on the icons displayed on the network, see "Types of Network/Memory Media Icons."
For instructions on arranging folders, checking detailed information for the file, and editing/deleting files, see "Access Stored Files."
|
