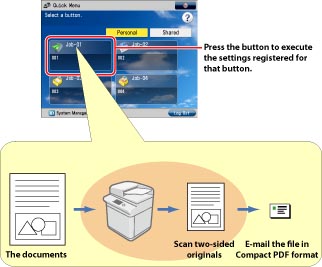
Registering a Series of Frequently Used Functions in One Button (Quick Menu)
The Quick Menu is a function that increases the efficiency of routine and repetitive office tasks that use the machine. You can create and register a series of frequently used functions such as Copy, Scan and Send, and Scan and Store in one button.
There are two types of buttons: Shared Buttons that can be used by all users and Personal Buttons that can only be set and used by each user. Personal Buttons can be used only when a login service is set.
This section describes the procedure for creating a "PDF-Scan" shared folder on the drive of a computer that is connected to the machine via the SMB protocol, and send a scanned 2-sided document to that folder as a text searchable PDF file.
The screens may differ, depending on the model of the machine and on attached optional products.
The screens may differ, depending on the operating system of your computer.
|
Required Condition
|
|
You can connect to the computer with the shared folder from this machine via the network.
|
Follow the procedures below.
Creating a Shared Folder
Registering an Address
Registering the Procedure for Sending from the Machine in the Quick Menu
Sending a Document Using the Quick Menu Button
1.
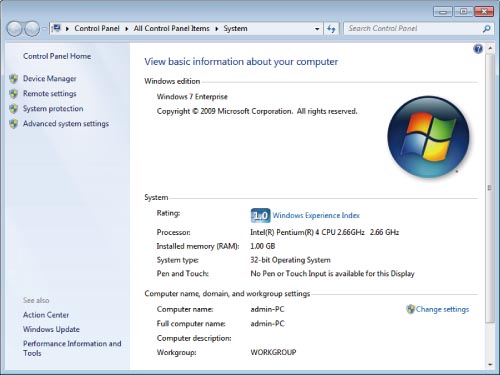
Check for the computer name.
For Windows Vista/Windows 7, click [

] (Start) → right-click [Computer] → click [Properties] → check for the computer name. For Windows 8/8.1, place the cursor on the top right (bottom right) of the desktop → right-click [Computer]→ click [Properties] → check for the computer name.
For Windows 7
2.
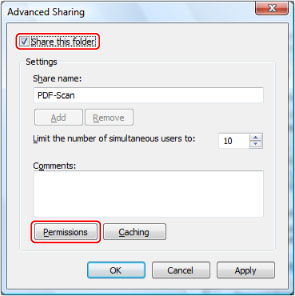
Right-click a blank area on the desktop → click [New] → [Folder] to create a new folder → enter 'PDF-Scan' as the folder name.
3.
Select [Share this folder].
For Windows Vista/Windows 7/Windows 8/Windows 8.1, right-click the "PDF-Scan" folder → select [Properties] to display the [PDF-Scan Properties] dialog box → click the [Sharing] tab → click [Advanced Sharing] → select [Share this folder] → click [Permissions].
For Windows 7
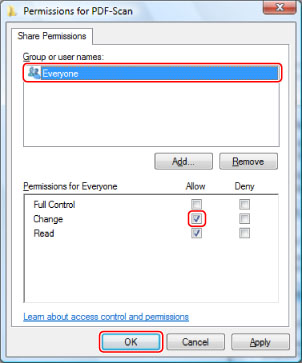
4.
Select [Everyone] → check that [Allow] for <Change> is selected → click [OK]. If [Allow] is not selected, select [Allow] → click [OK].
For Windows 7
5.
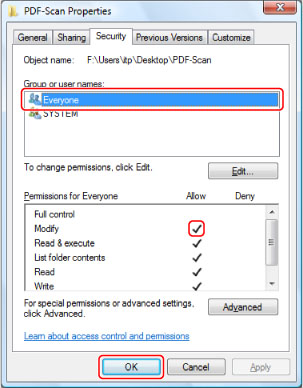
For Windows Vista/7/8/8.1, in the [PDF-Scan Properties] dialog box, click the [Security] tab → click [Edit] → [Add].
6.
Enter 'Everyone' → click [OK].
7.
For Windows Vista/7/8/8.1, select [Everyone] → select [Allow] for <Modify> → click [OK] → [Close].
For Windows 7
A shared folder to send data is created.
|
NOTE
|
For Windows Vista/7, the shared folder is displayed as  . |
You can specify the settings to use the shared folder ([Public] folder).
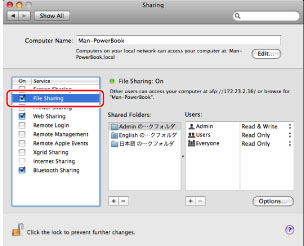
1.
Click [Sharing] on the [System Preferences] screen.
2.
Select [File Sharing].
The [Public] folder is now shared on the network.
You can share files in [Drop Box] in [Public]. You can access the [Drop Box] as follows: On the [Go] menu, click [Home] → [User] → select the login user name → [Public] → [Drop Box].
|
NOTE
|
|
The appearance of the screen may differ from the one you actually see, depending on the version of the operating system you are using.
|
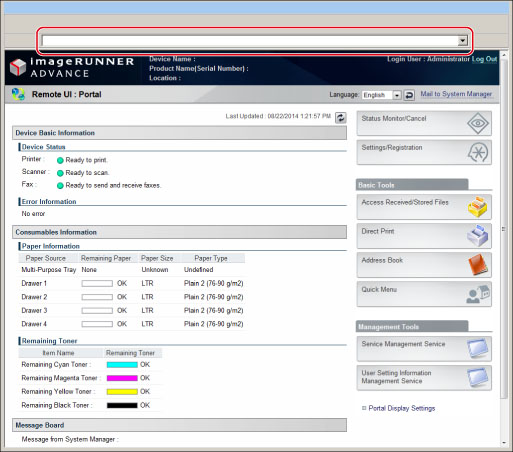
You can perform this procedure using the touch panel display or the Remote UI. Using the Remote UI, you can register a destination with ease.
1.
Start your Web browser → enter the IP address of the machine in [Address].
http://<IP address of the machine>
The portal page of the Remote UI is displayed.
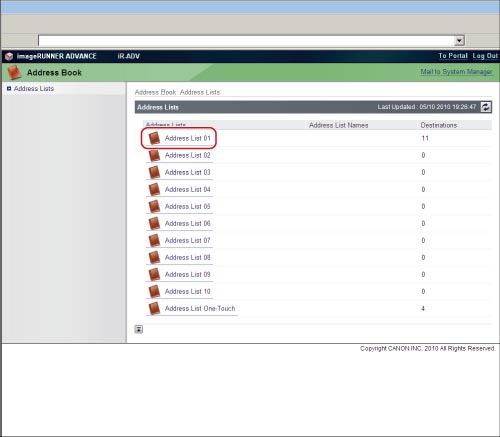
2.
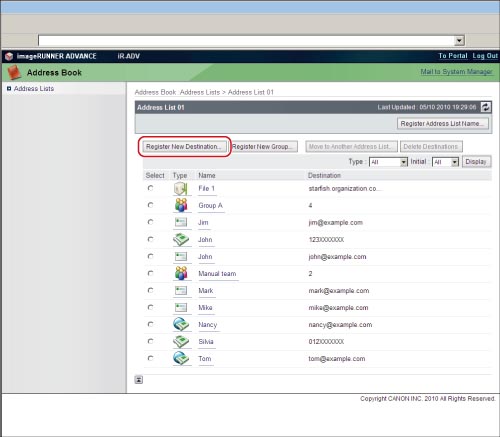
Click [Address Book] → [Address List 01] on the Address List screen.
3.
Click [Register New Destination]. A screen for registering a new destination is displayed.
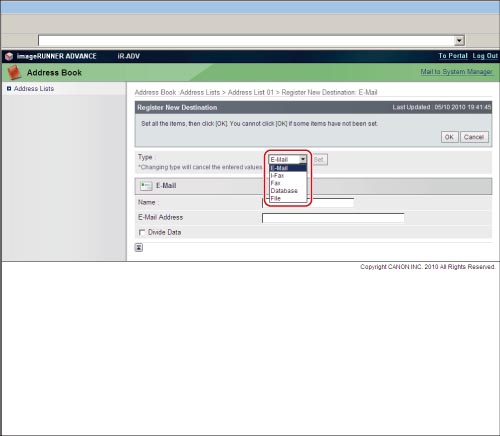
4.
From the Type drop-down list, select [File] → click [Set].
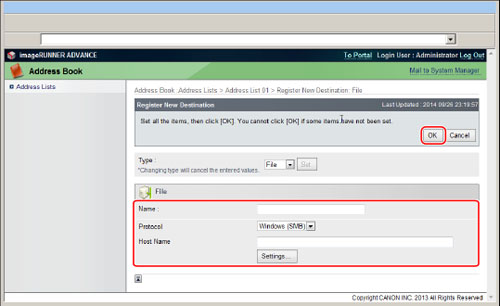
5.
Specify the desired settings on the [Register New Destination: File] screen → click [OK].
|
Name:
|
Enter a name for the destination. You can specify a desired name.
|
|
Protocol:
|
Select [Windows(SMB)].
|
|
Host Name:
|
\\Computer Name\PDF-Scan (For the computer name, if you are using Windows, enter the computer name that you checked in step 1 of "For Windows" in "Creating a Shared Folder." If you are using a Macintosh, enter the computer name that you checked in step 2 of "For Mac OS" in "Creating a Shared Folder.") |
|
The following items can be set by clicking [Settings]:
|
|
Folder Path:
|
If you want to create a folder named "Temporary" in the PDF-Scan folder, enter '\Temporary'. You can send without entering this field.
|
|
User Name:
|
Enter the sender's user name (the name used to log in to the computer).
|
|
Confirm Before Sending:
|
Select to display the confirmation screen before sending.
|
|
Password:
|
Enter the password that corresponds with the user name.
|
|
Confirm:
|
Reenter the same password for confirmation.
|
The destination you entered is registered.
Using the Touch Panel Display
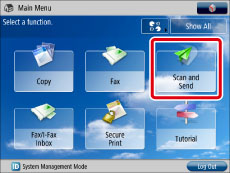
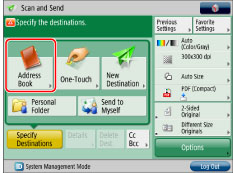
1.
Press [Scan and Send] on the Main Menu screen.
|
NOTE
|
|
If the Main Menu screen is not displayed, press [Main Menu].
|
2.
Select [Address Book].
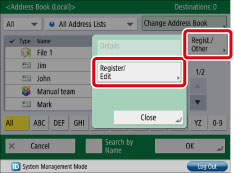
3.
Press [Regist./Other] → [Register/Edit].
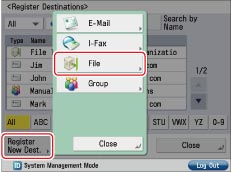
4.
Press [Register New Dest.] → [File].
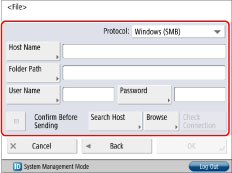
5.
Press [Name] → enter a name for the destination using the keyboard → press [OK] → [Next].
6.
Specify each setting.
|
Protocol:
|
Select [Windows (SMB)].
|
|
[Host Name]:
|
Enter the computer name that you checked in step 1 of "For Windows" in "Creating a Shared Folder," or step 2 of "For Mac OS" in "Creating a Shared Folder.") You can also press [Search Host] to search for the destination computer. |
|
[Folder Path]:
|
Specify the folder of the destination computer to save to. You can also press [Browse] to specify the folder of the destination computer.
|
|
[User Name]:
|
Enter the sender's user name (the name used to log in to the computer).
|
|
[Password]:
|
Enter the password that corresponds with the user name.
|
7.
Press [Check Connection] to check the connection to the file server.
8.
Press [OK].
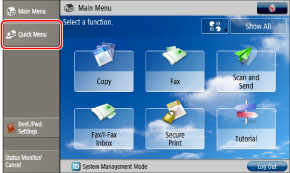
Registering the Procedure for Sending from the Machine in the Quick Menu
1.
Place your originals on the platen glass or in the feeder → press [Scan and Send] on the Main Menu screen.
|
NOTE
|
|
If the Main Menu screen is not displayed, press [Main Menu].
|
2.
Press [Address Book].
3.
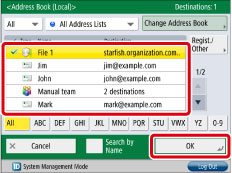
Select a registered destination → press [OK].
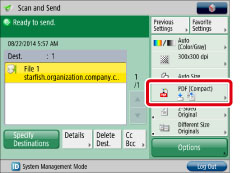
4.
Press [PDF(Compact)].
5.
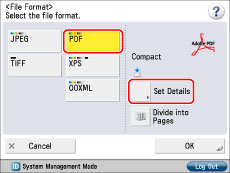
Select [PDF] → press [Set Details].
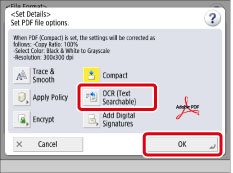
6.
Press [OCR (Text Searchable)] → [OK] → [OK].
7.
Press [Options].
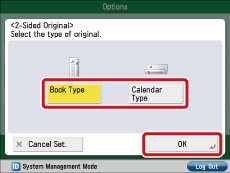
8.
Press [2-Sided Original] → specify the type of 2-sided original → press [OK].
9.
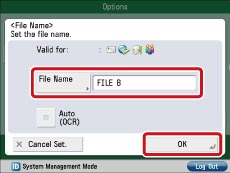
Enter a name for the PDF file to send.
Press [Options] → [File Name].
Press [File Name] → enter a file name using the keyboard → press [OK].
Press [OK].
You can select [Auto (OCR)] only when sending to an e-mail address or server.
When PDF (OCR) is set as the file format, set [Auto (OCR)] to 'On' to automatically extract the first text block in the document for use as its file name.
10.
Press [Close].
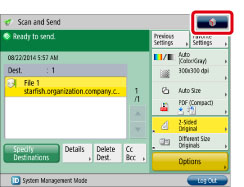
The settings required for sending are complete.
If you press

(Start), sending begins, however, this section proceeds to the procedure for registering the above series of functions in the Quick Menu.
11.
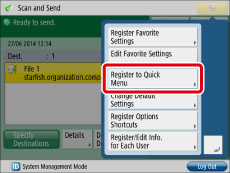
Press

→ [Register to Quick Menu].
12.
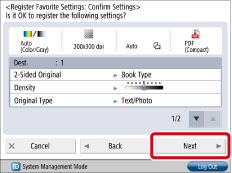
Verify the settings → press [Next].
13.
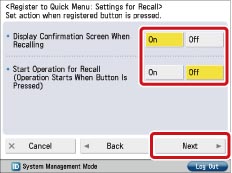
Specify the recall settings for the button to register → press [Next].
|
[Display Confirmation Screen When Recalling]:
|
If you select [On], when the registered button is recalled, a screen confirming the settings is displayed. For more information on the confirmation screen, see " Sending a Document Using the Quick Menu Button." If you select [Off], when the registered button is recalled, a screen confirming the settings is not displayed. |
|
[Start Operation for Recall (Operation starts when button is pressed.)]:
|
If you select [On], the settings registered in the button are executed when you press the registered button. You do not have to press (Start) to start the operation. If you select [Off], to execute the registered settings, you must press the registered button and then press (Start). |
14.
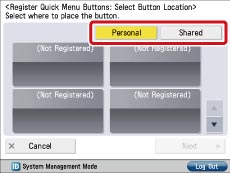
Select [Personal] or [Shared].
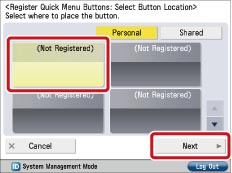
15.
Select the button you want to register → press [Next].
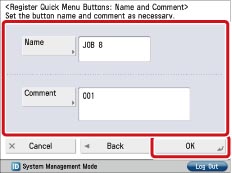
16.
Enter a button name and comment → press [OK].
Press [Name] → enter a name using the keyboard.
Press [Comment] → enter a comment using the keyboard.
|
NOTE
|
|
The maximum number of characters you can enter for the button name is 16 on one line, and you can use up to two lines.
The maximum number of characters you can enter for the comment is 26 on one line, and you can use up to three lines.
|
17.
Press [Close] to complete the registration of the Quick Menu button.
Sending a Document Using the Quick Menu Button
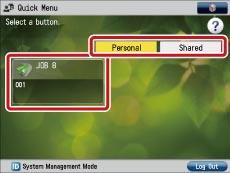
1.
Press [Quick Menu].
The Quick Menu screen is displayed.
2.
Select the [Personal] or [Shared] button → press the registered button.
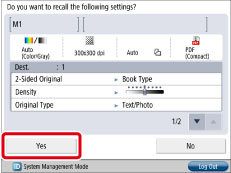
3.
Confirm the settings → press [Yes].
|
NOTE
|
|
If you set [Display Confirmation Screen When Recalling] to 'Off' when registering the recall settings in the Quick Menu, the confirmation screen is not displayed before executing the settings registered in the button.
|
4.
Press
(Start).
The settings registered in the button are executed.
|
NOTE
|
If you set [Start Operation for Recall (Operation starts when button is pressed.)] to 'On' when registering the recall settings in the Quick Menu, the registered settings are executed without the need to press (Start). |
You can convert original color/grayscale images scanned at a resolution of 300 dpi to compact (approx. 1/10 original size) PDF or XPS files. This mode eliminates the issue of the large file size of digitized documents, reducing color documents to the size of black-and-white documents. This also enables you to reduce the load on the network and servers. For details, see
"Compact PDF or XPS."Searchable PDF or OOXML
This mode enables you to perform OCR (optical character recognition) to extract data that can be recognized as text from the scanned image, and add it as a transparent layer of text to create a PDF or OOXML file that is searchable. If the file is a searchable PDF file, you can quickly search for the necessary information on the PDF or OOXML. For details, see
"Searchable PDF/OOXML."Trace & Smooth PDF (Universal Send Trace & Smooth PDF Kit Is Required)
This mode enables you to divide and extract the text, line drawings, and background of a scanned image, and convert the text and line drawings to scalable outline data to be placed on the background when creating a PDF file. For details, see
"Trace & Smooth Settings."Enhanced text quality
Outlining the text edges eliminates "jagginess" even when the text is enlarged, enhancing the overall quality of the text in the PDF.
Practical application of data
The outlined data on the PDF can be extracted and used in Adobe Illustrator.
|
NOTE
|
|
The Trace & Smooth PDF mode can be used with the Searchable PDF, Encrypted PDF, Digital Signatures, and PDF Files with a Security Policy modes.
Trace & Smooth PDF is linked with Compact PDF. Thus, if you select the Trace & Smooth PDF mode, Compact PDF is automatically set and the PDF file size is reduced.
If you select Trace & Smooth for the PDF file format, the resolution must be set to 300 dpi, and [Full Color] or [Grayscale] must be set for the color mode.
|
You can set a password for a PDF file. If a PDF file is encrypted with a password, you cannot open, print, or change the PDF file without entering the correct password. If you want to restrict access, it is recommended that you set a password before sending. For details, see
"Encrypting PDF Files."Changing the Default Settings
By storing the specified send settings as the default settings, you can recall the settings without specifying the settings again. For details, see
"Changing the Default Settings for Scan and Send."If You Cannot Use SMB to Communicate with Windows
If you cannot use SMB to communicate with Windows, follow the procedures below.
Firewall:
For Windows Vista
Right-click [Network] → click [Properties] → [Windows Firewall] → [Turn Windows Firewall on or off] → [Change settings] → select [Off] → [OK].
-For Windows 7
Right-click [Network] → click [Properties] → [Windows Firewall] → [Turn Windows Firewall on or off] → select [Off] for [Home or work (private) network location settings] and [Public network location settings] → click [OK].
For Windows 8/8.1
Place the cursor on the top right (bottom right) of the desktop → select [Settings] → [Control Panel] → [Windows Firewall] → [Turn Windows Firewall on or off] → select [Turn off Windows Firewall (not recommended)] for [Private Network settings] and [Public Network settings] → [Off].
Shared Simple File Settings:
For Windows Vista
Right-click [Network] → click [Properties] → click the arrow on the right of [File Sharing] for [Sharing and Discovery] → select [Turn on file sharing] → [Apply].
For Windows 7
Right-click [Network] → click [Properties] → [Change advanced sharing
settings] → select [Turn on network discovery] → [Turn on file and printer sharing] → [Save Changes].
For Windows 8/8.1
Place the cursor on the top right (bottom right) of the desktop → select [Network] → [Properties] → [Change advanced sharing settings] → select [Turn on network discovery] → [Turn on file and printer sharing] → [Save Changes].
Properties of the Shared Folder:
Right-click the shared folder → select [Properties] → click the [General] tab → deselect [Read-only] → [Apply].
Access Privilege of the Shared Folder ([Sharing] Sheet):
For Windows Vista/7/8/8.1
Right-click the shared folder → select [Properties] → click the [Sharing] tab → click [Advanced Sharing] → select [Permissions] → [Apply].
Security Policy:
Click [Start] → [Control Panel] → [Administrative Tools] → [Local Security Policy] → [Local Policies] → [Security Options] → [Microsoft network server: Digitally sign communications (always)] → [Disabled] → [Apply] → restart Windows.
Login Password:
If you are using Windows, you can login to the computer using a local account without a password set. However, the following issues may arise:
If <Check the login destination, user name, and password> is displayed, you cannot set the login/destination from the machine.
You can set the login/destination from the machine, but you cannot use the Push Scan function.
The above issues related to accounts with no specified password arise because authentication was not performed at the time the folder on the network was accessed.
From a security perspective, and to avoid the above issues, login using an account with a password.
Logging in an Active Directory Environment:
When a computer that one or more users log on to is restricted by the administrator in an Active Directory environment, follow the procedure below to register the name of the computer.
Open the user account properties dialog box. Click [Logon To] to open the [Logon Workstations] dialog box → set the computer name in the user account properties dialog box to "CANON + the last 8 digits of the MAC address of the computer + 00". For example, if the MAC address of the computer you are using is "00:00:11:22:33:44", set "CANON1122334400".