e-ManualTopSite mapHelpGlossary

Category Top

What This Machine Can Do

Overview of This Function

Things You Must Do Before Using This Machine

Flow of Sending Operations

Canceling a Job

Specifying Destinations

Specifying Destinations Using the Address Book (Local)

Specifying Destinations Using the Address Book (Remote)

Specifying Destinations Using the Address Book (LDAP Server)

Specifying Destinations Using the One-Touch Buttons

Specifying a Destination by Entering an E-mail Address

Specifying Destinations by Entering an I-Fax Address

Specifying a Destination by Entering a File Server

Specifying a File Server Using the Keyboard

Specifying a File Server Using the Browse Key (Windows (SMB))

Specifying a File Server Using the Search Host Key (Windows (SMB))

Storing in an Advanced Box

Setting Your Personal Folder as the Destination

Setting Your Own E-Mail Address as the Destination

Setting Cc and Bcc Addresses

Checking/Editing/Deleting the Information for a Destination

Favorite Settings

Recalling Previous Send Jobs

Storing New Addresses

Registering an E-Mail Address

Registering an I-Fax Address

Registering a File Server Address

Registering a Group Address

Registering an Address Obtained via an LDAP Server

Registering an Advanced Box Address

Storing/Editing/Deleting One-Touch Buttons

Checking/Editing/Deleting a Stored Address

Registering/Editing/Deleting Favorite Settings

Registering/Editing Favorite Settings

Checking Favorite Settings

Editing a Name/Comment

Deleting Favorite Settings

Assigning Shortcuts

Switching the Color Mode

Setting the Resolution

Specifying/Registering Scan Sizes

Setting the File Format

Trace and Smooth

Compact PDF or XPS

Searchable PDF/XPS/OOXML

Adding a Digital Signature to a PDF or XPS

Encrypting PDF Files

Applying a Policy

Preview

2-Sided Original

Adjusting Density Manually

Adjusting Background Density

Selecting the Original Type

Adjusting the Image Sharpness

Erase Frame

Delayed Send

Specifying the Orientation of the Original Image

File Name

Subject/Message

Reply-to

Setting E-Mail Priority

Receiving I-Fax Documents

Processing Received Documents

Receiving Documents

Setting the Memory Lock Mode

Forwarding Received Documents

Available Paper Sizes

When Problems Occur

Questions & Answers

Top » Scan and Send » Canceling a Job
Canceling a Job
0C1Y-0SF
Canceling a Job While Scanning
1.
Press [Cancel] on the screen that appears while the machine is scanning.
2.
Press [Yes].
NOTE
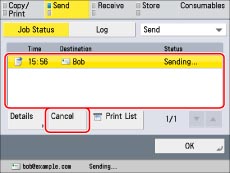
You can also cancel a send job by pressing (Stop), while the job is being scanned.
Canceling a Job Being Sent or Waiting to Be Sent
1.
Press [Status Monitor/Cancel].
2.
Press [Send] → [Job Status].
3.
Select [Send] from the drop-down list.
4.
Select the job that you want to cancel → press [Cancel].
NOTE
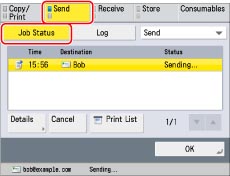
You cannot select multiple jobs and cancel them all at once. Select and cancel one job at a time.
5.
Press [Yes].
NOTE
The canceled job appears as <NG> (No Good) on the Log screen.

NOTE
You can only use (Stop) to cancel a send job that is currently being scanned.