e-ManualTopSite mapHelpGlossary

Category Top

Sending/Receiving a Fax

Main Features for Sending Faxes

Overview of This Function

Additional Lines

Things You Must Do Before Using This Machine

Flow of Sending Fax Operations

Sending Fax Documents Manually

Canceling a Job

Specifying Destinations

Specifying Destinations Using the Address Book (Local)

Specifying Destinations Using the Address Book (Remote)

Specifying Destinations Using the Address Book (LDAP Server)

Entering a New Fax Number

Specifying Destinations Using One-Touch Buttons

Recalling Previous Settings and Sending a Fax

Checking/Editing/Deleting the Information for a Destination

Storing New Addresses

Storing Fax Numbers

Storing Group Addresses

Storing Addresses Obtained via an LDAP Server

Storing/Editing/Deleting One-Touch Buttons

Checking/Editing/Deleting a Stored Address

Assigning Shortcuts

Setting the Resolution

Specifying/Registering Scan Sizes

Switching to Direct Sending

Setting Original Type

2-Sided Original

Book → 2 Pages

Different Size Originals

Adjusting Density Manually

Adjusting Background Density

Adjusting the Image Sharpness

Changing the Zoom Ratio

Erase Frame

Job Build

Selecting the Sender's Name When Sending a Fax

Selecting the Telephone Line When Sending a Fax

Delayed Send

Preview

Finished Stamp

Job Done Notice

Processing Received Documents

Receiving Documents

Setting the Memory Lock Mode

Forwarding Received Documents

Available Paper Sizes

Sending with a Subaddress

Using a PIN Code

Fax Information Services

When Problems Occur

Trouble Sending Fax Documents

Trouble Receiving Fax Documents

Trouble in Other Situations

Questions & Answers

Sending a Fax from a Computer (Windows)

System Requirements

Before Sending a Fax from a Computer

Installation

Setting the Fax Options

Faxing Fundamentals

Faxing

Specifying the Default Fax Settings

Viewing the Online Help

Using Subaddresses for Secure Transmission

Setting the Fax Send Time

Attaching a Cover Sheet

Registering a Profile for Faxing

Selecting a Profile for Faxing

Registering a Person in an Address Book

Registering a Group in an Address Book

Importing Address Book Entries

Exporting Address Book Entries

Changing the Address Book Export Destination

Sending a Fax from a Computer (Mac)

System Requirements

Before Sending a Fax from a Computer

Installation

Setting the Fax Options

Verifying the Fax Information
Manually Setting the Fax Options

Faxing Fundamentals

Faxing

Viewing the Online Help

Outputting Multiple Pages on One Sheet

Setting the Output Range

Using Subaddresses for Secure Transmission

Setting the Fax Send Time

Attaching a Cover Sheet

Registering a Person in an Address Book

Registering a Group in an Address Book

Importing an Address Book

Exporting an Address Book

Top » Fax » Sending/Receiving a Fax » Changing the Zoom Ratio
Changing the Zoom Ratio
08KY-0U5
You can set the machine to adjust the zoom ratio automatically, or you can specify the zoom ratio manually.
IMPORTANT
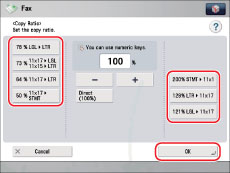
If you want to use Preset Zoom to perform the following enlargements, place your originals horizontally. Placing an original horizontally means setting the original with the longer side sideways. (See "Orientation.")
LTR → 11" x 17"
STMT → 11" x 17"

Preset Zoom
You can use preset zoom ratios to enlarge or reduce standard size originals to other standard sizes.
1.
Press [Fax].
2.
Specify the destination → press [Options] → [Copy Ratio].
3.
Select the zoom ratio → press [OK] → [Close].
Zoom by Percentage
You can enlarge or reduce originals by any zoom ratio in 1% increments. Any ratio from 50% to 200% can be set. The same zoom ratio is used for the horizontal and vertical axes.
1.
Press [Fax].
2.
Specify the destination → press [Options] → [Copy Ratio].
3.
Use [-] and [+] to specify the zoom ratio → press [OK] → [Close].

IMPORTANT
The maximum size of an image that you can send at 400 x 400 dpi resolution is 11" x 17".
If you select [Long Original] as the scan size, you can only send documents at a zoom ratio of 100%.
NOTE
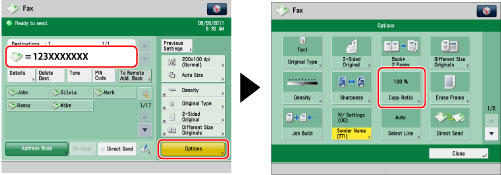
To return the ratio to 100%, press [Direct (100%)].