e-Manual TopContentsHelpGlossary
Category
Top » Basic Operation » Loading Paper » In the Paper Drawer

Category Top

Available Features

Parts and Their Functions

Front Side

Back Side

Interior

Handset

Operation Panel

LCD (Standby Mode)

Navigating the Menu

Entering Text

Registering Destinations in the Address Book

Registering and Editing One-Touch Keys

Registering and Editing Coded Dial Codes

Registering and Editing Destinations for Group Dialing

Toner Cartridges

Supplied Toner Cartridge

About Replacement Toner Cartridges

Handling Toner Cartridges

Storing Toner Cartridges

Using the Toner Saver Mode

Purchasing Consumables

Placing Documents

Placing Documents on the Platen Glass

Attention (Placing Documents on the Platen Glass)

Placing Documents in the Feeder

Attention (Placing Documents in the Feeder)

Loading Paper

In the Paper Drawer

In the Multi-Purpose Tray

Attention (Loading Paper)

Paper Loading Capacity

Paper Loading Orientation

Setting the Paper Size and Type

For the Paper Drawer

Registering the Default Paper Settings for the Multi-purpose Tray

Setting a Custom Paper Size

Adjusting the Volume

Customizing Timer Settings

Setting the Current Date and Time

Setting the Sleep Timer

Attention (Sleep Timer)

Setting the Auto Reset Timer

Specifying the Screen that Is Displayed after Auto Reset Is Performed

Setting the Auto Offline Time

Customizing Display Settings

Setting the Default Screen

Switching the Display Language (Operation Panel or Remote UI)

Adjusting the Display (Brightness, Contrast, and Invert Screen Colors)

Changing Units of Measurement

Changing Message Display Time

Changing Scroll Speed

Changing Cursor Movement

Setting a Paper Source to Be Used for Each Function

Selecting the Print Side

Initializing the Settings

Initializing the Menu

Initializing the Key and Certificate

Initializing the Address Book

Initializing the System Management Settings

Summary of Reports and Lists

Printing the Report Automatically

Send Results

Communication Management

Receive Results

Printing List

Printing the Address Book List

Printing the User Data List

Printing System Manager Data List

Printing a Communication Management Report

Printing Dept. ID Management Report

Printing the PCL/PS Font List

Viewing the Counter

Necessary Operations in Department ID Management

Locating the Serial Number

Collapse all|Expand all
In the Paper Drawer
07K4-02R
Before loading paper in the paper drawer, see "Attention (Loading Paper)."
NOTE
How to load the paper in the optional paper drawer (Drawer 2): Same as in Drawer 1.
1
Pull out the paper drawer.
2
Slide the paper guides to the size mark for the paper to be loaded.
While holding the lock release lever (A), adjust the length of the paper guide.
If you want to change the size of the paper to be loaded, be sure to register the paper size in "Setting the Paper Size and Type."
3
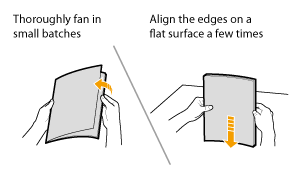
Fan the document stack and even the ends.
4
Load the paper with the printing side down so that it aligns with the rear side of the paper drawer.
Load the paper in portrait orientation.
NOTE
When loading paper with a letterhead or logo
See "Paper Loading Orientation," and load the paper in the proper orientation.
5
Hold down the paper, then set it under the hooks (A) on the paper guides.
IMPORTANT
Adjust the paper guides to the paper width without space.
If the paper guides are loose or tight, this may result in misfeeds or paper jams.
6
Make sure that the paper stack does not exceed the line of the load limit mark (A).
Make sure that the paper stack does not go over the line of the load limit mark. If the paper stack goes over the load limit mark lines, this may result in misfeeds.
7
Specify the loaded paper size and type.