e-ManualTopSite mapHelp

Category Top

Preventing Unauthorized Access

Increasing Security

Restricting Access by Authentication

Administrator Settings

Specifying the System Manager Settings

Department ID Management

Specifying Department ID Management

Checking/Printing/Clearing Page Totals

Accepting Jobs with Unknown Department IDs

Accepting B&W Copy and Print Jobs without Entering a Department ID

Specifying Authentication Method for Rights Management Server

Network Security

IEEE 802.1X Authentication Settings

Key Pair and Server Certificate Settings for Encrypted SSL Communication

Generating a Key Pair and Server Certificate

Registering a Key Pair File and Server Certificate File Installed from a Computer

Setting the Key Pair Used With SSL Encrypted Communications

Editing Key Pairs and Server Certificates

Registering/Editing a CA Certificate File

Verifying Certificate Validity Using Certificate Revocation List

IPSec Settings

Preventing Information Leakage

Digital Signatures

Setting/Confirming a Key Pair and Device Certificate

Checking a Device Signature Certificate

Setting a Rights Management Server

Copy Set Numbering Options

Restricting the Send Function

Setting the Address Book

Mail Box Settings

Specifying Settings for All Mail Boxes

Specifying the Mail Box Security Settings

Setting the Control Panel Display

Specifying Management Settings for the Hard Disk

Completely Erasing Unnecessary Data from the Hard Disk

Initializing All Data/Settings

TPM Settings

Device Management

Device Information Settings

Specifying Device Information Delivery Settings

Registering/Deleting/Printing Delivery Destinations

Setting Automatic Delivery

Setting Manual Delivery

Setting the Receiving Machine

Checking/Printing the Communication Log

Limiting Functions

Remote UI

Clearing the Message Board

Retrieving Audit Logs

Saving a Log of Key Operations

Available Administrator Settings Table (Touch Panel Display)

Top » Security » Key Pair and Server Certificate Settings for Encrypted SSL Communication » Generating a Key Pair and Server Certificate
Generating a Key Pair and Server Certificate
0S9Y-1H9
It is necessary to generate and register a key pair in order to perform the following: To use encrypted SSL communication for e-mail and I-faxes, the Remote UI, and device information delivery; and, to confirm Department IDs and PINs.
A key pair and server certificate are preinstalled in the machine. You can also perform encrypted SSL communication using the preinstalled key pair and server certificate.
The procedure for generating and registering a key pair and self-signed server certificate using the control panel of the machine is as follows:
1.
Press (Settings/Registration).
2.
Press [Management Settings] → [Device Management] → [Certificate Settings].
3.
Press [Generate Key].
4.
Press [Generate Network Communication Key] → specify the following settings → press [Next].
If device signature is disabled, it is not necessary to press [Generate Network Communication Key]. If you press [Generate Key], the screen changes to the screen for generating a network communication key.
Items you can set:
[Key Name]: Enter a name for the key pair.
<Signature Algorithm>: Select the hash function to use for the signature. Keys that are 1024-bit or longer support the hash function of SHA384 and SHA512. To set [SHA384] or [SHA512], select [1024], [2048], or [4096] in <Key Type>.
<Key Algorithm>: Select [RSA] (Rivest Shamir Adleman) or [ECDSA] (Elliptic Curve Digital Signature Algorithm).
<Key Length (bit)>: If you select [RSA] in <Key Algorithm>, select [512], [1024], [2048], or [4096].
<Key Type>: If you select [ECDSA] in <Key Algorithm>, select [P256], [P384], or [P521].
NOTE
The name of the preinstalled key pair is 'Default Key'.
You cannot specify 'Device Signature Key' (used for key pairs for adding digital signatures to PDF or XPS files) or 'AMS' (used for key pairs for access restrictions) as the name for the key pair.
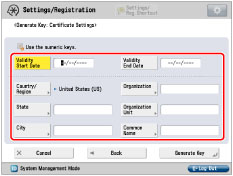
5.
Set the self-signed server certificate.
You cannot set an end date which is earlier than the start date.
Set at least one of the following items. You cannot issue a server certificate if all the items are left blank.
Items you can set:
[Country/ Region]:
Select the country/region name from the 25 countries/regions in the list, or enter an Internet country code.
[State]:
Set the state name.
[City]:
Set the city name.
[Organization]:
Set the organization name.
[Organization Unit]:
Set the organization unit, such as the department name.
[Common Name]:
Set the IP address or FQDN (for example, example.company.com) of the machine.
IMPORTANT
A DNS server is necessary to use the FQDN of the machine in [Common Name]. Use the IP address of the machine if you do not have a DNS server.
The key pair you have registered cannot be used for encrypting communications with SSL until it has been set as the default key. For instructions on setting the default key, see "Setting the Key Pair Used With SSL Encrypted Communications."
6.
Press [Generate Key] → [OK].
NOTE
To confirm the key pair and server certificate you have registered, see "Editing Key Pairs and Server Certificates."
After pressing [Generate Key], you cannot use any of the keys until a key pair has been generated and registered.

IMPORTANT
Up to 10 key pairs can be registered.