Configuring Auto Batch Printing
You can specify a day of the week and time, etc. to periodically print specified forms.
Functions of Auto Batch Printing
You can create forms in Salesforce at a specified day of the week and time. (See "Configuring Auto Batch Printing Jobs in Salesforce".)
You can specify a time to print forms from a device. (See "Auto Batch Printing Settings in Print Services Client".)
You can check the form creation history of Auto Batch Printing. (See "History of Auto Batch Printing".)
Required Auto Batch Printing Settings
Setting Item
Canon Business Imaging Online
Forms Services
Auto Batch Printing Settings
[Access Token Settings]
Checking [Authentication Key]
Checking the Forms to Print
Checking [Form Document ID]
Salesforce
[Tenant ID] Settings
[Authentication Key] Settings
[Manage Auto Batch Printing Jobs] Settings
Device
Print Services Client
Installing and Configuring
PullPrint Service Provider
Installing and Configuring
Access Token Provider
Installing and Configuring
Required Privileges
Canon Business Imaging Online or Salesforce settings
[Administrator] role, [User] role for Forms Services
[User] role for Print Services
Salesforce administrator privileges
Print Services Client settings
[Auto Batch Printing] role for Print Services
Preparation
Configure Single Sign-On settings to associate Canon Business Imaging Online and Salesforce. If the following settings have been configured once, users in a Tenant do not need to configure settings every time a job is created
Canon Business Imaging Online Settings
1.
Log in to Canon Business Imaging Online.
For more information, see "Logging In".
2.
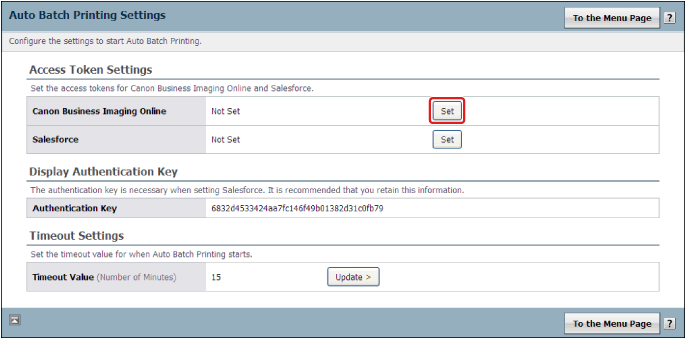
On the [Home] screen, click [Auto Batch Printing Settings] in [Manage Form Documents].
3.
Click [Set].
4.
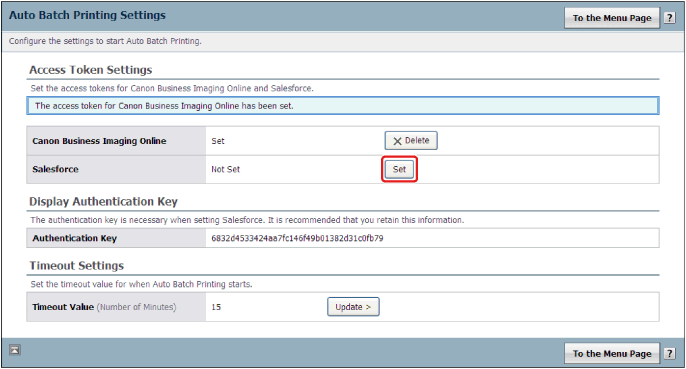
Click [Set].
You may have to log in to Salesforce.
5.
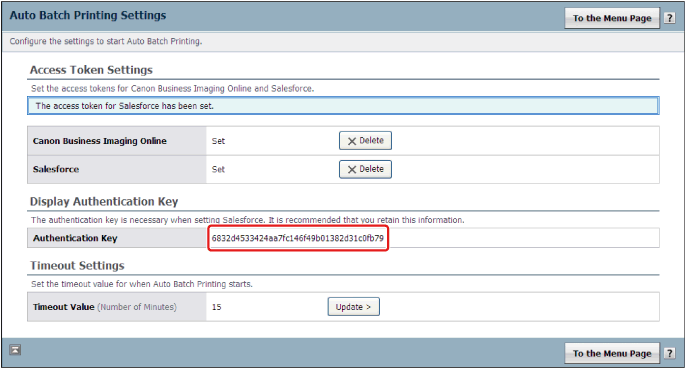
Check [Authentication Key].
Make a note of the key, as it is used in the Salesforce settings.
6.
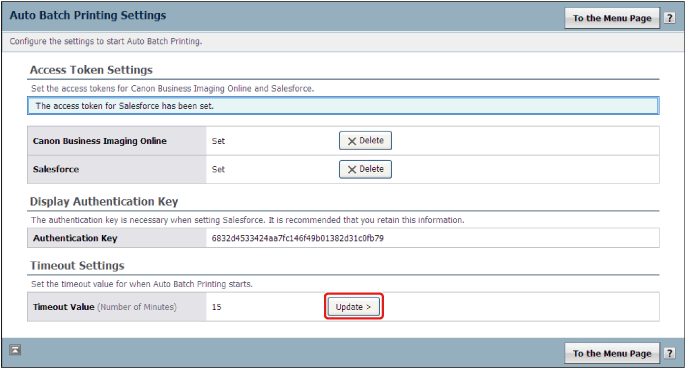
Click [Update].
7.
Enter [Timeout Value (Number of Minutes)] → click [Update].
Set the overlay time for the form data sent from Salesforce.
You can set a time from 1 to 15 minutes.
IMPORTANT
If the form data overlay time (the time to create a form) exceeds the time set here, the form is not created or printed. In this case, an error occurs and is displayed in [Auto Batch Printing Job History]. (See "History of Auto Batch Printing".)
This completes the Canon Business Imaging Online preparation.
Salesforce Settings
Registering a Tenant ID
Register the tenant ID of Canon Business Imaging Online to Salesforce. For more information on the procedure, see the Canon Business Imaging Online Forms Services Application Installation Guide.
Authentication Key Settings
Set the authentication key you made a note of in step 5 of "Canon Business Imaging Online Settings" in Salesforce.
1.
Log in to Salesforce.
2.
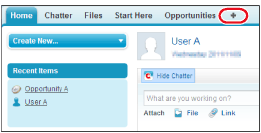
Click [+].
3.
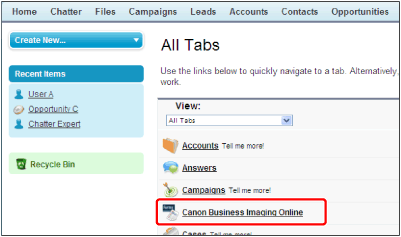
Click [Canon Business Imaging Online].
4.
Click [Authentication Key Settings].
5.
Click [Edit].
6.
Enter [Authentication Key] → click [Save].
Enter the Authentication Key you made a note of in [Auto Batch Printing Settings].
7.
Click [To the Canon Business Imaging Online Settings Page].
When the settings are complete, "****" is displayed for the Authentication Key.
To enter the Authentication Key again, click [Edit].
To delete the Delete, click [Authentication Key].
This completes the Salesforce preparation.
Checking the Forms to Print
Check the [Form Document ID] for the forms to print with Auto Batch Printing.
1.
Log in to Canon Business Imaging Online.
For more information, see "Logging In".
2.
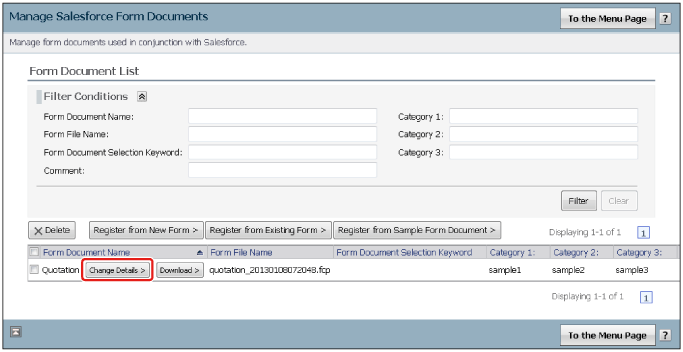
On the [Home] screen, click [Manage Salesforce Form Documents] in [Manage Form Documents].
3.
Click [Change Details] for the forms to print with Auto Batch Printing.
4.
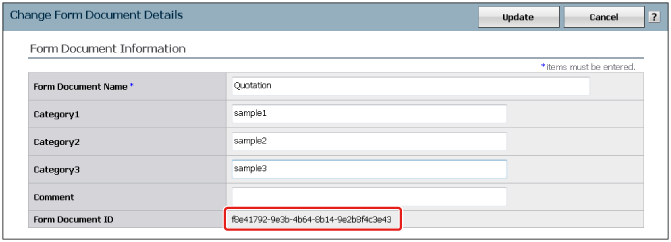
Make a note of the ID in [Form Document ID].
The ID is used in the Salesforce settings.
This completes the procedure for checking the forms to print.
Configuring Auto Batch Printing Jobs in Salesforce
Set items such as the specified form, and the schedule for sending data to the Print Services.
1.
Log in to Salesforce.
2.
Click [+].
3.
Click [Canon Business Imaging Online].
4.
Click [Manage Auto Batch Printing Jobs].
5.
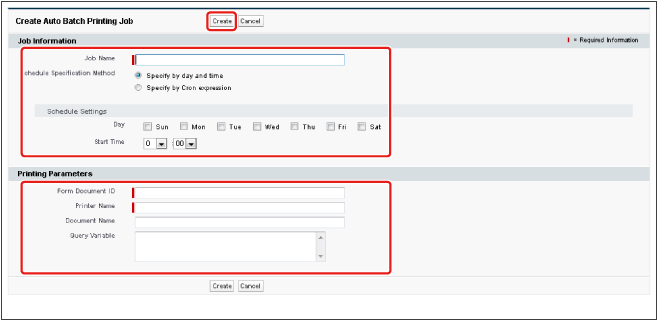
Click [Create New].
6.
Specify the following settings → click [Create].
Set the time for creating forms and sending data to Print Services, etc. If you want to register multiple combinations of forms to print and schedules, register them in [Manage Auto Batch Printing Jobs].
Enter [Job Name].
Enter a custom name. (Required)
Select [Schedule Specification Method].
Set the schedule for creating forms and sending data to Print Services.
[Specify by day and time]
Specify the day of the week and time in [Schedule Settings].
[Specify by Cron expression]
Specifies the schedule by entering commands. Select this to set more detailed schedules than [Specify by day and time]. You can specify months, days, days of the week, and times. For more information, see the help for Salesforce.
Set [Printing Parameters].
[Form Document ID]
Enter the Form Document ID you made a note of in [Checking the Forms to Print].
[Printer Name]
Enter My Printer Name you specified in [Register My Printer].
[Document Name]
Enter the document name for the form. You can enter a custom string of up to 64 characters.
[Query Variable]
Enter the value for the variable set for the form specified in [Form Document ID].
7.
Check [Job List].
The registered jobs are displayed in the list of batch printing jobs. You can delete or edit the jobs from [Action] using [Edit] or [Delete].
Auto Batch Printing Settings in Print Services Client
Set the time for printing forms from the device. For more information, see the Print Services Client User's Guide.
Changing the Auto Batch Printing Settings
It is necessary to specify the following settings to change the forms to print and the device to use, etc.
Setting Item
Canon Business Imaging Online
Forms Services
Checking the Forms to Print
Check [Form Document ID].
Salesforce
Editing the Auto Batch Printing Settings*
Changing [Form Document ID] (the Forms to Print), [Printer Name] (the Device to Print with), [Document Name], and [Query Variable]
Device
Print Services Client Settings
Configuring the Settings for Timeout, Periodic Printing, and Printing at a Specified Time (See the Print Services Client User's Guide.)
* Change the settings in Salesforce on the [Edit Auto Batch Printing Jobs] screen by clicking [Edit] in [Job List].
IMPORTANT
When changing the [Job Name] or the schedule for creating forms and sending data to Print Services, it is necessary to delete the batch jobs and create them again.
History of Auto Batch Printing
You can confirm the history of creating forms and sending data to Print Services.
1.
Click [Auto Batch Printing Job History].
2.
Confirm the history.
The information sent to the Canon Business Imaging Online Forms Services from Salesforce is displayed as history.
In addition, forms in which overlay could not be performed are also displayed in the history.
» How to Use Forms Services/Print Services » Using Services » Configuring Auto Batch Printing