Managing Formats Used with Forms Services
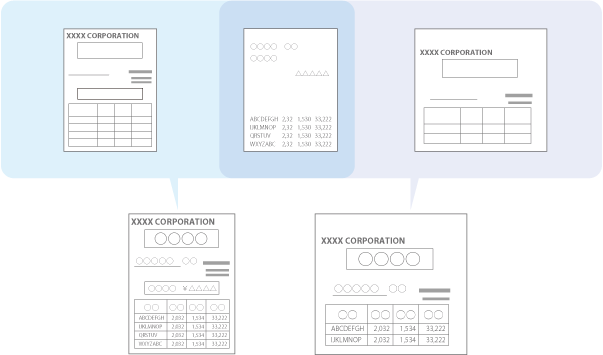
The formats used with Forms Services are comprised of layout data (form) and text data (queries) written to the layouts. Formats are created in advance and selected when creating forms in Salesforce.
Required Privileges
Administrator or general user privileges for the Tenant
[Administrator] Role for Forms Services
Forms and Queries
In Canon Business Imaging Online, layout data is called "forms" and text data is called "queries". For example, if the layout of delivery slips differs for each customer, separate delivery slip forms are created. Delivery items and money amounts are set as queries and registered with each delivery slip form as form documents to create delivery slips with different layouts for each customer.
Managing Forms/Images
Form files used to create form formats, and image files used by linking with form files are managed in a list. They can be registered, updated, or deleted.
NOTE
You can lay out your company name logo, etc. within the form format as an image file.
Adding Forms/Image Files
This section describes how to register a form file created in Form Manager Editor. If an image file is linked to a form file, the image file is also registered.
1.
Log in to Canon Business Imaging Online.
For more information, see "Logging In".
2.
On the [Home] screen, click [Manage Forms/Images] in [Manage Form Documents].
3.
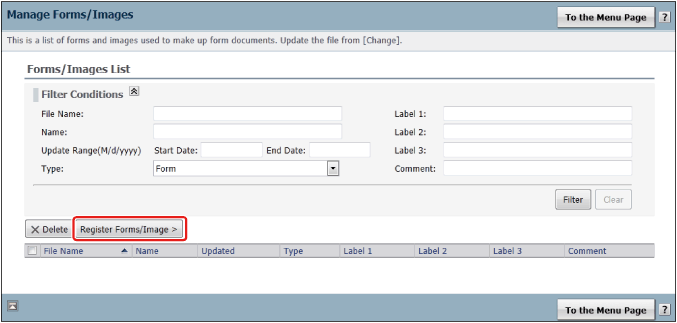
Click [Register Forms/Image].
4.
Set [Form/Image Information].
Specify a file.
Click [Browse] → specify the file.
You can register the following files.
Type
Extension
Description
Form files
.fcp
.fcx
Form files created in Form Manager Editor
Image files
.bmp
.emf
.wmf
.tif/.tiff
.jpg/.jpeg
.gif
.png
Image format files supported by Form Manager form files
The following restrictions apply to file names.
Number of characters
Type of characters
32 characters (including file extension)
Single-byte alphanumeric characters
!#$%&'=~`+_@,^-;(){}[]
You cannot register a file if another file with the same name is already registered.
Enter [Name].
Up to 64 characters of your choice can be entered for a name, such as "Quotation" or "Invoice".
The set name is displayed in the list.
Enter [Label 1].
Enter [Label 2] and [Label 3] in the same way using up to 32 characters.
Adding labels makes it convenient for sorting lists and filtering lists.
Example Labels
Categorized by Contact Person
Label
Example
[Label 1]
Sales Department No. 1
[Label 2]
Manager 1
[Label 3]
Sato
Categorized by customer
Label
Example
[Label 1]
Service industry
[Label 2]
Securities company
[Label 3]
Company A
Enter [Comment].
Up to 256 characters of your choice can be entered.
5.
Click [Register].
The form/image is registered.
Changing Form/Image Information
You can replace files and change information such as names and labels.
1.
Display [Forms/Images List].
The procedure up until here is the same as steps 1 and 2 in "Adding Forms/Image Files".
You can also filter the file displayed in a list using [Filter Conditions] and sort the list by each item.
2.
Click [Change] for the file you want to change.
3.
Set the changes.
To replace a file:
Select [Update file] → click [Browse] → specify the file.
For information on the file formats and file names that can be registered, see "Adding Forms/Image Files".
To change information on a file:
You can change the content of each item. For information on the restrictions such as the number of characters, see "Adding Forms/Image Files".
4.
Click [Update].
Deleting a Form/Image
You can delete selected files.
1.
Display [Forms/Images List].
The procedure up until here is the same as steps 1 and 2 in "Adding Forms/Image Files".
You can also filter the file displayed in a list using [Filter Conditions] and sort the list by each item.
2.
Select the file name to delete → click [Delete].
A confirmation screen is displayed.
IMPORTANT
If you delete a form file that is being used in a form format, all of the form formats using that form file become unable to be used.
3.
Click [Yes].
Downloading a Form/Image
You can download form files.
1.
Display [Forms/Images List].
The procedure up until here is the same as steps 1 and 2 in "Adding Forms/Image Files".
You can also filter the file displayed in a list using [Filter Conditions] and sort the list by each item.
2.
Click [Download] for the file you want to download.
Downloaded form files can be edited in Form Manager Editor.
Managing Form Formats
Combinations of query files and form files can be registered as form formats and managed in a list. They can be registered, updated, or deleted.
Registering Form Formats
There are three methods for registering formats; registering the format of sample forms, registering formats using existing form files, and registering formats using new form files.
1.
Log in to Canon Business Imaging Online.
For more information, see "Logging In".
2.
On the [Home] screen, click [Manage Salesforce Form Documents] in [Manage Form Documents].
3.
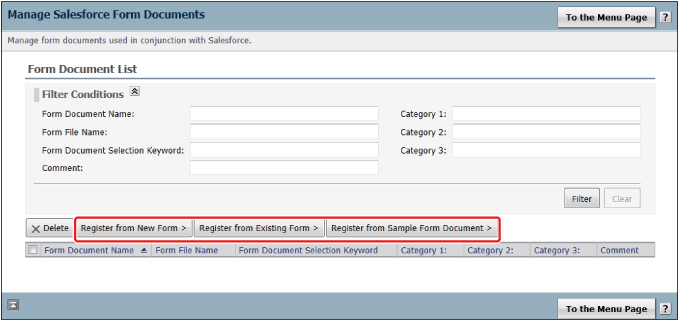
Select the registration method.
To register the format of sample forms:
Click [Register from Sample Form Document] to register formats provided as samples in Canon Business Imaging Online.
To register formats using existing form files:
Click [Register from Existing Form] → select a form file to register form formats using form files that are already registered. A query file must be prepared in advance.
To register formats using new form files:
Click [Register from New Form] to register form formats using form files that are not registered. A query file must be prepared in advance.
NOTE
When registering with [Register from Sample Form Document] or [Register from New Form], the form files included in the formats of the registered forms are also displayed in [Forms/Images List]. (See "Managing Form Formats".)
4.
Set the information to register.
Set [Form Document Information].
[Form Document Name]
You can enter any name using up to 64 characters.
[Category 1] - [Category 3]
Use up to 32 characters. Categorizing makes it convenient for sorting lists and filtering lists.
[Comment]
Up to 256 characters of your choice can be entered.
Example Categories
Categorized by document type
Label
Example
[Category 1]
Transaction documents
[Category 2]
Quotation
[Category 3]
Provisional quotation for Company A
Categorized by customer
Label
Example
[Category 1]
Company A
[Category 2]
For submission to Planning Department
[Category 3]
Land Development Planning Project Plan B
Set [Form Information].
If you selected [Register from Existing Form], the default information is set.
[Form File]
If you selected [Register from Sample Form Document], the form files of the sample form are set. (The file name can be changed.)
If you selected [Register from New Form], click [Browse] → specify a file. For information on the file formats and file names that can be registered, see "Adding Forms/Image Files".
[Name]
Up to 64 characters of your choice can be entered for a name, such as "Quotation" or "Invoice".
The set name is displayed in the list.
[Label 1] - [Label 3]
Use up to 32 characters. Adding a label makes it convenient for sorting lists and filtering lists.
For example entries, see "Adding Forms/Image Files".
[Comment]
Up to 256 characters of your choice can be entered.
Set a query file.
Click [Browse] → specify the file.
You can register FCQ files.
The following restrictions apply to file names.
Number of characters
Type of characters
32 characters (including file extension)
Single-byte alphanumeric characters
!#$%&'=~`+_@,^-;(){}[]
You cannot register a file if another file with the same name is already registered.
NOTE
When registering with a sample form, you cannot specify a query file. The file prepared in advance is registered.
Set [Keyword].
Set the form document selection keyword.
When directly entering the keyword, enter up to 64 single-byte alphanumeric characters.
Click [Select from Object List] to set an object name of Salesforce as a keyword.
NOTE
To set the object name of Salesforce as a keyword, it is necessary to log in to Salesforce to access the object list.
For more information on object names, see the Salesforce Web page.
5.
Click [Register].
The form format is registered.
Changing Detailed Information
You can replace query files and change information such as names and categories.
1.
Display [Forms/Images List].
The procedure up until here is the same as steps 1 and 2 in "Registering Form Formats".
You can also filter the file displayed in a list using [Filter Conditions] and sort the list by each item.
2.
Click [Change Details] for the format you want to change.
3.
Set the changes.
To replace a query file:
Select [Update file] → click [Browse] → specify the file.
For information on the file formats and file names that can be registered, see "Registering Form Formats".
To change information on a file:
You can change the content of each item. For information on the restrictions such as the number of characters, see "Registering Form Formats".
4.
Click [Update].
Deleting Form Formats
You can delete the selected form formats.
1.
Display [Form Document List].
The procedure up until here is the same as steps 1 and 2 in "Registering Form Formats".
You can also filter the file displayed in a list using [Filter Conditions] and sort the list by each item.
2.
Select the form name to delete → click [Delete].
A confirmation screen is displayed.
3.
Click [Yes].
Downloading a Configuration File
You can download the selected form format as a form file and query file.
1.
Display [Form Document List].
The procedure up until here is the same as steps 1 and 2 in "Registering Form Formats".
You can also filter the file displayed in a list using [Filter Conditions] and sort the list by each item.
2.
Click [Download] for the form name you want to download.
3.
Click the file name of the form or query.
Downloaded form files and query files can be edited in Form Manager Editor.
» How to Use Forms Services/Print Services » Tenant Settings » Managing Formats Used with Forms Services