
Specifying Detailed Synchronization Settings (Server Machine)
You can set the scope of sharing data to synchronize and manage the machines to synchronize. You can also delete user data and back up/restore synchronization data. This setting is only for the server machine.
1
Start the Remote UI. Starting the Remote UI
2
Click [Synchronize Custom Settings (Server)] on the portal page. Remote UI Screen
3
Perform the desired operation on the [Synchronize Custom Settings (Server)] screen.
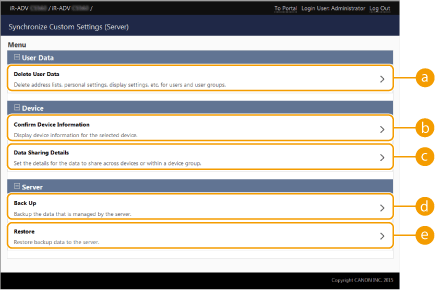
 [Delete User Data]
Deletes user data by searching for a user name or group ID. Search with the search conditions left blank to display all the user data.

If client machines are started and connected, the data in the server machine is prioritized when synchronizing the user data registered in both the server machine and client machines. To use the user data in a connected client machine, delete the corresponding user data from the server machine with this setting before starting the client machine.
 [Confirm Device Information]
Displays [Device Name], [Product Name], and [Location] of synchronized machines. The machines can also be filtered.
 [Data Sharing Details]
Set whether to share the synchronized data with all machines or retain settings in individual machines without sharing. For information on the items that are synchronized when [Device-Specific (Not Shared)] is set for all the items, see List of Items That Can Be Personalized.
If this setting is changed from [Shared across All Devices] to [Device-Specific (Not Shared)] after starting operation, the shared data is synchronized on all machines before switching. (All machines will have the same data at first when the setting is switched.)
If this setting is changed from [Device-Specific (Not Shared)] to [Shared across All Devices] after starting operation, the data in each machine is initialized before synchronization.
The settings in shared buttons (shared buttons on the Quick Menu) are also initialized when this setting is changed from [Device-Specific (Not Shared)] to [Shared across All Devices]. (Imported wallpaper images for the Quick Menu are also deleted.)
 [Back Up]
Enables you to back up the synchronization data stored on the server machine. You can select [Device] or [Network] as the destination to store the backup data.
Backup data saved to [Device] cannot be restored if the hard disk fails.
 [Restore]
Enables you to restore synchronization data that has been backed up.
4
Restart the machine to start synchronization. Turning OFF/Restarting the Machine
|
|
|
Data backed up to [Device] is automatically deleted when the next backup/restore operation is performed. (The data is deleted even if the next backup/restore operation is performed for a network destination.)
|
|
|
Changing Settings after Synchronization Has Been StartedTo change the settings after synchronization has been started, stop synchronization on all the client machines, change the scope of sharing, then start synchronization on all the client machines again. Starting Setting Synchronization
|