Copy > Making a Copy With the Express Copy Basic Features Screen > Collating Pages and Stapling (Staple)
*
Collating Pages and Stapling (Staple)

Return to Overview


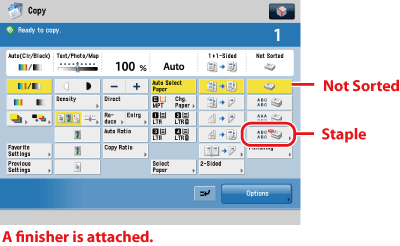
For instructions on this procedure using the Regular Copy Basic Features screen, see "Page Order (Staple)."


Remark
  • The Finishing modes cannot be set if [Custom Size], [Envelopes], [Transparencies], [Tracing Paper], or [Labels] is selected as the paper type.
  • The accuracy of folds created in the Saddle Stitch mode may vary, depending on the paper type and the number of sheets.
  • The Staple mode can be set only if a finisher is attached.
  • When printing on special types of paper, such as heavy paper or transparencies, be sure to correctly set the paper type, especially if you are using heavy paper. If the type of paper is not set correctly, it could adversely affect the quality of the image. Moreover, the fixing unit may become dirty, or the paper could jam, and a service repair may be needed.
  • The Finishing modes cannot be set for paper less than 16 lb bond (60g/m2). Do not select the Finishing modes.

  1. Press [Staple].

Press [Not Sorted] if you do not want to collate the output.

If you want hole punches made, press [Hole Punch].

If you want to fold, press [Fold] → select the fold type → press [OK].

  1. Select the type of staple ([Corner], [Double], or [Saddle Stitch]) and the stapling position.
  • Specify the Saddle Stitch.

If you want the edges of the booklet trimmed, press [TRIM] → press [OK].

  • Press [Paper Select] → select the paper source to use for the main document → press [OK].

If you selected the paper to use for the main document from [Change MP Tray Paper], select the paper size and press [Next] → select the paper type and press [OK] → press [OK]

  • If you want to add a cover, press [Add Cover].

Select the paper source to use for the cover and whether to print on the cover → press [OK].

If you press [Print] to print on covers, you cannot use the Document Insertion Unit-H1, Document Insertion Unit-J1, or Document Insertion/Folding Unit-G1 as the paper source for the covers. If you press [Leave Blank], you can use the Document Insertion Unit-H1, Document Insertion Unit-J1, or Document Insertion/Folding Unit-G1 as the paper source for the covers.

If you selected the paper to use for the cover from [Change MP Tray Paper], select the paper type → press [OK].

  • The paper used for the cover page must be the same size as the other pages in your document.
  • If you select [No] for <Select whether to print on covers.>, [Heavy] can be selected.
  • Only 16 lb bond to 110 lb cover (60 to 209 g/m2) paper can be used for the main document. (for the Booklet Finisher-A1)
  • Only 17 lb bond to 110 lb cover (64 to 209 g/m2) paper can be used for the main document. (for the Booklet Finisher-A1)
  • Up to 110 lb cover (300 g/m2) paper can be used for the cover paper. (for the Booklet Finisher-A1)
  • Up to 140 lb index (256 g/m2) paper can be used for the cover paper. (for the Booklet Finisher-B1)
  • If you select [Double] or [Saddle Stitch], the settings for the offset mode are ignored.
  • [Saddle Stitch] is only displayed when the Booklet Finisher is attached.

  • Back To Top