 CAUTION CAUTION |
|
Do not place your hand in the part of the tray where stapling is performed (near the rollers) if a finisher is attached, as this may result in personal injury.
 Do not place your fingers or hands on the finisher when the finisher is in use. Doing so may result in personal injury or damage to the finisher.
|
|
IMPORTANT
|
|
Since the trays of the finisher move during copying/printing, do not place anything under the trays, as doing so may damage the trays.
|

|
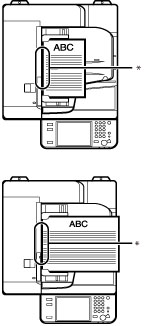
1.
|
Auxiliary Tray
Pull out the auxiliary tray if you are outputting large size paper.
|
|
2.
|
Output Tray
Paper is output to the output tray.
|
|
3.
|
Inner Finisher Additional Tray-A1
The Inner Finisher Additional Tray-A1 can be attached to the Inner Finisher-D1 to provide an additional paper output tray.
|
|
4.
|
Front Cover
Open this cover to remove punch waste, replace the staple cartridge in the stapler unit, or to clear a staple jam.
|
|
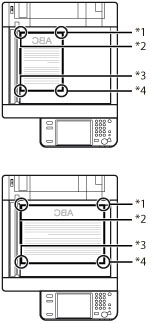
Corner Staple Area
|
Double Staple Area
|
|
 |
 |
|
|
*1 Upper Left
*2 Upper Right
*3 Lower Right
*4 Lower Left
|
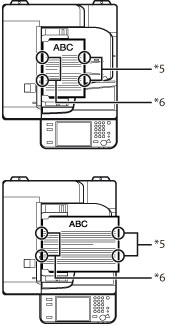
*5 Left Side
*6 Right Side
|
|
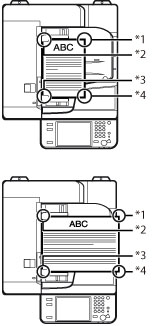
Corner Staple Area
|
Double Staple Area
|
|
 |
|
 |
|
*1 Upper Right
*2 Upper Left *3 Lower Left *4 Lower Right |
*5 Right Side
*6 Left Side |
|
Platen Glass
|
Feeder
|
 |
 |
|
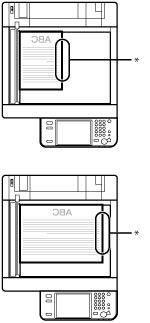
* Hole Punched Area
|
 |
 |
|
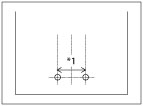
2 Holes
|
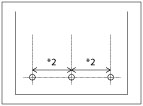
3 Holes
|
|
*1 2 3/4" (70 mm)
*2 4 1/4" (108 mm)
|
 : Available
|
Paper Size
|
Output Tray
|
|
|
11" x 17"
|
|
|
|
LGL
|
|
|
|
LTR
|
|
|
|
LTRR
|
|
|
|
STMTR
|
|
|
|
EXEC
|
-
|
|
|
Envelope
|
Nagagata 3
|
|
|
Yougatanaga
|
|
|
|
Kakugata 2
|
|
|
|
No. 10(COM10)
|
|
|
|
Monarch
|
|
|
|
DL
|
|
|
|
If you are using ISO-C5:
|
|
|
|
Free Size
|
3 7/8" x 5 7/8" to 11 3/4" x 17"
(99 mm x 148 mm to 297 mm x 431 mm) |
-
|
|
Custom Size
|
3 7/8" x 5 7/8" to 11 3/4" x 17"
(99 mm x 148 mm to 297 mm x 431 mm) |
-
|
|
IMPORTANT
|
|
If the Inner Finisher-D1 is attached, the Inner 2Way Tray-H1 cannot be attached.
The following paper sizes can be stapled: 11" x 17", LGL, LTR, LTRR
You cannot staple envelopes, transparencies, tracing paper, or labels.
The following paper sizes can be hole punched: 11" x 17", LGL, LTR, LTRR
You cannot hole punch transparencies, tracing paper, labels, envelopes, or pre-punched paper.
|
|
NOTE
|
|
For instructions on general maintenance for the finisher, such as replacing staples, see "Maintenance." For instructions on resolving problems, such as paper jams and staple jams, see "Problem Solving."
The maximum number of sheets (including cover sheets) that can be stapled together is 30 sheets for 11" x 17", LGL, LTRR paper, and 50 sheets for LTR paper.
If the machine stops while stapling and the message <Load staples into the saddle stitcher unit.> appears, almost all of the staples have been used, and the staple cartridge must be replaced. To proceed, replace the staple cartridge.
If the Collate, Group, or Staple mode is set, the output trays move downward as the stack of paper that is output increases in quantity and thickness, and printing may temporarily stop after the paper is output in the following cases. To resume printing, remove all of the prints from the output tray.
When the position of the tray reaches the lower limit
When 30 sets are printed (with the Staple mode set)
If you press [Offset] when either the Collate or Group mode is set, each set of prints is shifted alternately to the front and back of the tray before it is delivered to the output tray.
|
