All computers that use the machine for printing or sending a fax must be enabled for SMB/CIFS network use.
The setup procedures differ depending on your operating system. See the procedures below to set the computers.
Windows 2000/XP/Server 2003/Server 2008/Vista/7/Server 2008 R2: See "Windows 2000/XP/Server 2003/Server 2008/Vista/7/Server 2008 R2."
Mac OS X 10.3.9 or later/10.4: See the documentation provided with your Macintosh.
|
IMPORTANT
|
|
The following procedures describe a sample SMB/CIFS setup. Depending on your environment, the actual setup procedure may differ.
|
The following is the procedure for specifying an SMB/CIFS network with Windows 2000/XP/Server 2003/Server 2008/Vista/7/Server 2008 R2.
In the following procedures, items displayed on the screens for Windows Vista are used. Depending on your environment, the items you see on the screen may differ.
1.
Display the window for setting the network connection.
Windows 2000: Right-click the [My Network Places] icon on the screen → select [Properties].
Windows XP: From the [Start] menu, right-click [My Network Places] → select [Properties].
Windows Server 2003: From the [Start] menu, select [Control Panel] - [Network Connections].
Windows Vista/Server 2008: From the [Start] menu, right-click [Network] → select [Properties] → click [Manage network connections].
Windows 7/Server 2008 R2: From the [Start] menu, select [Control Panel] → click [Network and Internet] → [Network and Sharing Center].
2.
Right-click the [Local Area Connection] icon → select [Properties].
If you are using Windows 7/Server 2008 R2, click [Local Area Connection] → [Properties].
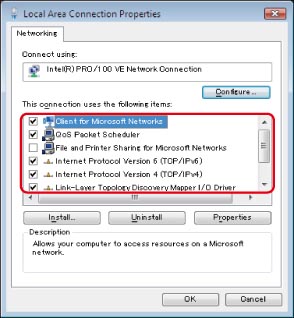
3.
In the [Local Area Connection Properties] dialog box, select [Client for Microsoft Networks] and [Internet Protocol (TCP/IP)]/[Internet Protocol Version 4 (TCP/IPv4)].
4.
Double-click [Internet Protocol (TCP/IP)]/[Internet Protocol Version 4 (TCP/IPv4)].
5.
In the [Internet Protocol (TCP/IP) Properties]/[Internet Protocol Version 4 (TCP/IPv4) Properties] dialog box, click [Advanced] on the [General] sheet → click the [WINS] tab.
6.
On the [WINS] sheet, select [Enable NetBIOS over TCP/IP].
7.
Click [OK] repeatedly to close the dialog box.
8.
Restart the computer if prompted.
|
NOTE
|
|
If you are using Windows Vista, a dialog box may appear while you are performing the procedure. In this case, enter a user name and password. For more information, see the manuals provided with the operating system.
|