1.
Press  (Settings/Registration).
(Settings/Registration).2.
Press [Management Settings] → [User Management] → [Department ID Management].
3.
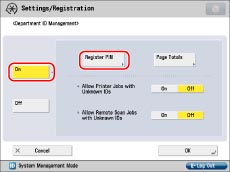
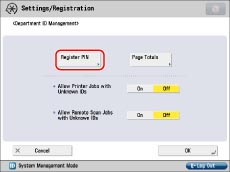
Press [On] → [OK].
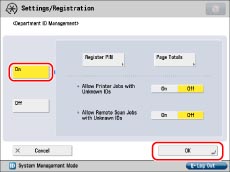
If you do not want to use Department ID Management, press [Off].
1.
Press (Settings/Registration).
(Settings/Registration). 2.
Press [Management Settings] → [User Management] → [Department ID Management].
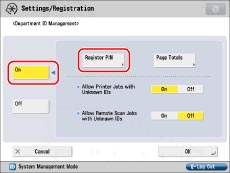
3.
Press [On] → [Register PIN].
4.
Press [Register].
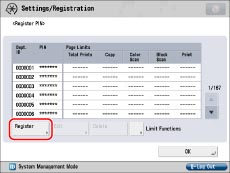
5.
Enter the Department ID and PIN using  -
-  (numeric keys).
- (numeric keys). 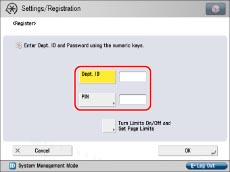
Press [Dept. ID] → enter the Department ID.
Press [PIN].
Press [PIN] → enter the PIN.
Press [Confirm] → enter the same number to confirm the PIN → press [OK].
Even if you enter fewer than seven digits, zeros are added to the start of the number, and a seven digit number is set. However, the zeros at the start of the number can be omitted when logging in. For example, even if you enter <2>, <02>, or <002>, the PIN is set as <0000002>. However, you can log in by entering <2>, <02>, or <002>.
You cannot register a System Manager ID or System PIN comprised of only zeros, such as <0> or <00>.
You cannot register a System Manager ID or System PIN comprised of only zeros, such as <0> or <00>.
|
NOTE
|
|
You can clear incorrect values by pressing
If you do not set a PIN, you can use the machine by entering only the Department ID.
|
6.
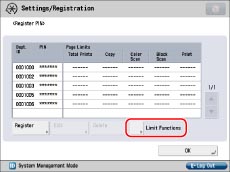
Press [Turn Limits On/Off and Set Page Limits].
7.
Set the page limits.
|
NOTE
|
|
The number of sides refers to the number of printed sides. Therefore, the number of sides of a two-sided print is counted as two. The page limit refers to the maximum number of printed sides.
|
Press [On] under the desired function(s).
|
NOTE
|
|
Total Print Limit is the sum of Copy Limit and Print Limit.
Color Scan Limit and Black Scan Limit are not included in the Total Print Limit.
|
Press  (Page Limit) next to [On]/[Off] of the desired function(s).
(Page Limit) next to [On]/[Off] of the desired function(s).Enter the page limit using - (numeric keys).
- (numeric keys). |
IMPORTANT
|
|
The machine stops sending a fax if the Scan Limit is reached while faxing a document either from memory or directly to the recipient.
The machine stops scanning if the Scan Limit is reached while the machine is scanning originals that are being fed from the feeder. (Those originals that were scanned before the limit is reached are not added to the scan count.)
|
|
NOTE
|
|
You can clear incorrect values by pressing
You can set the page limit from 0 to 999,999 pages. Once a page limit is reached, copying, scanning, or printing is not possible.
|
Press [OK] → [OK].

8.
Press [OK] → [OK].
If the Copy Card Reader-F1 is attached and a page limit is set, the Count Left (the page limit minus the Page Count) appears on the Basic Features screen for each function.
You can limit specific functions other than the Print function using Department ID Management.
1.
Press (Settings/Registration).
(Settings/Registration).2.
Press [Management Settings] → [User Management] → [Department ID Management].
3.
Display the PIN registration screen.
Press [On] → [Register PIN].
Press [Limit Functions].
Press [Register PIN].

Press [Limit Functions].
4.
Press [On] for the functions (other than the Copy function) you want to limit using Department ID Management → press [OK].
If you want to limit the Print function only, press [Off] for all the functions.
<Send/Fax> is displayed only if the fax board is installed. If the fax board is not installed, <Send> is displayed.
5.
Press [OK] → [OK].
|
IMPORTANT
|
|
If you are managing the machine using control cards and there is a function with its limit set to 'Off' in [Limit Functions], the Main Menu screen appears when the machine starts. In this case, perform the procedure from step 1 without inserting a control card.
|
|
NOTE
|
|
The Count Left only appears for functions with their limit set to 'On'.
On the Copy Basic Features screen and the Print Settings screen, the two items with the lowest Count Left appear. However, if the Total Print Limit is the lowest, only the Total Print Limit appears.
|
You can change the PIN and page limit settings that you have registered.
1.
Press (Settings/Registration).
(Settings/Registration). 2.
Press [Management Settings] → [User Management] → [Department ID Management].
3.
Display the PIN registration screen.
Press [On] → [Register PIN].

Press [Register PIN].
4.
Press  or
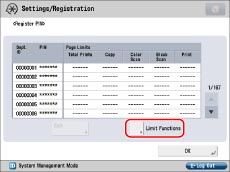
or  to display the department whose PIN you want to change → select the department → press [Edit].
or to display the department whose PIN you want to change → select the department → press [Edit]. 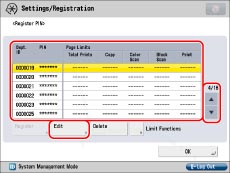
By holding down or , you can scroll quickly and continuously backward or forward through the available Department ID pages. When the desired page is displayed, release the keys. Continuous scrolling is useful when a large number of Department IDs are registered.
or , you can scroll quickly and continuously backward or forward through the available Department ID pages. When the desired page is displayed, release the keys. Continuous scrolling is useful when a large number of Department IDs are registered.5.
Enter the desired PIN using - (numeric keys).
- (numeric keys). Press [PIN].
Press [PIN] → enter the new PIN.
Press [Confirm] → enter the same number to confirm the PIN → press [OK].
Even if you enter fewer than seven digits, zeros are added to the start of the number, and a seven digit number is set. However, the zeros at the start of the number can be omitted when logging in. For example, even if you enter <2>, <02>, or <002>, the PIN is set as <0000002>. However, you can log in by entering <2>, <02>, or <002>.
You cannot register a System Manager ID or System PIN comprised of only zeros, such as <0> or <00>.
You cannot register a System Manager ID or System PIN comprised of only zeros, such as <0> or <00>.
|
NOTE
|
|
You can clear incorrect values by pressing
You cannot change the Department ID.
|
6.
Press [Turn Limits On/Off and Set Page Limits] → change the page limit.
|
NOTE
|
|
You can clear incorrect values by pressing
You can set the page limit from 0 to 999,999 pages. Once a page limit is reached, copying, scanning, or printing is not possible.
The number of sides refers to the number of printed sides. Therefore, the number of sides of a two-sided print is counted as two. The page limit refers to the maximum number of printed sides.
|
7.
Press [OK] → [OK].
8.
Press [OK] → [OK].
You can delete a Department ID that you have registered.
1.
Press (Settings/Registration).
(Settings/Registration). 2.
Press [Management Settings] → [User Management] → [Department ID Management].
3.
Press [On] → [Register PIN].
4.
Press or to display the department you want to delete → select the department → press [Delete].
or to display the department you want to delete → select the department → press [Delete]. 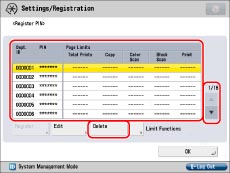
|
NOTE
|
|
By holding down
or , you can scroll quickly and continuously backward or forward through the available Department ID pages. When the desired page is displayed, release the keys. Continuous scrolling is useful when a large number of Department IDs are registered. |
5.
Press [Yes].
6.
Press [OK] → [OK].
|
IMPORTANT
|
|
If Department ID Management is activated through the Copy Card Reader-F1, you cannot register/delete Department IDs.
|