Replacing the Stamp Cartridge
0UUY-0HA 0X7F-0KA 0X6E-0KA 0X7C-0KA 0WXY-0KC 0WR6-0KJ 0WR5-0KJ 0UW1-0HA 0X7H-0KA 0X6W-0KA 0X7A-0KA 0X7E-0KA 0WR7-0KJ 0WR8-0KJ
The stamp cartridge, which the machine uses when adding a stamp to documents to indicate that they have been scanned by the feeder, is a consumable item. When the stamp becomes blurry, replace the stamp cartridge installed in the feeder.
|
NOTE
|
|
For information on the product number for the stamp cartridge, see Consumables.
|
1
Turn OFF the machine, and unplug the power cord from the AC power outlet. Turning OFF the Machine
IMPORTANT:
Check the machine's operation status before turning it OFF. You can turn OFF the machine while a process is active, but a problem may occur, which may cause you to lose or damage data.
2
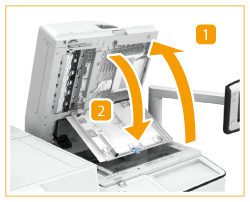
Open the feeder, and then open the scanning area cover.
 |
 |
Open the feeder.
|
 |
Pull the lever above the feeder, and open the scanning area cover.
Gently open the scanning area cover so as not to damage the platen glass.
|
3
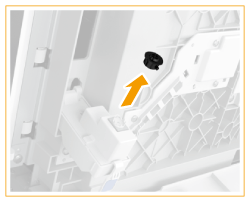
Open the stamp cover.

4
Insert the stamp cartridge.
 |
|
Use tweezers to remove the old stamp cartridge.
|
|
|
Use tweezers to insert a new stamp cartridge.
|
IMPORTANT:
Push in the new stamp cartridge until it clicks. If the stamp surface of a stamp cartridge is protruding, it may cause a paper jam.
5
Close the stamp cover.
6
Close the scanning area cover, and then close the feeder.
7
Reconnect the power cord and turn ON the machine. Turning ON the Machine