
Loading Transparencies
You can load transparencies in the paper drawers.
|
|
|
You can also load transparencies in the multi-purpose tray. Loading Paper in the Multi-Purpose Tray
You can load only A4 or LTR size transparencies.
|
1
Hold the handle of the paper drawer and pull it out until it stops.


2
Adjust the position of the paper guides.
  |
 |
While pressing the top part of the left guide, slide it to align with the size indicator for the paper to be loaded.
|
 |
While pressing the top part of the front guide, slide it to align with the size indicator for the paper to be loaded.
|

Slide the guides until they click into place. If the left guide and front guide are not aligned correctly, the paper size will not correctly appear on the touch panel display. It is also necessary to adjust the guides correctly to avoid causing a paper jam, dirty prints, or making the inside of the machine dirty.
Size abbreviations on the paper guides
The abbreviations on the paper guides in the paper drawer indicate paper sizes as follows:
LGL: Legal
LTR: Letter
EXEC: Executive
STMT: Statement
3
Prepare the transparencies.
Fan the transparency stack well, and align the edges on a flat surface.
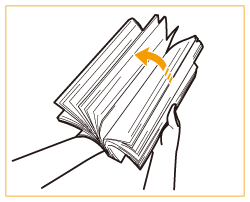
Fan all four sides of the paper stack well.
Separate each sheet of paper, and make sure that there is enough air between them.
4
Load the transparencies.
  |
|
Make sure that the paper size setting of the paper drawer matches the size of the transparencies to load in the paper drawer.
|
|
|
Load the transparency stack with the print side face up, and against the side wall of the paper drawer.
|
It is recommended that you load transparencies one sheet at a time.
If you leave transparencies loaded in the paper drawer or multi-purpose tray, the sheets may stick together and cause a multiple sheet feed or a paper jam. When printing is complete, return the remaining transparencies to their original package for storage, avoiding locations subject to high temperatures and humidity.