Practical Workflows > Mail Box and Advanced Box > Practically Applying Print Data
*
Practically Applying Print Data

Return to Overview


You can store print data in the Mail Box of your machine, enabling the practical reuse of your data.

  • Benefits of Using the Mail Box
  • You can print documents stored in the Mail Box without using your computer.
  • This can save you the effort of using your computer to print routine documents such as fax transmittal cover sheets.
  • You can insert a document before/after a specified page in a standard document. By previewing an image of the specified page, you can avoid errors when inserting a document.
  • You can merge files created using different platforms, such as Windows and Macintosh, providing you with greater possibilities when creating documents.
  • You can use the Mail Box in combination with the Fax and Send functions as an alternative to sending via paperless fax.

Required Condition
  • Network settings are set.
  • The printer driver is installed.

This section describes how to print five 2-sided sets of documents created using different application software.

The screen may differ, depending on the version of your operating system.

Follow the procedures below.

Storing the Print Data

Re-printing the Print Data


Storing the Print Data

Any application file that can be printed from your computer can be stored in the Mail Box.


  1. Select [Print] from the [File] menu of the application you are printing the document from → display the [Print] dialog box → click [Properties].


  1. On the [Page Setup] sheet, select [Store] from the [Output Method] drop-down list.


  1. Click [Details].

The [Store to] dialog box is displayed.


  1. Select the Mail Box number you want to store in → click [OK].

If you manually enter a name, the Mail Box will easier to recognize on the machine.


  1. In the [Print] dialog box, click [OK].

The document is stored in the specified Mail Box.

  • If you click [Get Device Status] on the [Device Settings] sheet, Mail Box names that were registered using the machine are reflected on the printer driver.
  • You can also set to print a document at the same time it is stored in the Mail Box.

Re-printing the Print Data

When re-printing, you can specify the print settings from the Remote UI or the control panel of your imageRUNNER ADVANCE.


Using the Touch Panel Display


  1. Press [Access Stored Files] on the Main Menu screen.

  • If the Main Menu screen is not displayed, press (Main Menu).

  1. Press [Mail Box].


  1. Select the Mail box that you stored your document in.


  1. Select the document that you want to re-print → press [Print].


  1. Enter '5' for the number of print sets using - (numeric keys) → press [Start Printing].

If you want to change the print settings, such as 2-sided printing and stapling, press [Change Print Settings].


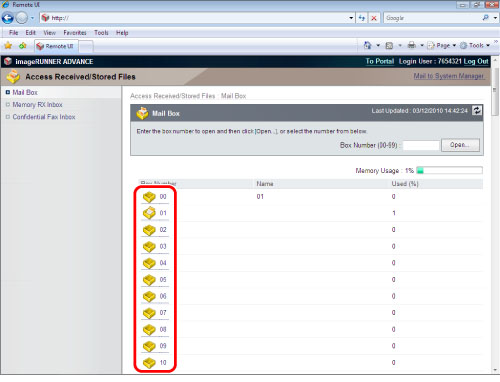
Using the Remote UI

You can print documents stored in a Mail Box using the Remote UI.


  1. Access the Remote UI → click [Access Received/Stored Files] → [Mail Box] → click the number of the desired Mail Box.


  1. Select the documents that you want to print → click [Print].


  1. Click [Start Printing] on the screen for printing documents.


Sending the Print Data

By faxing print data from the Remote UI, you can achieve the same results as a paperless fax.

Even users with Mac OS 9, which does not support a fax driver, you can send a paperless fax.


  1. Access the Remote UI → click [Access Received/Stored Files] → [Mail Box].


  1. Select the documents that you want to send → click [Send].

  • You can select multiple files stored in the Mail Box and send them at once.

  1. Click [Address Book] → select the destination → specify the send settings as necessary → click [Start Sending].

  • You can enter a new destination on the Send Settings screen from the control panel of your imageRUNNER ADVANCE. When sending from the Remote UI, you can only select the destinations that are stored in the Address Book.
  • To send data stored in a Mail Box to a computer or other external device, an optional Send function must be available for use.
  • You cannot send CMYK data that was output and stored with a PS server or a compatible PS.

Reference Information
  • Specifications of the imageRUNNER ADVANCE C9075 PRO/C9065 PRO/C7065/C7055 Mail Box
Type Mail Box Scan and Send Documents Sent from a Computer
Print
(incl. Printing after merging)
Yes Yes Yes
Change Print Settings No. of print sets Yes Yes Yes
Select Paper Yes Yes Yes
2-Sided printing Yes Yes Yes
Finishing Yes Yes Yes
Staple Yes Yes Yes
Saddle Stitch Booklet Yes Yes*1 Yes
Gutter Yes Yes Yes
Cover/Job Separator Yes Yes Yes
Page Numbering Yes Yes*1 Yes
Superimpose Image Yes Yes*1 Yes
Secure Watermark Yes Yes Yes
Merge and Store Yes Yes*1 Yes
Move/Duplicate
(Moving to another Mail Box)
Yes Yes Yes
Clear Erase Document Yes Yes Yes
Erase Page Yes Yes Yes
Insert Document Yes Yes Yes
Sending Documents*2 Yes Yes Yes*3
Backing Up Stored Data Yes Yes Yes
Storage Capacity Total 1,500 documents
Each Mail Box 1,500 documents

*1 Not available if the document is scanned with a resolution other than 600 dpi.

*2 Available if the Send function is available for use.

*3 Not available if the data is a CMYK file stored with PS.

  • URL Send

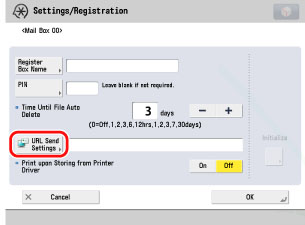
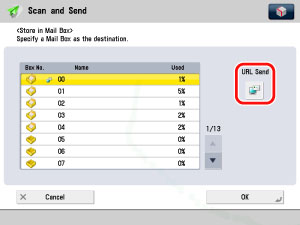
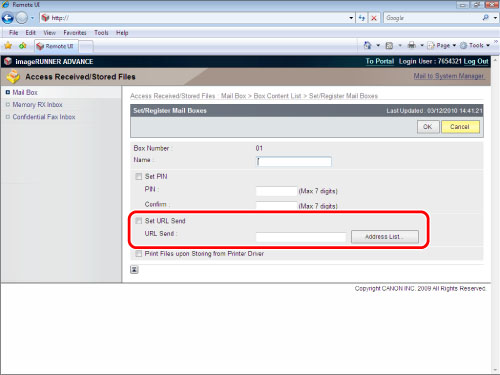
When storing documents in a Mail Box, you can set the machine to automatically send a URL indicating where the document is stored via e-mail.

Click the URL to display the storage location on the Remote UI screen.

You can operate this procedure using the touch panel display or the Remote UI.

  • Network settings are set.
  • E-mail settings are set.

  • Using the Touch Panel Display
(1) Press 
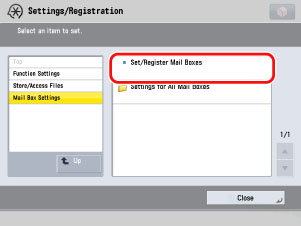
(Settings/Registration) → [Function Settings] → [Store/Access Files] → [Mail Box Settings] → [Set/Register Mail Boxes].

(2) Select the desired Mail Box.

(3) Press [URL Send Settings] → select the destination (e-mail address/group) from the Address Book.

The machine is now set to automatically send an e-mail with a URL link to the location of the stored document.
If you scan documents from the Scan and Send screen, press [URL Send] on the screen for specifying the storage location.


  • Using the Remote UI

You can specify the settings using the Remote UI.

(1) Access the Remote UI → click [Access Received/Stored Files] → [Mail Box] → click the number of the Mail Box for which to set URL Send.

(2) Click [Settings] → select [Set URL Send] → click [Address Book] → select the destination.


  • Back To Top